DirectAccess Network Connectivity Assistant (NCA) Configuration Guidance

DirectAccess Network Connectivity Assistant (NCA) Configuration GuidanceThe DirectAccess Network Connectivity Assistant (NCA), first introduced in Windows 8, provides DirectAccess connectivity status information as well as diagnostic support on the client. The NCA validates that DirectAccess is working end-to-end by attempting to reach internal resources defined by the administrator during the configuration of DirectAccess. NCA configuration and operation is a source of much confusion. This article serves to provide best practice configuration guidance for the NCA to ensure optimum and reliable operation.

NCA Operation

When a DirectAccess client is outside the corporate network, it will attempt to establish a DirectAccess connection any time it has an active Internet connection. After a DirectAccess connection is made, the NCA will attempt to validate DirectAccess connectivity by verifying availability of corporate resources as defined in the DirectAccess configuration (Remote Access Management console, Step 1, Edit, Network Connectivity Assistant).

If the NCA can reach the defined internal corporate resource(s), the DirectAccess connection is verified end-to-end and it will report the connection status as “Connected”. If it fails to connect to any internal corporate resource, it displays “Connecting”.

DirectAccess Network Connectivity Assistant (NCA) Configuration Guidance

Figure 1. NCA successfully validated internal corporate resource connectivity.

DirectAccess Network Connectivity Assistant (NCA) Configuration Guidance

Figure 2. NCA failed to connect to one or more corporate resources.

NCA Configuration

When first installing DirectAccess, the Remote Access Setup wizard will collect information to be used by the NCA, including corporate resources, helpdesk email address, and DirectAccess connection name. It will also provide the option to allow DirectAccess clients to use local name resolution.

Note: The NCA settings configured in the Remote Access Management console pertain only to Windows 8.x and Windows 10 clients. They are not used by Windows 7 clients at all.

DirectAccess Network Connectivity Assistant (NCA) Configuration Guidance

Intuitively it would appear that information needs to be entered in the Resource and Type fields. However, it is recommended to leave this blank when first configuring DirectAccess. This is because the Remote Access Setup Wizard will automatically populate this field later. Specifying a resource during initial configuration will result in two entries being included, as shown here.

DirectAccess Network Connectivity Assistant (NCA) Configuration Guidance

As you can see, the Remote Access Setup wizard automatically added the resource directaccess-WebProbeHost.<internal domain.>. A corresponding DNS record is created that resolves this hostname to the internal IPv4 address of the DirectAccess server. In this configuration, the DirectAccess server itself serves as the corporate resource used by the NCA.

Multiple Corporate Resources

Having more than one resource to validate connectivity to the internal network is problematic though. If there are multiple entries specified, they must ALL pass a validation check from the client to report the connection status as “Connected”. Some administrators configure multiple entries with the mistaken belief that it will provide redundancy for the NCA, but it actually has the opposite effect. Having more than one entry only increases the chance of a false positive.

NCA Configuration Best Practices

It is recommended that only a single corporate resource URL be defined for the NCA. The default directaccess-WebProbeHost running on the DirectAccess server can be used, or, alternatively, another internal web server can be specified if desired. Any web server will work, including Microsoft Internet Information Services (IIS), Apache, NGINX, and most Application Delivery Controllers (ADCs) or load balancers. HTTPS is not required for the web probe host, only HTTP. If using an internal web server, ensure that it is highly available.

Do NOT use the Network Location Server (NLS) as a corporate resource! The NLS is exempted from the Name Resolution Policy Table (NRPT) on the client and is not reachable over DirectAccess. This will result in the NCA failing and reporting a “Connecting” status perpetually. In addition, avoid the use of PING for validating internal corporate resources. Ping uses ICMP which is inherently unreliable and commonly blocked by host and intermediary firewalls, making it an unreliable indicator of corporate network connectivity over DirectAccess.

Summary

The NCA is a crucial and often misunderstood component in the DirectAccess architecture. Follow the guidance outlined here to ensure that the NCA works reliably and effectively in your environment.

Additional Resources

DirectAccess Clients in Connecting State when using External Load Balancer
Planning and Implementing DirectAccess on Windows Server 2016 on Pluralsight
Implementing DirectAccess with Windows Server 2016 book

Configuration Guidance for DirectAccess Security Advisory KB2862152

Introduction

Since Microsoft released security advisory KB2862152, there has been much confusion surrounding where the associated update should be installed, in what deployment scenarios it needs to be installed, and what the best way to configure it is. Recently my colleague and good friend Jason Jones and I worked together to research and answer these questions.

Overview

Microsoft security advisory KB2862152 addresses a vulnerability in IPsec that could allow an attacker to perform a man-in-the-middle attack by spoofing a DirectAccess server to intercept network traffic and potentially capture encrypted domain credentials. The associated update is designed to allow security administrators to configure DirectAccess clients to perform more rigorous validation checks when establishing the DirectAccess IPsec tunnels. It’s important to understand that without additional client-side configuration, this security update does nothing.

Windows 8 Clients

For DirectAccess deployments that use Kerberos authentication (Kerberos Proxy), the update needs to be installed on all Windows 8.x clients. No updates are required for Windows 7 clients as they are not supported using this deployment model. To enforce additional validation checks, configure the registry on the Windows 8.x DirectAccess clients with the IP addresses and Service Principal Name (SPN) of the DirectAccess server as outlined here.

Windows 7 Clients

For DirectAccess deployments that use certificate-based authentication, the update needs to be installed on all Windows 7 clients. No updates are required for Windows 8.x client using this deployment model. To enforce additional validation checks, configure the registry on the Windows 7 DirectAccess clients with the IP addresses and either the fully-qualified domain name (FQDN) of the DirectAccess server (not recommended) or the Object Identifier (OID) of the computer certificated used for IPsec authentication (recommended, with custom OID).

The choice between using FQDN or OID is a challenging one, however. Choosing to validate the DNS name is simple and straightforward, but this information may be known to an attacker, or perhaps discoverable, allowing them to spoof it. In addition, there is a limit of 10 DNS names supported using this method, which can be potentially limiting, especially in large, multi-site deployments. Using the certificate OID is even more problematic, because by default it uses a well-known Server Authentication EKU OID (1.3.6.1.5.5.7.3.1) common to many Microsoft Active Directory Certificate Services (AD CS) certificate templates which, of course, could be spoofed by an attacker even easier.

The most effective implementation of this security update for DirectAccess deployments that use certificate-based authentication is to use the OID option with a certificate configured with a custom OID. Custom OIDs are unique to your organization and will help prevent spoofing by using a unique value that is much harder to guess or determine. The remainder of this article will outline how to configure and deploy a certificate with a custom OID along with implementation details for configuring the appropriate client-side registry settings via group policy to enforce the additional validation checks.

Server Configuration

To implement this, it will require creating and deploying a new certificate template. In the Certificate Services management console, right-click Certificate Templates and choose Manage. Right-click the Computer certificate template and choose Duplicate Template. Select the General tab and give the template a descriptive name.

DirectAccess KB2862152 Implementation Guidance

Select the Extensions tab, highlight Application Policies and click Edit. Click Add and then New, and then provide a descriptive name. Leave the OID as is and click Ok to continue.

DirectAccess KB2862152 Implementation Guidance

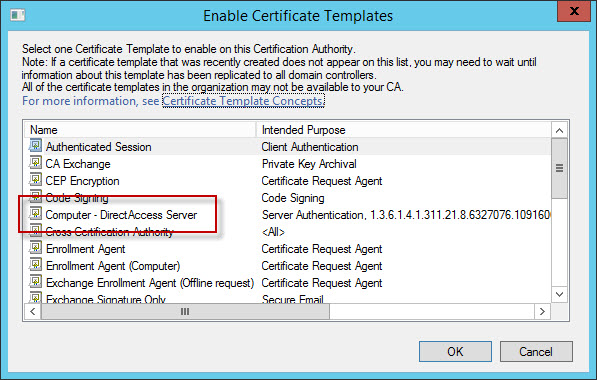
Right-click once again on Certificate Templates and choose New and then Certificate Template to Issue. Select the certificate template you just created and click Ok.

DirectAccess KB2862152 Implementation Guidance

Once complete you can request a new certificate for each of your DirectAccess servers using this new template.

DirectAccess KB2862152 Implementation Guidance

After you have successfully installed the computer certificate using this new template, be sure to delete the old computer certificate on each DirectAccess server. No further changes are required on the DirectAccess server.

Note: If you are assigning a computer certificate to the DirectAccess server via group policy auto enrollment, the certificate will be reinstalled again after it is deleted, once group policy refreshes. To avoid this situation you will need to deny access to this GPO to ensure that only a single computer certificate with the custom OID is installed on the DirectAccess server.

Client Configuration

To instruct the client to validate the tunnel endpoint IPv6 address and the OID of the DirectAccess server certificate before initiating IPsec tunnels we’ll need to configure registry settings on our DirectAccess clients. Jason Jones’ article describes which settings need to be made and when, so I won’t duplicate his efforts here. However, it is recommended that you deploy these settings using group policy, which I will cover.

To create a Group Policy Object (GPO) to deploy these registry settings, open the Group Policy Management Console, expand the target domain, right-click Group Policy Objects and select New. Give the new GPO a descriptive name and click Ok. Right-click the newly created GPO and choose Edit. Expand Computer Configuration, Preferences, and Windows Settings. Right-click Registry and choose New and then Registry Item. Select Update for the action and HKEY_LOCAL_MACHINE for the hive. Enter

SYSTEM\CurrentControlSet\Services\IKEEXT\Parameters\IPsecTunnelConfig\AuthIP\Cert

for the Key Path and enter DTE1 for the value. Select REG_MULTI_SZ for the Value Type and in the Value Data enter the IPv6 address of the first DTE. On the next line enter EKU:<OID> and click Ok.

DirectAccess KB2862152 Implementation Guidance

Repeat this procedure for each tunnel endpoint. Finally, highlight the GPO and change the Security Filtering from Authenticated Users to the security group for your DirectAccess clients and link the GPO to the domain.

DirectAccess KB2862152 Implementation Guidance

Exercise extreme caution when creating and implementing these GPOs to enforce additional validation checks. If there’s a typo somewhere or you forget a DTE, you could potentially orphan your DirectAccess clients. I recommend testing your changes by manually adding the registry entries required and then copying/pasting those settings to the GPO in Active Directory when you’re ready to deploy globally. Also, don’t forget that you’ll need to update GPOs each time you add a cluster node or multisite entry point.