

When preparing a Windows Server 2012 DirectAccess server with two network interfaces, proper configuration of the network interfaces is vital to the operation and security of the remote access solution, especially in edge-facing scenarios. Preparing a server with two network interfaces might seem trivial, but there are some important and often overlooked settings that may lead to trouble. In this post I’d like to outline the proper network interface configuration for a Windows Server 2012 DirectAccess server in an edge-facing deployment scenario. It is important to note that you should configure your network interfaces prior to installing and configuring DirectAccess.
The first step is to rename the network interfaces with intuitive names that identify their role. Typically I use Internal and External. This will make DirectAccess configuration much easier, as you will see when you are configuring DirectAccess using the deployment wizards. To rename the network interfaces, open the Networking and Sharing Center from the Control Panel and choose the option to Change adapter settings. Optionally you can simply highlight the network interface you wish to rename and hit F2. Assign new names to the network interfaces as appropriate.


Next, right-click the Internal network interface and choose Properties. Enter an IPv4 address, subnet mask, and DNS servers as required. Notice that I have not entered a default gateway here. This is absolutely critical and one of the most common mistakes made when configuring a multihomed DirectAccess server. On a server with multilple network interfaces there can be only one default gateway, and the gateway must reside on the External network interface.


In the absence of a default gateway on the Internal network interface, static routes will be required to reach any remote internal subnets. To add a static route, open an elevated PowerShell command prompt and add any necessary routes using the following syntax:
New-NetRoute -InterfaceAlias <Interface_Name> -DestinationPrefix <SubnetID/Mask> -NextHop <Gateway_Address>
For example, my lab network has a remote subnet of 172.16.2.0/24 that is reachable through a router interface of 172.16.1.254.
New-NetRoute -InterfaceAlias Internal -DestinationPrefix 172.16.2.0/24 -NextHop 172.16.1.254
It’s also a good idea to unbind any protocols that are not required. For example, in my implementation I will not be leveraging QoS or NIC teaming, nor will I require the Link-Layer Topology Discovery services so I’ve unchecked those boxes accordingly.


Perform this same exercise for the External network interface. Enter an IPv4 address and subnet mask, and this time be sure to include the default gateway for the External network. Notice that I have not entered any DNS servers here. Resist the urge to enter the DNS servers provided by your ISP. They are not required here.

Since this DirectAccess server will be edge-facing and connected directly to the public Internet, it is a good idea to unbind all protocols from the network interface with the exception of IPv4 and IPv6.

In addition, uncheck the option to Enable LMHOSTS lookup and also chooseDisable NetBIOS over TCP/IP.


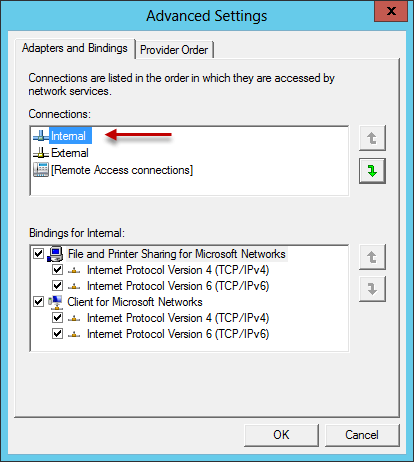
One last change that needs to be made, and perhaps the most critical and often overlooked setting, is the network interface binding order. This change can be made by pressing the Alt key on the keyboard to display the drop-down menu and choosing Advanced Settings.
Important Note: Beginning with Windows Server 2016, making changes to the network interface binding order is no longer required, and this option has been removed from the UI.

Make certain that the Internal network interface is listed first in the list of connections.
So that’s it! You can now proceed with installing and configuring DirectAccess in full confidence that your network interfaces are configured properly!
Additional Resources
Always On VPN and the Future of DirectAccess
5 Things DirectAccess Administrators Should Know about Always On VPN