



Microsoft Entra Application Proxy applications published with custom domains require a public TLS certificate, and keeping those certificates current is a manual, error-prone task when done in the Entra admin center. With the industry moving to 47-day public TLS certificates by 2029, automation is quickly becoming a requirement rather than a convenience. I recently configured CertKit to automatically deploy renewed certificates to my Entra App Proxy applications using an Entra app registration with client secret authentication. This configuration follows security best practices and enforces least privilege, granting CertKit only the access it needs to find App Proxy applications and update their certificates. The following sections describe how to configure it using both PowerShell and the Entra admin center. CertKit also supports managed identity authentication, which I’ll cover in a future post.
CertKit Deployment Options
CertKit can deploy a certificate to Entra App Proxy in one of two ways.
- Individual applications. CertKit updates only the App Proxy applications you specify.
- All applications. CertKit enumerates every App Proxy application in the tenant, determines which ones have an external URL covered by the certificate, and updates each of them.
If you choose to update all applications, be sure to use a wildcard or multi-SAN (subject alternative name) certificate that covers the external URL of every App Proxy application you want CertKit to manage. CertKit updates only applications whose external URL matches a name on the certificate, so a certificate with a single name updates only the application that uses that name. CertKit also skips Global Secure Access (Private Access) applications, such as Enterprise Quick Access. These applications appear alongside App Proxy applications, but they don’t use a TLS certificate, so there’s nothing to update.
Why 6-Day Certificates
In my lab, I’m using Let’s Encrypt’s short-lived 6-day certificates. Testing and evaluating certificate automation is much easier with short-lived certificates, because renewals happen every few days rather than every few months. Any problem with the renewal or deployment process shows up quickly, and I can confirm the automation works reliably across many renewal cycles in a short time. Short-lived certificates leave little margin for error, though, so I don’t recommend them in production until the automation is proven.
Required Permissions for CertKit
Create a dedicated Entra app registration for CertKit. CertKit uses this identity to sign in to Microsoft Graph, and it requires only the following permissions.
- Application.Read.All. A read-only Microsoft Graph application permission CertKit uses to find App Proxy applications in the tenant.
- A custom Entra role. A custom role, named App Proxy Certificate Manager in this example, with only three permissions: read Application Proxy settings, update the Application Proxy SSL certificate, and read connector groups.
This configuration enforces least privilege. Built-in roles such as Application Administrator also work, but they grant far more access than CertKit needs, including the ability to add credentials to any application in the tenant, a well-known privilege escalation path. With the custom role, CertKit can’t add credentials, change API permissions, or grant consent. Custom roles require Microsoft Entra ID P1, which is already required for Application Proxy. CertKit displays a warning that the identity has no Graph permission to update apps, but you can safely ignore it, because the custom role grants that access.
Configuration Using PowerShell
You can perform this configuration in a single run using my New-CertKitAppProxyIdentity.ps1 PowerShell script on GitHub, which creates the app registration, custom Entra role, Application.Read.All permission, role assignment, and client secret for CertKit. If your account has access to more than one tenant, use the -TenantId parameter to specify the tenant to configure. The script displays the connected tenant before making any changes. Alternatively, follow the manual steps below, which show exactly what the script does. Either way, you’ll need the Microsoft.Graph.Authentication module from the Microsoft Graph PowerShell SDK, since every call uses Invoke-MgGraphRequest. Install it using the following command.
Install-Module -Name Microsoft.Graph.Authentication -Scope CurrentUser
Connect to Microsoft Graph
First, connect to Microsoft Graph with an account that can create custom roles, grant application permissions, and assign directory roles, such as Privileged Role Administrator or Global Administrator. If your account has access to more than one tenant, add -TenantId with the tenant ID or domain name to sign in to the correct tenant.
Connect-MgGraph -Scopes 'Application.ReadWrite.All', 'AppRoleAssignment.ReadWrite.All', 'RoleManagement.ReadWrite.Directory' -NoWelcome
Create the App Registration
Next, create a dedicated app registration for CertKit. The command displays the application (client) ID, which CertKit needs later.
$NewApp = Invoke-MgGraphRequest -Method POST -Uri 'https://graph.microsoft.com/v1.0/applications' -Body @{ displayName = 'CertKit App Proxy Deployment'; signInAudience = 'AzureADMyOrg' }$NewApp.appId
Create the Service Principal
App registrations created with Graph don’t get a service principal automatically, so create one. The role and API permission are assigned to the service principal, not the app registration.
$NewSp = Invoke-MgGraphRequest -Method POST -Uri 'https://graph.microsoft.com/v1.0/servicePrincipals' -Body @{ appId = $NewApp.appId }
Create the Custom Role
Now create a custom role that can only read Application Proxy settings and update the Application Proxy SSL certificate.
$RoleBody = @{ displayName = 'App Proxy Certificate Manager' description = 'Can read Application Proxy settings and update the Application Proxy SSL certificate. Used by CertKit.' isEnabled = $true rolePermissions = @(@{ allowedResourceActions = @( 'microsoft.directory/applications/applicationProxy/read' 'microsoft.directory/applications/applicationProxySslCertificate/update' 'microsoft.directory/connectorGroups/allProperties/read' ) })}$Role = Invoke-MgGraphRequest -Method POST -Uri 'https://graph.microsoft.com/v1.0/roleManagement/directory/roleDefinitions' -Body $RoleBody
Grant the Application.Read.All Permission
Next, grant the service principal the read-only Microsoft Graph application permission Application.Read.All. Assigning the permission this way also grants admin consent.
$GraphSp = (Invoke-MgGraphRequest -Method GET -Uri "https://graph.microsoft.com/v1.0/servicePrincipals?`$filter=appId eq '00000003-0000-0000-c000-000000000000'&`$select=id,appRoles").value[0]$AppRoleId = ($GraphSp.appRoles | Where-Object { $_.value -eq 'Application.Read.All' -and $_.allowedMemberTypes -contains 'Application' }).id$Grant = @{ principalId = $NewSp.id resourceId = $GraphSp.id appRoleId = $AppRoleId}Invoke-MgGraphRequest -Method POST -Uri "https://graph.microsoft.com/v1.0/servicePrincipals/$($NewSp.id)/appRoleAssignments" -Body $Grant
Assign the Custom Role
Now assign the custom role to the service principal, scoped to the entire tenant.
$Body = @{ '@odata.type' = '#microsoft.graph.unifiedRoleAssignment' roleDefinitionId = $Role.id principalId = $NewSp.id directoryScopeId = '/'}Invoke-MgGraphRequest -Method POST -Uri 'https://graph.microsoft.com/v1.0/roleManagement/directory/roleAssignments' -Body $Body
If your tenant is licensed for Microsoft Entra ID P2 or Microsoft Entra ID Governance, assign the role through Privileged Identity Management (PIM) instead. Role assignments made outside PIM aren’t tracked by PIM and trigger a high-severity alert. Service principals support only active assignments in PIM, so the following command creates a permanent active assignment.
$Body = @{ action = 'adminAssign' justification = 'CertKit certificate deployment to Entra Application Proxy' roleDefinitionId = $Role.id directoryScopeId = '/' principalId = $NewSp.id scheduleInfo = @{ startDateTime = (Get-Date).ToUniversalTime().ToString('o') expiration = @{ type = 'noExpiration' } }}Invoke-MgGraphRequest -Method POST -Uri 'https://graph.microsoft.com/v1.0/roleManagement/directory/roleAssignmentScheduleRequests' -Body $Body
Create the Client Secret
Finally, create a client secret. I’ve chosen a 1-year expiration, but you can choose a shorter or longer period as you see fit by changing the AddYears(1) value. For example, use AddMonths(6) for a 6-month expiration or AddYears(2) for 2 years. The secret is copied to the clipboard rather than displayed on screen, which keeps it out of console history and screen recordings. The secret value can’t be retrieved later, so paste it into CertKit right away.
$Params = @{ passwordCredential = @{ displayName = 'CertKit' endDateTime = (Get-Date).AddYears(1).ToString('o') }}$Secret = Invoke-MgGraphRequest -Method POST -Uri "https://graph.microsoft.com/v1.0/applications/$($NewApp.id)/addPassword" -Body $Params$Secret.secretText | Set-Clipboard
After pasting the secret into CertKit, clear the clipboard.
Set-Clipboard -Value $null
Configuration Using the Entra Admin Center
The same configuration can be performed in the Microsoft Entra admin center using an account that can create custom roles, grant application permissions, and assign directory roles, such as Privileged Role Administrator or Global Administrator.
Create the App Registration
To begin, create the app registration. The admin center creates the service principal (enterprise application) automatically.
- Navigate to Entra ID > App registrations and click New registration.
- Enter CertKit App Proxy Deployment for the name.
- Select Accounts in this organizational directory only.
- Leave the redirect URI blank and click Register.
- On the Overview page, record the Application (client) ID and Directory (tenant) ID.

Grant the Application.Read.All Permission
Next, grant the app registration the read-only Application.Read.All permission.
- In the app registration, navigate to API permissions. Select the delegated User.Read permission the admin center adds by default and click Remove permission, since CertKit doesn’t use it.
- Click Add a permission, then Microsoft Graph > Application permissions.
- Search for and select Application.Read.All, then click Add permissions.
- Click Grant admin consent for your tenant and click Yes.
Create the Client Secret
Next, create a client secret for CertKit to authenticate with. I’ve chosen a 1-year expiration, but you can choose a shorter or longer period as you see fit.
- In the app registration, navigate to Certificates & secrets > Client secrets and click New client secret.
- Enter CertKit for the description and select 365 days (12 months) for the expiration.
- Click Add, then copy the Value immediately. Don’t copy the Secret ID. The value is displayed only once.
Create the Custom Role
Now create the custom role.
- Navigate to Entra ID > Roles & admins and click New custom role.
- Enter App Proxy Certificate Manager for the name, add a description, and click Next.
- On the Permissions page, search for and select microsoft.directory/applications/applicationProxy/read, microsoft.directory/applications/applicationProxySslCertificate/update, and microsoft.directory/connectorGroups/allProperties/read, then click Next.
- Review the settings and click Create.
Assign the Custom Role
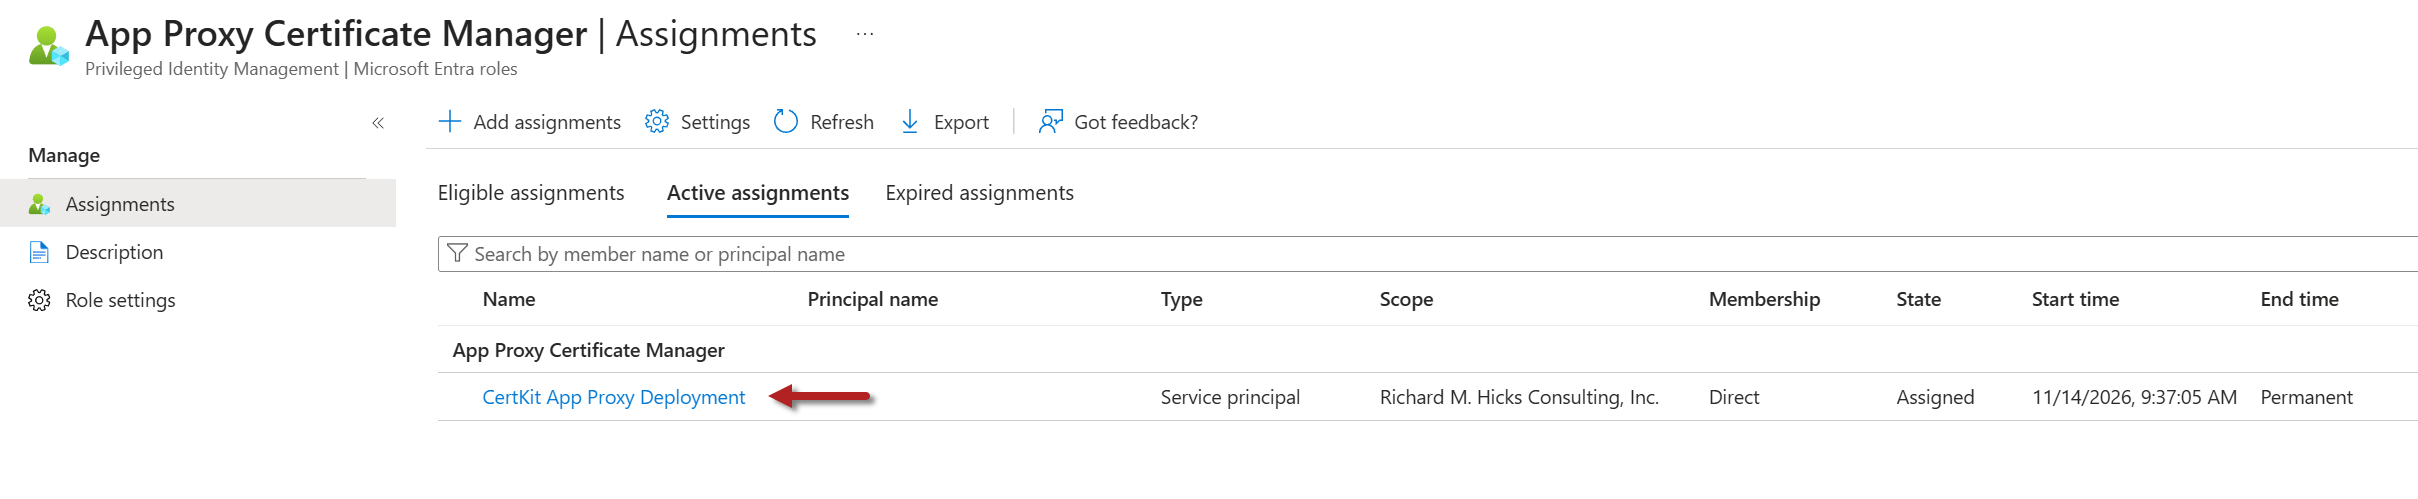
Finally, assign the custom role to the new identity.
- Navigate to Entra ID > Roles & admins, then search for and select App Proxy Certificate Manager.
- Click Add assignments, then Select member(s).
- Search for CertKit App Proxy Deployment, select it, and click Select.
- If Privileged Identity Management (PIM) is enabled, click Next, set the assignment type to Active and Permanently assigned, enter a justification, and click Assign. Without PIM, click Add.
Configure CertKit
With the app registration in place, create a new deployment in CertKit using the Microsoft Entra Application Proxy (Client Secret Auth) template. Select the certificate to deploy, and enter the directory (tenant) ID, application (client) ID, and client secret from the app registration. Then list the App Proxy applications to update by name, separated by commas, or enter an asterisk (*) as an app list wildcard to update all of them.

Deploy and Validate
After saving the CertKit deployment and deploying the changes, wait a few minutes for the role assignment and API permission to take effect, then run the deployment. A successful run lists each App Proxy application, whether its external URL is covered by the certificate, and the thumbprint Entra reports after the update.
Update command output:Microsoft Entra Application Proxy Deployment | Apps: *[Step 1] Reading certificate... Certificate: | Thumbprint: <redacted> | Expires: 2026-11-21 Covers: *.example.net, example.net[Step 2] Signing in to Microsoft Graph... Signed in as the app registration <redacted> (tenant <redacted>) Graph permissions: Application.Read.All Warning: The identity has no Microsoft Graph permission to update apps. Unless an Entra role allows it, uploads will be refused. Grant the application permission Application.ReadWrite.OwnedBy (admin consented) and add the identity as an owner of each App Proxy app.[Step 3] Finding App Proxy apps... Found 7 App Proxy app(s) App1 (https://app1.example.net/): covered by this certificate Private Access App: skipped, a Global Secure Access (Private Access) app, which has no TLS certificate App2 (https://app2.example.net/): covered by this certificate App3 (https://app3.example.net/): covered by this certificate App4 (https://app4.example.net/): covered by this certificate App5 (https://app5.example.net/): covered by this certificate App6 (https://app6.example.net/): covered by this certificate[Step 4] Uploading certificate... App1 (https://app1.example.net/): updated (Entra reports thumbprint <redacted>, expires 2026-11-21) App2 (https://app2.example.net/): updated (Entra reports thumbprint <redacted>, expires 2026-11-21) App3 (https://app3.example.net/): updated (Entra reports thumbprint <redacted>, expires 2026-11-21) App4 (https://app4.example.net/): updated (Entra reports thumbprint <redacted>, expires 2026-11-21) App5 (https://app5.example.net/): updated (Entra reports thumbprint <redacted>, expires 2026-11-21) App6 (https://app6.example.net/): updated (Entra reports thumbprint <redacted>, expires 2026-11-21)DONE | Updated 6 app(s), 0 already had the certificate. Entra takes a minute or two to start serving it.
Validate the Entra Configuration
To confirm Entra stored the new certificate, open the application in Entra ID > Enterprise applications and select Application proxy, or query the application’s App Proxy settings with PowerShell. Replace <objectId> with the app registration’s object ID.

$Uri = "https://graph.microsoft.com/beta/applications/<objectId>?`$select=onPremisesPublishing"(Invoke-MgGraphRequest -Method GET -Uri $Uri).onPremisesPublishing.verifiedCustomDomainCertificatesMetadata.thumbprint
Validate the Live Endpoint
App Proxy can take several minutes to begin serving the new certificate after the configuration is updated. To check the certificate the endpoint is actually serving, view it in a browser or use my Get-TlsCertificate PowerShell script.
Get-TlsCertificate is available in the PowerShell Gallery and on GitHub. Install it using the following command.
Install-Script -Name Get-TlsCertificate
Once installed, run it against the application’s external hostname.
Get-TlsCertificate -Hostname app1.example.net

The expiration date CertKit displays may differ by one day from the date Entra reports. That’s expected, because Entra reports dates in UTC.
Secret Rotation and Security
The client secret must be rotated before it expires, or CertKit deployments will fail. To rotate it, create a new secret on the app registration, update CertKit with the new value, confirm a deployment succeeds, and then delete the old secret. Set a calendar reminder well ahead of the expiration date. Least privilege limits the impact if the secret is ever exposed. Anyone holding it could replace the TLS certificate on App Proxy applications and read app registration details, but couldn’t add credentials to other applications, change permissions, or grant consent. Even so, store the secret securely and limit who can access it.
Summary
CertKit can fully automate certificate deployment to Entra Application Proxy, either for individual applications or for every App Proxy application in the tenant. By combining a custom Entra role limited to App Proxy certificate updates with the read-only Application.Read.All permission, this configuration follows security best practices and enforces least privilege, without the broad access of built-in roles such as Application Administrator. Using short-lived 6-day certificates makes it easy to confirm the automation works, and rotating the client secret before it expires keeps the deployment running.
Getting Started with CertKit
Need help automating TLS certificate deployment for Entra Application Proxy, Always On VPN, DirectAccess, IIS, SQL, and more? I can help you design and implement a secure, least-privilege certificate automation strategy with CertKit across your internal and public-facing workloads. Fill out the form below, and I’ll provide you with more information.


Additional Information
- Configure Microsoft Entra Application Proxy Using Microsoft Graph APIs
- Enterprise Application Permissions for Custom Roles in Microsoft Entra ID
- Assign Microsoft Entra Roles in Privileged Identity Management
- IIS TLS Certificate Deployment with CertKit
- Always On VPN SSTP Certificate Automation with CertKit