

Automating Entra App Proxy Certificates with CertKit (Client Secret)

Microsoft Entra ID icon

Microsoft Entra Application Proxy applications published with custom domains require a public TLS certificate, and keeping those certificates current is a manual, error-prone task when done in the Entra admin center. With the industry moving to 47-day public TLS certificates by 2029, automation is quickly becoming a requirement rather than a convenience. I recently configured CertKit to automatically deploy renewed certificates to my Entra App Proxy applications using an Entra app registration with client secret authentication. This configuration follows security best practices and enforces least privilege, granting CertKit only the access it needs to find App Proxy applications and update their certificates. The following sections describe how to configure it using both PowerShell and the Entra admin center. CertKit also supports managed identity authentication, which I’ll cover in a future post.

CertKit Deployment Options

CertKit can deploy a certificate to Entra App Proxy in one of two ways.

  • Individual applications. CertKit updates only the App Proxy applications you specify.
  • All applications. CertKit enumerates every App Proxy application in the tenant, determines which ones have an external URL covered by the certificate, and updates each of them.

If you choose to update all applications, be sure to use a wildcard or multi-SAN (subject alternative name) certificate that covers the external URL of every App Proxy application you want CertKit to manage. CertKit updates only applications whose external URL matches a name on the certificate, so a certificate with a single name updates only the application that uses that name. CertKit also skips Global Secure Access (Private Access) applications, such as Enterprise Quick Access. These applications appear alongside App Proxy applications, but they don’t use a TLS certificate, so there’s nothing to update.

Why 6-Day Certificates

In my lab, I’m using Let’s Encrypt’s short-lived 6-day certificates. Testing and evaluating certificate automation is much easier with short-lived certificates, because renewals happen every few days rather than every few months. Any problem with the renewal or deployment process shows up quickly, and I can confirm the automation works reliably across many renewal cycles in a short time. Short-lived certificates leave little margin for error, though, so I don’t recommend them in production until the automation is proven.

Required Permissions for CertKit

Create a dedicated Entra app registration for CertKit. CertKit uses this identity to sign in to Microsoft Graph, and it requires only the following permissions.

  • Application.Read.All. A read-only Microsoft Graph application permission CertKit uses to find App Proxy applications in the tenant.
  • A custom Entra role. A custom role, named App Proxy Certificate Manager in this example, with only three permissions: read Application Proxy settings, update the Application Proxy SSL certificate, and read connector groups.

This configuration enforces least privilege. Built-in roles such as Application Administrator also work, but they grant far more access than CertKit needs, including the ability to add credentials to any application in the tenant, a well-known privilege escalation path. With the custom role, CertKit can’t add credentials, change API permissions, or grant consent. Custom roles require Microsoft Entra ID P1, which is already required for Application Proxy. CertKit displays a warning that the identity has no Graph permission to update apps, but you can safely ignore it, because the custom role grants that access.

Configuration Using PowerShell

You can perform this configuration in a single run using my New-CertKitAppProxyIdentity.ps1 PowerShell script on GitHub, which creates the app registration, custom Entra role, Application.Read.All permission, role assignment, and client secret for CertKit. If your account has access to more than one tenant, use the -TenantId parameter to specify the tenant to configure. The script displays the connected tenant before making any changes. Alternatively, follow the manual steps below, which show exactly what the script does. Either way, you’ll need the Microsoft.Graph.Authentication module from the Microsoft Graph PowerShell SDK, since every call uses Invoke-MgGraphRequest. Install it using the following command.

Install-Module -Name Microsoft.Graph.Authentication -Scope CurrentUser

Connect to Microsoft Graph

First, connect to Microsoft Graph with an account that can create custom roles, grant application permissions, and assign directory roles, such as Privileged Role Administrator or Global Administrator. If your account has access to more than one tenant, add -TenantId with the tenant ID or domain name to sign in to the correct tenant.

Connect-MgGraph -Scopes 'Application.ReadWrite.All', 'AppRoleAssignment.ReadWrite.All', 'RoleManagement.ReadWrite.Directory' -NoWelcome

Create the App Registration

Next, create a dedicated app registration for CertKit. The command displays the application (client) ID, which CertKit needs later.

$NewApp = Invoke-MgGraphRequest -Method POST -Uri 'https://graph.microsoft.com/v1.0/applications' -Body @{ displayName = 'CertKit App Proxy Deployment'; signInAudience = 'AzureADMyOrg' }
$NewApp.appId

Create the Service Principal

App registrations created with Graph don’t get a service principal automatically, so create one. The role and API permission are assigned to the service principal, not the app registration.

$NewSp = Invoke-MgGraphRequest -Method POST -Uri 'https://graph.microsoft.com/v1.0/servicePrincipals' -Body @{ appId = $NewApp.appId }

Create the Custom Role

Now create a custom role that can only read Application Proxy settings and update the Application Proxy SSL certificate.

$RoleBody = @{
displayName = 'App Proxy Certificate Manager'
description = 'Can read Application Proxy settings and update the Application Proxy SSL certificate. Used by CertKit.'
isEnabled = $true
rolePermissions = @(@{
allowedResourceActions = @(
'microsoft.directory/applications/applicationProxy/read'
'microsoft.directory/applications/applicationProxySslCertificate/update'
'microsoft.directory/connectorGroups/allProperties/read'
)
})
}
$Role = Invoke-MgGraphRequest -Method POST -Uri 'https://graph.microsoft.com/v1.0/roleManagement/directory/roleDefinitions' -Body $RoleBody

Grant the Application.Read.All Permission

Next, grant the service principal the read-only Microsoft Graph application permission Application.Read.All. Assigning the permission this way also grants admin consent.

$GraphSp = (Invoke-MgGraphRequest -Method GET -Uri "https://graph.microsoft.com/v1.0/servicePrincipals?`$filter=appId eq '00000003-0000-0000-c000-000000000000'&`$select=id,appRoles").value[0]
$AppRoleId = ($GraphSp.appRoles | Where-Object { $_.value -eq 'Application.Read.All' -and $_.allowedMemberTypes -contains 'Application' }).id
$Grant = @{
principalId = $NewSp.id
resourceId = $GraphSp.id
appRoleId = $AppRoleId
}
Invoke-MgGraphRequest -Method POST -Uri "https://graph.microsoft.com/v1.0/servicePrincipals/$($NewSp.id)/appRoleAssignments" -Body $Grant

Assign the Custom Role

Now assign the custom role to the service principal, scoped to the entire tenant.

$Body = @{
'@odata.type' = '#microsoft.graph.unifiedRoleAssignment'
roleDefinitionId = $Role.id
principalId = $NewSp.id
directoryScopeId = '/'
}
Invoke-MgGraphRequest -Method POST -Uri 'https://graph.microsoft.com/v1.0/roleManagement/directory/roleAssignments' -Body $Body

If your tenant is licensed for Microsoft Entra ID P2 or Microsoft Entra ID Governance, assign the role through Privileged Identity Management (PIM) instead. Role assignments made outside PIM aren’t tracked by PIM and trigger a high-severity alert. Service principals support only active assignments in PIM, so the following command creates a permanent active assignment.

$Body = @{
action = 'adminAssign'
justification = 'CertKit certificate deployment to Entra Application Proxy'
roleDefinitionId = $Role.id
directoryScopeId = '/'
principalId = $NewSp.id
scheduleInfo = @{
startDateTime = (Get-Date).ToUniversalTime().ToString('o')
expiration = @{ type = 'noExpiration' }
}
}
Invoke-MgGraphRequest -Method POST -Uri 'https://graph.microsoft.com/v1.0/roleManagement/directory/roleAssignmentScheduleRequests' -Body $Body

Create the Client Secret

Finally, create a client secret. I’ve chosen a 1-year expiration, but you can choose a shorter or longer period as you see fit by changing the AddYears(1) value. For example, use AddMonths(6) for a 6-month expiration or AddYears(2) for 2 years. The secret is copied to the clipboard rather than displayed on screen, which keeps it out of console history and screen recordings. The secret value can’t be retrieved later, so paste it into CertKit right away.

$Params = @{
passwordCredential = @{
displayName = 'CertKit'
endDateTime = (Get-Date).AddYears(1).ToString('o')
}
}
$Secret = Invoke-MgGraphRequest -Method POST -Uri "https://graph.microsoft.com/v1.0/applications/$($NewApp.id)/addPassword" -Body $Params
$Secret.secretText | Set-Clipboard

After pasting the secret into CertKit, clear the clipboard.

Set-Clipboard -Value $null

Configuration Using the Entra Admin Center

The same configuration can be performed in the Microsoft Entra admin center using an account that can create custom roles, grant application permissions, and assign directory roles, such as Privileged Role Administrator or Global Administrator.

Create the App Registration

To begin, create the app registration. The admin center creates the service principal (enterprise application) automatically.

  1. Navigate to Entra ID > App registrations and click New registration.
  2. Enter CertKit App Proxy Deployment for the name.
  3. Select Accounts in this organizational directory only.
  4. Leave the redirect URI blank and click Register.
  5. On the Overview page, record the Application (client) ID and Directory (tenant) ID.
The Overview page of the CertKit App Proxy Deployment app registration, showing the Application (client) ID and Directory (tenant) ID.

Grant the Application.Read.All Permission

Next, grant the app registration the read-only Application.Read.All permission.

  1. In the app registration, navigate to API permissions. Select the delegated User.Read permission the admin center adds by default and click Remove permission, since CertKit doesn’t use it.
  2. Click Add a permission, then Microsoft Graph > Application permissions.
  3. Search for and select Application.Read.All, then click Add permissions.
  4. Click Grant admin consent for your tenant and click Yes.

Create the Client Secret

Next, create a client secret for CertKit to authenticate with. I’ve chosen a 1-year expiration, but you can choose a shorter or longer period as you see fit.

  1. In the app registration, navigate to Certificates & secrets > Client secrets and click New client secret.
  2. Enter CertKit for the description and select 365 days (12 months) for the expiration.
  3. Click Add, then copy the Value immediately. Don’t copy the Secret ID. The value is displayed only once.

Create the Custom Role

Now create the custom role.

  1. Navigate to Entra ID > Roles & admins and click New custom role.
  2. Enter App Proxy Certificate Manager for the name, add a description, and click Next.
  3. On the Permissions page, search for and select microsoft.directory/applications/applicationProxy/read, microsoft.directory/applications/applicationProxySslCertificate/update, and microsoft.directory/connectorGroups/allProperties/read, then click Next.
  4. Review the settings and click Create.

Assign the Custom Role

Finally, assign the custom role to the new identity.

  1. Navigate to Entra ID > Roles & admins, then search for and select App Proxy Certificate Manager.
  2. Click Add assignments, then Select member(s).
  3. Search for CertKit App Proxy Deployment, select it, and click Select.
  4. If Privileged Identity Management (PIM) is enabled, click Next, set the assignment type to Active and Permanently assigned, enter a justification, and click Assign. Without PIM, click Add.
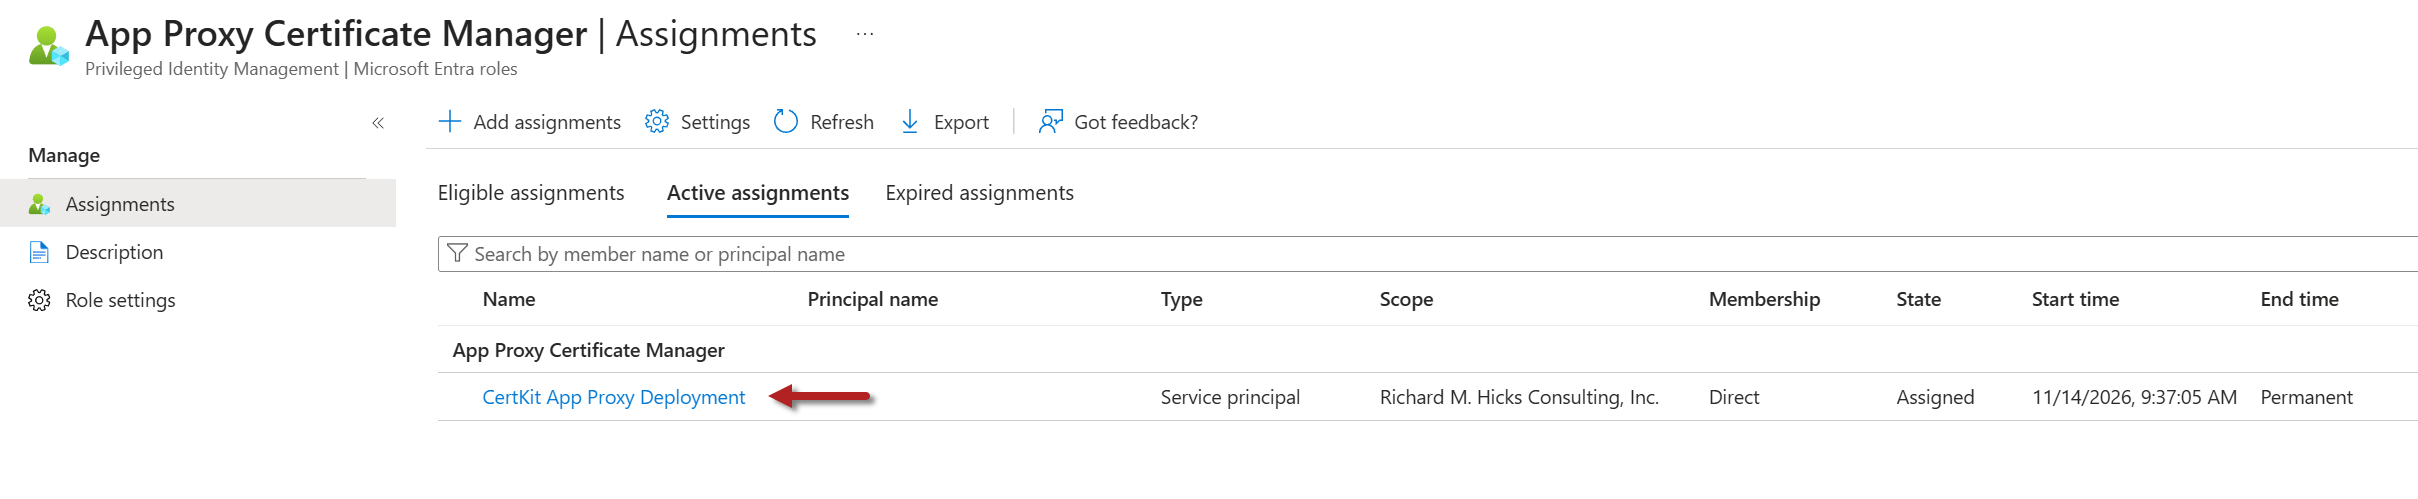
The App Proxy Certificate Manager role's Active assignments tab in Privileged Identity Management, showing CertKit App Proxy Deployment permanently assigned as a service principal.

Configure CertKit

With the app registration in place, create a new deployment in CertKit using the Microsoft Entra Application Proxy (Client Secret Auth) template. Select the certificate to deploy, and enter the directory (tenant) ID, application (client) ID, and client secret from the app registration. Then list the App Proxy applications to update by name, separated by commas, or enter an asterisk (*) as an app list wildcard to update all of them.

A CertKit deployment using the Microsoft Entra Application Proxy (Client Secret Auth) template, with the wildcard set to update all App Proxy applications.

Deploy and Validate

After saving the CertKit deployment and deploying the changes, wait a few minutes for the role assignment and API permission to take effect, then run the deployment. A successful run lists each App Proxy application, whether its external URL is covered by the certificate, and the thumbprint Entra reports after the update.

Update command output:
Microsoft Entra Application Proxy Deployment | Apps: *
[Step 1] Reading certificate...
Certificate: | Thumbprint: <redacted> | Expires: 2026-11-21
Covers: *.example.net, example.net
[Step 2] Signing in to Microsoft Graph...
Signed in as the app registration <redacted> (tenant <redacted>)
Graph permissions: Application.Read.All
Warning: The identity has no Microsoft Graph permission to update apps. Unless an Entra role allows it, uploads will be refused. Grant the application permission Application.ReadWrite.OwnedBy (admin consented) and add the identity as an owner of each App Proxy app.
[Step 3] Finding App Proxy apps...
Found 7 App Proxy app(s)
App1 (https://app1.example.net/): covered by this certificate
Private Access App: skipped, a Global Secure Access (Private Access) app, which has no TLS certificate
App2 (https://app2.example.net/): covered by this certificate
App3 (https://app3.example.net/): covered by this certificate
App4 (https://app4.example.net/): covered by this certificate
App5 (https://app5.example.net/): covered by this certificate
App6 (https://app6.example.net/): covered by this certificate
[Step 4] Uploading certificate...
App1 (https://app1.example.net/): updated (Entra reports thumbprint <redacted>, expires 2026-11-21)
App2 (https://app2.example.net/): updated (Entra reports thumbprint <redacted>, expires 2026-11-21)
App3 (https://app3.example.net/): updated (Entra reports thumbprint <redacted>, expires 2026-11-21)
App4 (https://app4.example.net/): updated (Entra reports thumbprint <redacted>, expires 2026-11-21)
App5 (https://app5.example.net/): updated (Entra reports thumbprint <redacted>, expires 2026-11-21)
App6 (https://app6.example.net/): updated (Entra reports thumbprint <redacted>, expires 2026-11-21)
DONE | Updated 6 app(s), 0 already had the certificate. Entra takes a minute or two to start serving it.

Validate the Entra Configuration

To confirm Entra stored the new certificate, open the application in Entra ID > Enterprise applications and select Application proxy, or query the application’s App Proxy settings with PowerShell. Replace <objectId> with the app registration’s object ID.

The SSL certificate pane of an App Proxy application, showing the certificate's subject, thumbprint, and expiration date.
$Uri = "https://graph.microsoft.com/beta/applications/<objectId>?`$select=onPremisesPublishing"
(Invoke-MgGraphRequest -Method GET -Uri $Uri).onPremisesPublishing.verifiedCustomDomainCertificatesMetadata.thumbprint

Validate the Live Endpoint

App Proxy can take several minutes to begin serving the new certificate after the configuration is updated. To check the certificate the endpoint is actually serving, view it in a browser or use my Get-TlsCertificate PowerShell script.

Get-TlsCertificate is available in the PowerShell Gallery and on GitHub. Install it using the following command.

Install-Script -Name Get-TlsCertificate

Once installed, run it against the application’s external hostname.

Get-TlsCertificate -Hostname app1.example.net
Output of Get-TlsCertificate showing the certificate served by the App Proxy endpoint, including its issuer, thumbprint, expiration date, and subject alternative names.

The expiration date CertKit displays may differ by one day from the date Entra reports. That’s expected, because Entra reports dates in UTC.

Secret Rotation and Security

The client secret must be rotated before it expires, or CertKit deployments will fail. To rotate it, create a new secret on the app registration, update CertKit with the new value, confirm a deployment succeeds, and then delete the old secret. Set a calendar reminder well ahead of the expiration date. Least privilege limits the impact if the secret is ever exposed. Anyone holding it could replace the TLS certificate on App Proxy applications and read app registration details, but couldn’t add credentials to other applications, change permissions, or grant consent. Even so, store the secret securely and limit who can access it.

Summary

CertKit can fully automate certificate deployment to Entra Application Proxy, either for individual applications or for every App Proxy application in the tenant. By combining a custom Entra role limited to App Proxy certificate updates with the read-only Application.Read.All permission, this configuration follows security best practices and enforces least privilege, without the broad access of built-in roles such as Application Administrator. Using short-lived 6-day certificates makes it easy to confirm the automation works, and rotating the client secret before it expires keeps the deployment running.

Getting Started with CertKit

Need help automating TLS certificate deployment for Entra Application Proxy, Always On VPN, DirectAccess, IIS, SQL, and more? I can help you design and implement a secure, least-privilege certificate automation strategy with CertKit across your internal and public-facing workloads. Fill out the form below, and I’ll provide you with more information.

← Back

Thank you for your response. ✨

Additional Information

WEBINAR: Preparing for 100-Day Certificates with CertKit

Join me and the CertKit team on Tuesday, October 6, 2026, at 9:00 AM PDT for a free, live webinar about the upcoming reduction in public TLS certificate lifetimes. Beginning March 15, 2027, the maximum validity period for public TLS certificates will be reduced to 100 days. This change will make manual certificate management increasingly difficult for many organizations.

Automation

Shorter certificate lifetimes require organizations to identify, enroll, deploy, and renew certificates more frequently. Automation can help reduce the administrative effort and the risk of service interruptions caused by expired certificates. This is especially important for public-facing Microsoft workloads such as Internet Information Services (IIS), Remote Desktop Services (RDS), Always On VPN, DirectAccess, and other services that use public TLS certificates.

Visibility

Effective certificate management begins with knowing which certificates exist, where they are installed, and when they expire. Without this visibility, organizations may overlook certificates until they are close to expiration or have already expired.

Internal Certificates

Certificates issued by a private certification authority (CA) aren’t subject to the lifetime restrictions imposed on public TLS certificates. However, they still require inventory, monitoring, and renewal. A consistent approach to managing public and private certificates can help reduce operational overhead.

How CertKit Helps

CertKit is a cloud-based service for managing public and private TLS certificates. During the webinar, we’ll demonstrate how CertKit provides visibility into certificate inventories and expiration dates while automating common lifecycle tasks such as enrollment, deployment, and renewal. We’ll also review recent additions to the service.

Register Now

The webinar takes place on Tuesday, October 6, at 9:00 AM PDT. Registration is required. Everyone who registers will be notified when the session recording is available.

Intranet Certificate Monitoring with CertKit

CertKit is a cloud-based solution that automates the issuance and management of public TLS certificates. It also provides certificate monitoring and alerting for public-facing workloads. However, many organizations have internal (non-public-facing) services that also use TLS. CertKit agent v1.13.0, currently in preview, closes this gap by providing visibility into TLS certificates used by intranet resources. After installing the latest release of the agent, CertKit can now provide visibility into the status of TLS certificates for internal resources.

Intranet Monitoring

After installing or updating the CertKit agent to v1.13.0, administrators can select an internal TLS service to monitor. Follow the steps below to enable this feature.

Certificate Collection

I recommend creating a separate Certificate Collection to support intranet monitoring. In the CertKit management console, click Add Collection, enter a unique, descriptive name, and click Add Collection.

Install the Agent

Once the new collection is created, navigate to the Agents tab, select your platform, then download, install, and register the agent.

Monitor New Host

After the agent is installed and registered, navigate to the Monitoring tab and click Monitor New Host. Enter the fully qualified domain name (FQDN) of the resource and specify its TLS port. Under Host Visibility, select Internal, and then choose the agent to monitor the host from. When finished, click Monitor Host.

Note: The server running the CertKit agent does not require a TLS certificate of its own to monitor internal resources.

Monitored Hosts

CertKit can track certificates for any internal workload that uses TLS. In this example, the monitored resources include web applications, security appliances, load balancers, and HTTP CRL distribution points. The list also includes LDAPS on the domain controllers and the RDP and WinRM HTTPS services on the management workstation.

The circle next to each resource indicates its certificate status. Green indicates a healthy certificate, yellow indicates one approaching expiration, and red indicates an expired certificate or another detected issue.

Note: The RDP certificate on the management workstation appears red because it contains only the Remote Desktop Authentication EKU (1.3.6.1.4.1.311.54.1.2). It intentionally does not include Server Authentication, which CertKit currently expects when validating the service. CertKit is aware of this limitation and plans to address it in a future release.

Host Discovery

CertKit provides robust discovery for public websites but does not currently offer equivalent functionality for intranet resources. Administrators can identify internal systems listening on a specific port by using Nmap.

nmap.exe -Pn -p [port] --open [internal subnet]

For example:

nmap.exe -Pn -p 443 --open 172.16.0.0/24

Alternatively, add the -oX switch to save the output in XML format.

nmap.exe -Pn -p 443 --open 172.16.0.0/24 -oX scan.xml

The resulting Nmap XML file output can be converted to CSV format using this PowerShell code.

Summary

CertKit agent v1.13.0 extends certificate monitoring to internal TLS services, giving administrators greater visibility into certificates that were previously difficult to track. Although intranet host discovery remains a manual process, tools such as Nmap and PowerShell can help identify resources to add to the monitoring platform

Getting Started with CertKit

Need help improving certificate visibility and management across your organization? Want to automate public TLS certificate enrollment for workloads such as DirectAccess, Always On VPN, IIS, SQL, and more? I can help you assess your certificate environment, identify monitoring gaps, and develop a strategy for managing certificates across internal and public-facing workloads. Fill out the form below, and I’ll provide you with more information.

← Back

Thank you for your response. ✨

Additional Information

CertKit Website

What Is CertKit?

CerKit Agent Support for Always On VPN SSTP and DirectAccess IPHTTPS TLS Certificates

IIS TLS Certificate Deployment with CertKit

The Case for 6-Day Public TLS Certificates

DirectAccess IPHTTPS and Let’s Encrypt 6-Day TLS Certificates

Webinar: Certificate Automation in Practice – A Technical Deep Dive

If you manage Windows Server workloads that require public TLS certificates like Always On VPN, DirectAccess, Remote Desktop Gateway, Internet Information Services (IIS), and others, you know that certificate expirations don’t send friendly reminders. Certificates expire quietly. Too often, end users are the ones who sound the alarm—when resources are already unavailable. Of course, this never happens at a convenient time. It’s usually the middle of the night, on the weekend.

Missed the event? Watch the on-demand replay here.

Current State

Most Windows IT teams are still managing certificates the same way they did years ago, using spreadsheets, calendar reminders, and an assortment of renewal scripts. It usually works… until it suddenly doesn’t.

Free Webinar

I’m pleased to announce that I’ll be joining Todd Gardner from CertKit for a free live webinar on Tuesday, June 16, at 11:00 AM CDT, in which we will break down the following:

  • Why certificate mismanagement causes so much pain at scale
  • How to build real automation that works across your full environment, including internal services and vendor appliances
  • A live demonstration of CertKit showing end-to-end discovery, monitoring, and automated renewal

There will also be time for live Q&A, so bring your questions!

Join Us!

If you’re tired of patching the problem with fragile scripts and assorted reminders, join us to learn about a fully automated solution that can dramatically improve the situation. Register now and don’t miss this opportunity to reduce your TLS certificate management burden and end the need for 2 AM certificate renewal fire drills.

Webinar Details

Webinar: TLS Certificate Automation for Windows Infrastructure
Hosts: Todd Gardner (CertKit) and Richard Hicks (Richard M. Hicks Consulting, Inc.)
Date: Tuesday, June 16
Time: 11:00 AM CDT
Registration: Click here to register!

Recording

If you are unable to attend the live session, be sure to register to receive a link to the recorded session for on-demand viewing.

Webinar: Certificate Automation for Windows Infrastructure

If you manage Windows Server workloads that require public TLS certificates like Always On VPN, DirectAccess, Remote Desktop Gateway, Internet Information Services (IIS), and others, you know that certificate expirations don’t send friendly reminders. Certificates expire quietly. Too often, end users are the ones who sound the alarm—when resources are already unavailable. Of course, this never happens at a convenient time. It’s usually the middle of the night, on the weekend.

Did you miss the webinar? You can view it on demand here!

Current State

Most Windows IT teams are still managing certificates the same way they did years ago, using spreadsheets, calendar reminders, and an assortment of renewal scripts. It usually works… until it suddenly doesn’t.

Free Webinar

I’m pleased to announce that I’ll be joining Todd Gardner from CertKit for a free live webinar on Tuesday, May 26, at 11:00 AM CDT, in which we will break down the following:

  • Why certificate mismanagement causes so much pain at scale
  • How to build real automation that works across your full environment, including internal services and vendor appliances
  • A live demonstration of CertKit showing end-to-end discovery, monitoring, and automated renewal

There will also be time for live Q&A, so bring your questions!

Join Us!

If you’re tired of patching the problem with fragile scripts and assorted reminders, join us to learn about a fully automated solution that can dramatically improve the situation. Register now and don’t miss this opportunity to reduce your TLS certificate management burden and end the need for 2 AM certificate renewal fire drills.

Webinar Details

Webinar: TLS Certificate Automation for Windows Infrastructure
Hosts: Todd Gardner (CertKit) and Richard Hicks (Richard M. Hicks Consulting, Inc.)
Date: Tuesday, May 26
Time: 11:00 AM CDT
Registration: Click here to register!

Recording

If you missed the live event, you can view the on demand recording here!

IIS TLS Certificate Deployment with CertKit

With public TLS certificate lifetimes shrinking to just 47 days by 2029, administrators must find ways to automate certificate enrollment and renewal for workloads that require them. One of the most common is Microsoft Internet Information Services (IIS). I’ve been using CertKit.io to handle this process for workloads like Always On VPN and DirectAccess, so it made sense to migrate my public-facing IIS servers to this solution as well. The migration went smoothly, but I encountered an unexpected issue when deploying a new IIS server using CertKit.

CertKit Agent

CertKit Agents make loading certificates on the server a breeze. The CertKit agent automatically detects installed software (e.g., Terminal Services, RRAS, DirectAccess, IIS, etc.) and handles the server-side process of assigning the TLS certificate to the application. For RRAS and DirectAccess, it works perfectly. For an IIS server with an HTTPS binding and TLS certificate already configured, it works without issue as well. However, I ran into a snag when I tried to deploy a certificate to a brand-new IIS server.

New Server

After installing the CertKit agent on an IIS server, it searches for existing HTTPS web bindings to identify the workload. However, on a freshly installed IIS server, no HTTPS bindings have been configured yet, so the agent doesn’t recognize the IIS workload.

Of course, you could create an HTTPS web binding before installing the agent, but you’ll need a TLS certificate first. This introduces the classic “chicken and egg” scenario. 🤪 Fortunately, there are a few ways to resolve the issue.

Windows Certificate Store

With this method, you configure the CertKit agent to download and install the certificate into the local computer certificate store on the IIS server. Once complete, you can create the HTTPS binding in the IIS Manager console or by using PowerShell. After that, restart the CertKit agent service by running the following PowerShell command.

Restart-Service -Name certkit-agent -PassThru

The IIS workload will now appear in the agent’s Software list. At that point, you can delete the Windows certificate store configuration and replace it with the IIS configuration.

Self-Signed Certificate

Using this method before installing the CertKit agent allows the agent to automatically discover IIS after installation, which can be helpful when deploying IIS servers programmatically. First, create a short-lived certificate (one day in this example) and configure the IIS site binding by running the following PowerShell commands.

$Hostname = 'www.example.net'
$Certificate = New-SelfSignedCertificate -DnsName $Hostname -CertStoreLocation 'Cert:\LocalMachine\My' -KeyAlgorithm RSA -KeyLength 2048 -HashAlgorithm SHA256 -NotAfter (Get-Date).AddDays(1) -TextExtension @('2.5.29.37={text}1.3.6.1.5.5.7.3.1')
$Params = @{
    Name                 = 'Default Web Site'
    BindingInformation   = '*:443:'
    Protocol             = 'https'
    CertificateThumbPrint = $Certificate.Thumbprint
    CertStoreLocation    = 'Cert:\LocalMachine\My'
}
New-IISSiteBinding @Params

Once complete, run iisreset.exe to apply the changes. Now, when you install the CertKit agent, it will automatically detect IIS, and you can assign your public TLS certificate accordingly. You can delete the old self-signed certificate later if desired.

Summary

If you’re automating server builds, the self-signed certificate approach is typically the easiest because it enables IIS discovery immediately. For ad-hoc deployments, installing to the Windows certificate store first is usually the quickest option.

Additional Information

CertKit.io

CerKit Agent Support for Always On VPN SSTP and DirectAccess IP-HTTPS TLS Certificates

Microsoft Intune Certificate Connector Failure

The Microsoft Intune Certificate Connector enables the provisioning and de-provisioning of on-premises PKI certificates for Intune-managed devices. Always On VPN administrators using Intune to deploy certificates with the Intune Certificate Connector using either PKCS or SCEP may encounter a scenario where certificates are no longer being provisioned to users or devices after working reliably previously.

Certificate Not Found

When this issue occurs, users will no longer be able to access the VPN and receive a “certificate could not be found that can be used with this Extensible Authentication Protocol” error message.

Always On VPN error stating a certificate could not be found that can be used with this Extensible Authentication Protocol

Connector Status

To determine the status of the Intune Certificate Connector, open the Microsoft Intune Admin Center (https://intune.microsoft.com) and navigate to Tenant Administration > Connectors and Tokens > Certificate Connectors. The status of the certificate connector server will be in Error.

Intune admin center Certificate Connectors page showing the connector in an Error state

Event Log

Open the event log on the server where the Intune Certificate Connector is installed. Navigate to Applications and Services Logs > Microsoft > Intune > CertificateConnectors > Operational. Here, you will find a variety of warning and error messages.

Event ID 5001

This is a warning from the CertificateConnectors source with event ID 5001 in the Task Category HealthMessageUploadFailedAttempt with the following details.

PKI Create Service:

Failed to upload health messages. Requeuing messages.

Event ID 1003

This is an error from the CertificateConnectors source with event ID 1003 in the Task Category PkcsDownloadFailure with the following details.

PKI Create Service:

Failed to download PKCS requests.

Event ID 2

This is an error from the CertificateConnectors source with event ID 2 in the Task Category Exception with the following details.

PKI Create Service:

Microsoft.Intune.Connectors.PkiCreateProcessor.Process threw an exception.

Expired Certificate

The warning and error messages recorded in the event log indicate an expired certificate on the Intune Certificate Connector server. Open the local computer certificate store (certlm.msc) on the server where the Intune Certificate Connector is installed. Review the expiration date of the certificate issued by Microsoft Intune ImportPFX Connector CA. It is most likely expired.

Local computer certificate store on the Intune Certificate Connector server showing the expired connector certificate

Click on the Certification Path tab to view the certificate status.

Certificate Certification Path tab showing the certificate has expired

Renew Certificate

To renew this certificate, you must reinstall the Intune Certificate Connector. However, you do not have to uninstall it first. To renew the certificate, navigate to C:\Program Files\Microsoft Intune\PFXCertificateConnector\ConnectorUI and double-click on PFXCertificateConnectorUI.exe. Follow the prompts without making changes to the existing configuration. You’ll be prompted for the service account password (if using a domain account) and proxy credentials (if using a proxy server). In addition, you’ll be asked to sign in to Entra ID (formerly Azure AD). Be sure to provide credentials that are a global administrator and have an Intune license assigned. Once the process is complete, a new certificate will be installed in the local computer certificate store.

Intune Configuration

After updating the Intune Certificate Connector, a new certificate connector appears in the Intune Admin Center. You can now safely delete the old connector and rename the new one accordingly.

Intune admin center listing the old and new Intune Certificate Connector entries

Redundancy

Deploying multiple instances of the Intune Certificate Connector is an excellent way to avoid future outages! It’s also a good idea to stagger their installation by a few months to ensure that a future certificate expiration doesn’t result in lost functionality. If you’ve deployed Intune Certificate Connectors recently, consider updating them at rotating intervals so certificates expire at different times.

Additional Information

Enterprise PKI with Microsoft Active Directory Certificate Services

Intune Certificate Connector Configuration Failed

Intune Certificate Connector Service Account and PKCS

Intune Certificate Connector Configuration Failure

Microsoft Intune Learning Resources for Always On VPN Administrators

Always On VPN Error -2146762495

DirectAccess Troubleshooting and the Windows 10 Network Connectivity Assistant

Always On VPN Administrators may encounter a scenario where Always On VPN connections suddenly stop working for all clients using the Secure Socket Tunneling Protocol (SSTP) VPN protocol. IKEv2 VPN connections continue to work, however.

Event Log

Reviewing the event log on a client machine reveals an error event ID 20227 from the RasClient source. The error message states the following.

“The user [username] dialed a connection named [connection name] which has failed. The error code returned on failure is -2146762495.”

Error -2146762495?

Always On VPN administrators will be familiar with error codes such as 809, 691 and 812, 853, 858, and even 13801, 13806, and 13868. However, this error code seems to be formatted much differently. As it turns out, this message is in decimal format. Thankfully it’s pretty easy to convert it to something more meaningful, like hexadecimal. To do this, open the Windows calculator (calc.exe) and switch to programmer mode. Highlight DEC and enter -2146762495. The hexadecimal value will be displayed in the HEX field, as shown here.

Error 0x800B0101

After converting the error message from decimal to hex, use the Microsoft Error Lookup tool (err.exe) to translate the hex value of this error. As shown here, 0x800B0101 translates to CERT_E_EXPIRED.

Expired TLS Certificate

Once again, an expired certificate is to blame! In this case, the TLS certificate installed on the VPN server has expired and is no longer valid.

Resolution

The problem is simple enough to resolve, of course. Obtain a new TLS certificate from your certification authority (CA) of choice and update your VPN server configuration. You can find detailed guidance for updating the RRAS VPN server’s TLS certificate here. You will also find a video demonstration of the RRAS SSL/TLS certificate renewal process here.

Additional Information

Installing or Renewing an SSL/TLS Certificate on Windows Server RRAS for Always On VPN and SSTP

VIDEO: Installing or Renewing an SSL/TLS certificate on Windows Server RRAS for Always On VPN and SSTP

Microsoft Windows Always On VPN SSTP Security Configuration

Microsoft Windows Always On VPN SSL/TLS Certificate Requirements for SSTP

Microsoft Windows Always On VPN SSTP with Let’s Encrypt Certificates

Always On VPN Error Code 858

Always On VPN Error Code 858When configuring Windows 10 Always On VPN using Extensible Authentication Protocol (EAP), the administrator may encounter a scenario in which the client connection fails. The event log will include an event ID 20227 from the RasClient source that includes the following error message.

“The user [domain\username] dialed a connection named [connection name] which has failed. The error code returned on failure is 858.”

Always On VPN Error Code 858

RasClient Error 858

RasClient error code 858 translates to ERROR_EAP_SERVER_CERT_EXPIRED. Intuitively, this indicates that the Server Authentication certificate installed on the Network Policy Server (NPS) has expired. To resolve this issue, renew the certificate on the NPS server.

Additional Information

Windows 10 Always On VPN Network Policy Server (NPS) Load Balancing

Windows 10 Always On VPN and Windows Server 2019 NPS Bug

Windows 10 Always On VPN Error Code 864

DirectAccess Expired IP-HTTPS Certificate and Error 0x800b0101

Introduction

DirectAccess is an IPv6 only solution, at least from the perspective of the client. When the DirectAccess client is remote, it communicates with the DirectAccess server using IPv6 exclusively. IPv6 transition technologies are used to enable this connectivity when the DirectAccess server and/or client are on the pubic IPv4 Internet.

IP-HTTPS

One of the IPv6 transition technologies used by DirectAccess is IP-HTTPS. With IP-HTTPS, IPv6 traffic is encapsulated in HTTP and delivered to the DirectAccess server using IPv4. IP-HTTPS is used exclusively when the DirectAccess server is located behind an edge firewall performing network address translation.

SSL Certificate

To support IP-HTTPS, an SSL certificate is installed on each DirectAccess server. The SSL certificate is commonly issued by a public certification authority, but it can also be issued by an internal PKI. The SSL certificate used for IP-HTTPS can and does expire, and when it does it will prevent any DirectAccess connection from being established using this transition technology.

Troubleshooting

When troubleshooting DirectAccess connectivity via IP-HTTPS, the first thing the administrator will notice is that the media state for the DirectAccess client’s IP-HTTPS tunnel adapter interface is shown as disconnected.

DirectAccess Expired IP-HTTPS Certificate and Error 0x800b0101

In addition, the Get-NetIPHttpsState PowerShell command returns an error code 0x800b0101 indicating Failed to connect to the IP-HTTPS server; waiting to reconnect.

DirectAccess Expired IP-HTTPS Certificate and Error 0x800b0101

Err.exe translates this error to CERT_E_EXPIRED, indicating that the SSL certificate is no longer valid.

DirectAccess Expired IP-HTTPS Certificate and Error 0x800b0101

Viewing the IP-HTTPS SSL certificate is not possible using a web browser. Instead, use Nmap and the ssl-cert script to view the certificate.

nmap.exe -n -Pn -p443 [FQDN] –script ssl-cert

DirectAccess Expired IP-HTTPS Certificate and Error 0x800b0101

In the Operations Status window of the Remote Access Management console on the DirectAccess server, the IP-HTTPS status is listed as Critical. Details show IP-HTTPS not working properly, with an error stating the IP-HTTPS certificate is not valid, and clearly indicating that the certificate is expired.

DirectAccess Expired IP-HTTPS Certificate and Error 0x800b0101

The IP-HTTPS status can also be viewed at the command line by issuing the following command in an elevated PowerShell command window.

Get-RemoteAccessHealth | Where-Object Component -eq IP-Https | Format-List

DirectAccess Expired IP-HTTPS Certificate and Error 0x800b0101

Updating the Certificate

Simply renewing the SSL certificate is not sufficient to restore IP-HTTPS connectivity for remote DirectAccess clients. The DirectAccess configuration must also be updated to use the new certificate. In the Remote Access Management console, highlight DirectAccess and VPN under Configuration and then click Edit on Step 2 (for load-balanced or multisite DirectAccess deployments, first highlight the individual server and then click Configure Server Settings). Click Network Adapters, click Browse, and then select the new SSL certificate.

DirectAccess Expired IP-HTTPS Certificate and Error 0x800b0101

Click Ok, Next, and then Finish twice and Apply. Repeat these steps for each server in the load-balanced cluster, and for all servers in all entry points in the enterprise.

Alternatively, the IP-HTTPS certificate can be updated in the DirectAccess configuration by opening an elevated PowerShell command window and entering the following commands.

$cert = Get-ChildItem -Path cert:\localmachine\my | Where-Object Thumbprint -eq [cert_thumbprint]
Set-RemoteAccess -SslCertificate $cert -Verbose

For example…

$cert = Get-ChildItem -Path cert:\localmachine\my | Where-Object Thumbprint -eq 2BFD1BC5805EBBF8ACB584DA025AD75B341A8B33
Set-RemoteAccess -SslCertificate $cert -Verbose


Important Note: Be sure to execute these commands on each DirectAccess server in the load-balanced cluster, and for all servers in all entry points in the enterprise.


Self-Signed Certificates

When DirectAccess is deployed using the Getting Started Wizard (GSW), also known as a “simplified deployment“, a self-signed certificate is used for IP-HTTPS. By default, this certificate expires 5 years after it is created. The expiration of a self-signed certificate presentsa unique challenge. Although the self-signed certificate can’t be renewed, it can be re-created or cloned using the New-SelfSignedCertificate PowerShell command. However, DirectAccess clients will not trust this new certificate until they receive the updated client settings via group policy. DirectAccess clients outside the network will not be able to establish IP-HTTPS connections until they receive these new policies. When they attempt to connect to the DirectAccess server without first updating group policy, the IP-HTTPS status will indicate an error code 0x800b0109 which translates to CERT_E_UNTRUSTEDROOT.

If the expired self-signed certificate is replaced with another self-signed certificate (not recommended), DirectAccess clients will have to come back to the internal network or connect remotely via client-based VPN to update group policy and receive the new DirectAccess client settings. A better alternative is to replace the expired self-signed certificate with a public SSL certificate that matches the existing public hostname. This will allow remote clients to reestablish DirectAccess connectivity without the need to udpate group policy first.

Summary

Certificate expiration must be monitored closely to ensure the highest level of availability for the DirectAccess remote access solution. Certificate auto enrollment can be leveraged to ensure that IPsec certificates are automatically renewed prior to expiration. However, the IP-HTTPS certificate must be renewed manually and requires additional configuration after it has been updated.

Additional Resources

DirectAccess Computer Certificate Auto Enrollment

DirectAccess and Multi-SAN SSL Certificates for IP-HTTPS

SSL Certificate Considerations for DirectAccess IP-HTTPS

Implementing DirectAccess with Windows Server 2016 book