

NDES Security Hardening: Protecting and Monitoring the SCEP Registry Configuration

The Active Directory Certificate Services (AD CS) Network Device Enrollment Service (NDES) is widely deployed to support the issuance and management of enterprise PKI certificates via Microsoft Intune and the Intune Certificate Connector. NDES relies on registry settings to identify its issuing CA, certificate templates, and other SCEP configuration parameters. An attacker with sufficient access to an NDES server could alter these settings and redirect enrollment to another template published on the issuing CA and accessible to the NDES service account. Because enrollment might continue without an obvious service failure, administrators could overlook the change. This article explains how to restrict access to the MSCEP registry key, audit modifications, and use Sysmon to collect additional investigative context.

Understanding the MSCEP Registry Configuration

NDES stores its core SCEP configuration under the HKLM\SOFTWARE\Microsoft\Cryptography\MSCEP registry key. These settings identify the issuing CA and certificate templates used for enrollment and control other aspects of NDES operation. Because they directly influence how certificate requests are processed, unauthorized changes could alter enrollment behavior without modifying the NDES application itself.

Enrollment Templates

NDES uses the following registry values to identify the certificate templates used for SCEP enrollment.

HKLM\SOFTWARE\Microsoft\Cryptography\MSCEP\EncryptionTemplate
HKLM\SOFTWARE\Microsoft\Cryptography\MSCEP\GeneralPurposeTemplate
HKLM\SOFTWARE\Microsoft\Cryptography\MSCEP\SignatureTemplate
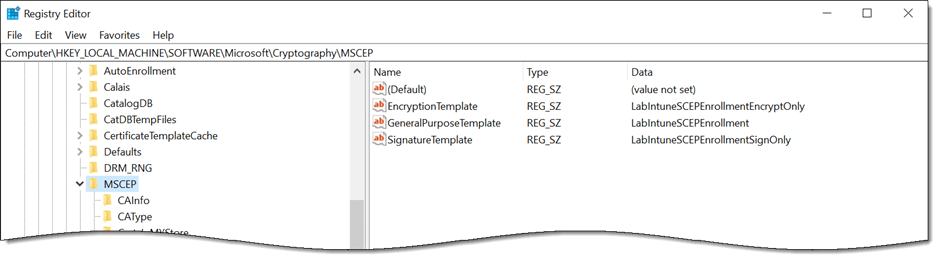
MSCEP registry key with the EncryptionTemplate, GeneralPurposeTemplate, and SignatureTemplate values

In many deployments, all three values reference the same template. If the environment supports distinct signature, encryption, or general-purpose enrollment scenarios, each value can reference a template designed for that specific purpose.

Additional MSCEP Settings

The MSCEP key contains more than certificate template assignments. Its CAInfo and CAType subkeys identify the CA to which NDES submits requests, while other subkeys control settings such as the hash algorithm and capabilities advertised to SCEP clients.

Information Disclosure and Reconnaissance

The default permissions for the MSCEP registry key are inherited from HKLM\SOFTWARE, which grants the local Users group read access. This allows locally authenticated users, as well as users granted remote registry access, to read the template names and CA configuration. Template names can aid reconnaissance, as an attacker can query Active Directory for the corresponding template definitions and evaluate their configurations against known AD CS escalation techniques. The CAInfo subkey can also disclose the internal fully qualified domain name of the issuing CA. Restricting access to the MSCEP key reduces unnecessary exposure of this information.

Why the MSCEP Key Is an Effective Monitoring Target

After NDES is deployed to production, these values should change only during planned reconfiguration. This makes the MSCEP key a high-value, low-noise monitoring target. Legitimate modifications should be rare and documented, while any unexpected change warrants immediate investigation.

Before You Begin

The changes described in this article modify access permissions and configure auditing for registry settings that NDES requires. An incorrect service identity, incomplete allowlist, or unsupported environmental assumption can prevent certificate enrollment. Test these changes in a nonproduction environment first, confirm that you have a working backup and rollback procedure, and validate successful enrollment before applying them broadly. Adapt the examples to your environment and follow your organization’s change management and security review processes.

In addition, be sure to back up the configuration before making any changes. A full server backup or a virtual machine snapshot is helpful. However, administrators can perform additional steps to save information before altering the default settings.

Determine the NDES Service Account

The permissions applied below grant access to the account used by the SCEP application pool. Confirm this account before proceeding by opening IIS Manager (inetmgr.exe), expanding the IIS server, and selecting Application Pools. Highlight the SCEP application pool and note the account shown in the Identity column.
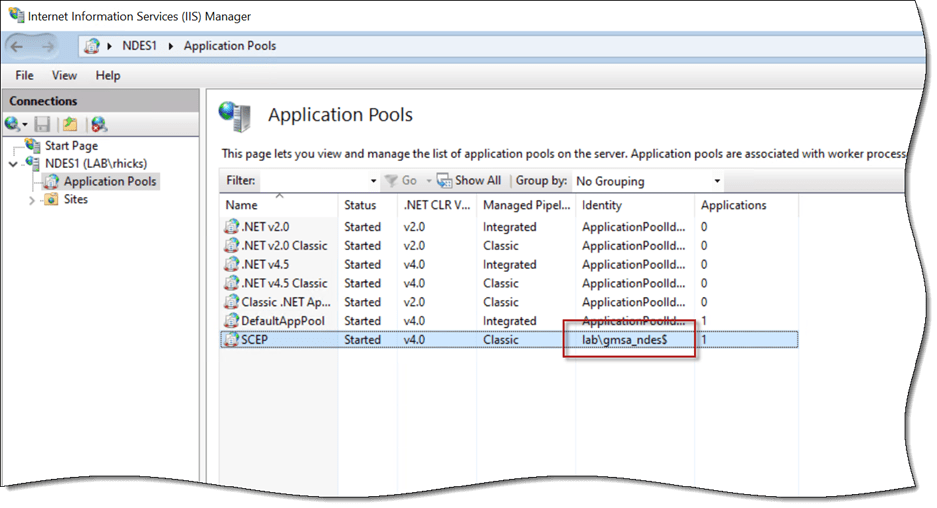
IIS Manager application pools showing the SCEP application pool identity

Back Up the Current Permissions

A registry export with reg.exe captures data but not the security descriptor, so it is not a rollback for this change. Run the following PowerShell commands to capture the descriptor in SDDL format instead.

$Key = 'HKLM:\SOFTWARE\Microsoft\Cryptography\MSCEP'
(Get-Acl -Path $Key -Audit).Sddl | Out-File -FilePath .\mscep-acl-backup.txt -Encoding utf8

The rollback process is covered later in this post.

Restricting Access to the MSCEP Key

For a dedicated NDES server, restrict the MSCEP key to SYSTEM, the local Administrators group, and the identity used by the SCEP application pool. All other access entries should be removed, including the inherited Read permission for the local Users group. If another service identity requires access in your environment, such as a domain service account used by the Intune Certificate Connector, account for it in both the explicit access rules and the allowlist before applying the changes.

Administrators must retain full control. Even if the Administrators entry were removed, a local administrator could exercise the necessary privileges to take ownership of the key and rewrite its permissions. The ACL therefore reduces unnecessary access but does not provide a security boundary against a local administrator or an attacker with equivalent privileges. This is why the auditing described in the next section is an important complementary control.

Important Note: Registry values do not carry their own security descriptors, so the permissions applied here govern the MSCEP key, every value in it, and every subkey beneath it. The service identity is granted full control rather than read because NDES writes to this key during normal operation, and read-only access will break it.

Removing Inheritance

The inherited entries from HKLM\SOFTWARE are where the broad access comes from, so they must be removed first. On the NDES server, open an elevated PowerShell command window and run the following commands.

$Acl = Get-Acl -Path $Key -Audit
$Acl.SetAccessRuleProtection($True, $False)

The -Audit parameter reads the system access control list (SACL) and the discretionary access control list (DACL), so both can be updated and committed in a single write later. The second parameter of SetAccessRuleProtection is set to false, which discards the inherited entries rather than converting them to explicit copies. This approach is intentional. Inherited entries cannot be removed with the PurgeAccessRules method, so preserving them would leave the broad grants in place and defeat the entire exercise. No explicit deny entry is required anywhere in this process. After this change, the local Users group has no access to the key at all.

Granting Explicit Access

Breaking inheritance also removes the SYSTEM and Administrators grants, so our explicit entries will replace them. Well-known security identifiers (SIDs) are used instead of account names, so this works correctly on non-English Windows installations.

$ServiceIdentity = 'corp\gmsa_ndes$'   # or 'corp\svc_ndes' if using a domain service account
$Sid = (New-Object System.Security.Principal.NTAccount($ServiceIdentity)).Translate([System.Security.Principal.SecurityIdentifier])
ForEach ($Identity in @('S-1-5-18', 'S-1-5-32-544', $Sid.Value)) {
    $Trustee = New-Object System.Security.Principal.SecurityIdentifier($Identity)
    $Acl.AddAccessRule((New-Object System.Security.AccessControl.RegistryAccessRule($Trustee, 'FullControl', 'ContainerInherit', 'None', 'Allow')))
}

S-1-5-18 is the well-known SID for SYSTEM, and S-1-5-32-544 is the well-known SID for the local Administrators group. ContainerInherit ensures the rights propagate to the subkeys.

Removing Unapproved Access Entries

The remaining explicit entries are evaluated against an allowlist, and anything that does not belong to those three identities is purged.

$AllowedSids = @('S-1-5-18', 'S-1-5-32-544', $Sid.Value)
ForEach ($Entry in ($Acl.Access | Where-Object { -not $_.IsInherited } | Select-Object -ExpandProperty IdentityReference -Unique)) {
    If ($Entry -is [System.Security.Principal.SecurityIdentifier]) {
        $EntrySid = $Entry
}
Else {
        $EntrySid = $Entry.Translate([System.Security.Principal.SecurityIdentifier])   
}
   
If ($AllowedSids -notcontains $EntrySid.Value) {
        $Acl.PurgeAccessRules($EntrySid)   
}
}

Sweeping against an allowlist rather than purging a fixed list of known principals removes application capability SIDs, CREATOR OWNER, any application pool entry that no longer matches the current SCEP application pool service account, and anything left over from previous administrative changes, without enumerating them in advance. It also makes the operation repeatable, so running it a second time on an already hardened server produces the same result.

Important Note: This code uses SID comparison. Identity references can be returned as either an NTAccount or a SecurityIdentifier, depending on whether the account resolves, so comparing by name will silently miss orphaned entries.

Auditing Changes to the MSCEP Key

Restricting the ACL reduces unnecessary access, but it cannot prevent a local administrator from taking ownership or rewriting the permissions. Auditing provides a complementary detective control by recording attempts to modify the key.

Add the Registry Audit Rule

To enable auditing, add an audit rule to the MSCEP key’s SACL that records successful and failed attempts by any identity to modify its values, subkeys, or permissions. Then commit the DACL and SACL together.

$Everyone = New-Object System.Security.Principal.SecurityIdentifier('S-1-1-0')
$AuditRule = New-Object System.Security.AccessControl.RegistryAuditRule($Everyone, 'SetValue, CreateSubKey, Delete, ChangePermissions, TakeOwnership', 'ContainerInherit', 'None', 'Success, Failure')
$Acl.AddAuditRule($AuditRule)
Set-Acl -Path $Key -AclObject $Acl

The audited operations are limited to changes. Specifically, setting a value, creating or deleting a subkey, changing permissions, and taking ownership. Reads are intentionally not audited. The three identities that still have access read these values routinely, so auditing that activity would generate excessive noise. Note that failure auditing applies only to the listed modification rights, so a denied read attempt will not be logged.

In addition, TakeOwnership and ChangePermissions are included deliberately because an attempt to alter the key’s security descriptor could indicate that someone is trying to weaken or bypass the applied controls. These operations should be rare after deployment and warrant investigation when they are not associated with an approved administrative change.

Recycle the SCEP Application Pool

Once the permissions are committed, recycle the SCEP application pool to close any existing registry handles and ensure the worker process reopens the MSCEP key under the new access controls.

Restart-WebAppPool -Name SCEP

Enable the Registry Audit Subcategory

An audit rule on its own does not generate events. The Object Access category must have the Registry subcategory enabled before Windows will write anything to the Security event log. Confirm the current setting by running the following command.

auditpol.exe /get /subcategory:"{0CCE921E-69AE-11D9-BED3-505054503030}" /r

The subcategory is referenced by GUID rather than by name for locale independence. If it is not enabled, enable it through Group Policy under Advanced Audit Policy Configuration > Object Access > Audit Registry rather than setting it locally, so the setting survives and applies consistently across your NDES infrastructure.

Recommended Security Alerts

With the Registry audit subcategory and the SACL configured as described, creating, deleting, or modifying a registry value under the MSCEP key generates event ID 4657 in the Security event log, identifying the account, the value name, and both the old and new data. That last detail is what makes the event immediately actionable. You do not have to look up what the template was supposed to be, because the event tells you what it was and what it was changed to.

My recommendation is to alert on every event ID 4657 associated with EncryptionTemplate, GeneralPurposeTemplate, or SignatureTemplate values rather than attempting to tune out individual processes or accounts. These values should remain static after deployment, so their expected change volume is zero. Monitor modifications elsewhere under the MSCEP path as well but establish a baseline before treating every such event as an alert because some NDES configurations may update other values or subkeys during normal operation.

Additional Alerts

Two additional events are worth correlating when one of these fires:

  • Event ID 4670 records a change to the permissions on the object. On a hardened key, this is a strong signal, since it means someone modified the ACL you just applied.
  • An application pool recycle or an IIS restart shortly after a value change is the corroborating signal. Because NDES caches the template configuration in the worker process, a substituted template does not take effect until the SCEP application pool or server restarts. An attacker seeking immediate activation would therefore need to trigger a recycle or restart, creating another potentially observable event. Otherwise, the change could take effect later during a routine recycle or restart.

Add Process Context with Sysmon

Security event ID 4657 identifies the account, process name, process ID, registry value, and old and new data associated with a change. However, it does not provide the full command line, process lineage, hashes, or surrounding activity needed for a more complete investigation. The System Monitor (sysmon.exe) utility from the Microsoft Sysinternals suite supplements the Security event log with this information.

Sysmon is not a replacement for SACL. The Security event records the authorization decision as Windows made it, which is the authoritative record. Sysmon records the process lineage around that decision. The two sources are complementary. Sysmon can capture the process that triggers an application pool recycle or an IIS restart when that activity matches the configured process creation rules.

Sample Sysmon Configuration for NDES

I have published a sample Sysmon configuration for NDES servers on GitHub. It is available here. This targeted configuration monitors SCEP enrollment settings, IIS application pool activity, registration authority certificates and private keys, credential access, and selected AD CS, certificate store, IIS, and operating-system security events relevant to an NDES deployment. It is not intended to serve as a general enterprise baseline. You can run it as a standalone configuration on an NDES server or merge its rule groups into an existing baseline such as SwiftOnSecurity or Olaf Hartong sysmon-modular.

Install or Update Sysmon

After reviewing and testing the sample configuration, install Sysmon or apply the configuration to an existing Sysmon deployment. To install Sysmon, open an elevated command window and run the following command.

sysmon.exe -accepteula -i sysmon-ndes.xml

To update an existing installation and confirm the active configuration, run the following commands.

sysmon.exe -c sysmon-ndes.xml
sysmon.exe -c

Sysmon events are written to the following event log location.

Applications and Services Logs > Microsoft > Windows > Sysmon > Operational.

Sysmon Monitoring Coverage

The configuration is centered on detecting changes to security-sensitive registry locations. The remaining rules capture the process, file, network, and system activity needed to investigate those changes.

  • Registry events 12, 13, and 14 cover the MSCEP key and its subkeys using a contains condition so both the native and WOW6432Node paths are captured. The same rule group covers the Certificate Services configuration key, machine certificate stores and trust anchors, SCHANNEL and TLS configuration, IIS service configuration, and common persistence locations.
  • Process creation events capture the tools used to make these changes, including reg.exe, regedit.exe, certutil.exe, appcmd.exe, and iisreset.exe. Tools such as appcmd.exe and iisreset.exe, as well as PowerShell commands such as Restart-WebAppPool, can recycle the SCEP application pool or restart IIS, allowing a modified template configuration to take effect. Sysmon can capture these actions when the initiating process and command line match the configured process-creation rules. PowerShell Script Block Logging provides additional visibility into commands executed within an existing PowerShell session, which might not be captured as separate Sysmon process-creation events.
  • Process access events are restricted to handle requests against LSASS with the access masks commonly associated with credential dumping. On a host that holds registration authority private keys and runs under a gMSA identity, this is the single highest-value rule.
  • File creation and deletion events cover the private key containers under Crypto\RSA, Crypto\Keys, and Crypto\PCPKSP, the IIS configuration directory, and certificate file extensions. Web content extensions such as .aspx and .ashx are also included, because a file with one of those extensions appearing under the NDES site is a strong indicator of a web shell.
  • Network connection events are purposefully scoped to scripting hosts and file transfer utilities rather than everything. An NDES server constantly talks to the CA and enrolling clients, and logging all of it produces excessive noise and provides little insight.
  • Named pipe, WMI, and process tampering events are also included. Legitimate volume for these is close to zero on a dedicated NDES server, so they are logged in full.

Note: The registry rule group includes an exclusion for the highest-volume legitimate writers, such as services.exe, svchost.exe, and TrustedInstaller.exe, as well as CreateKey events. Without those exclusions, useful events are buried within minutes. However, broad process-based exclusions can create visibility gaps. Administrators should validate that those exclusions do not suppress meaningful changes to the monitored paths.

Correlating Sysmon and Security Log Events

When a template value is modified, the Security event log records event ID 4657 with the account, value name, and old and new data. Sysmon records event ID 13 for the same operation, including the image path and process GUID associated with the write. If Sysmon also captured the corresponding process-creation event, the process GUID can be used to correlate event ID 13 with event ID 1, which provides the full command line and parent-process information. The Security event identifies the audited account and registry change, while Sysmon supplies richer process lineage and surrounding activity.

Sysmon event recording a change to the MSCEP registry key

Sysmon Deployment Considerations

Before deploying this configuration, confirm that it is compatible with your installed Sysmon version and existing monitoring baseline. Test it on a representative NDES server first, then review the resulting event volume and adjust only those rules that conflict with known, legitimate activity.

  • Confirm the schema version supported by your installed Sysmon build by running
    sysmon.exe -s before deployment. The sample configuration uses schema version 4.90 and therefore requires Sysmon 15 or later.
  • The FileBlockExecutable rules actively block matching executable files rather than merely recording their creation. Review and test these rules carefully before deploying the configuration in production.
  • If you already run a Sysmon baseline, merge these rule groups into it rather than installing this configuration over the top of it. Installing a new configuration replaces the existing one entirely.
  • Forward both the Sysmon Operational event log and the Security event log to your Security Information and Event Management (SIEM) platform. Local event logs on a compromised server hosting an Internet-published SCEP endpoint are of limited investigative value, and an alert that nobody receives provides little protection.
  • Validate the configuration in a lab first. Sysmon rule evaluation order is not always intuitive, and an overly broad include rule on a busy server can generate a surprising amount of data.

NDES Operational Considerations

Tightening permissions on a key that a running service depends on has consequences worth understanding before you make these changes in production.

  • If the Intune Certificate Connector service runs as a custom account rather than SYSTEM, add that account to the allowlist and grant it read access. Check the logon account on the connector service before you begin. In this scenario, I recommend running the Intune Certificate Connector as SYSTEM to follow security best practices.
  • If you change the SCEP application pool identity later, NDES will fail until the key permissions are updated to include the new identity. These permissions are aligned to a specific account, so any change to that account requires a corresponding change here.
  • If you operate multiple NDES servers, apply these changes to all of them to ensure full coverage.
  • Document any planned change to the template configuration in your change management process. If you alert on these events as recommended, someone will need to close the ticket the alert generates.

Validate Permissions, Auditing, and Enrollment

Run the following PowerShell command to verify the resulting access rules.

(Get-Acl -Path $Key).Access | Format-Table IdentityReference, RegistryRights, IsInherited

PowerShell output of the MSCEP registry key permissions

Only SYSTEM, BUILTIN\Administrators, and the NDES service account identity should be listed, and none of the entries should be inherited. Next, run the following command to confirm the audit rule is present.

(Get-Acl -Path $Key -Audit).Audit

PowerShell output of the MSCEP registry key audit settings

With the Registry audit subcategory enabled, perform a controlled test in a lab by changing a template value and recycling the SCEP application pool. Verify that event ID 4657 appears in the Security event log and includes the expected old and new values.

Security event ID 4657 recording a registry value change

Event ID 4657 details with the old and new registry values

If event ID 4657 does not appear in the Security event log after you modify a registry value under the MSCEP key, confirm that the Registry audit subcategory is enabled.

auditpol.exe /get /subcategory:"{0CCE921E-69AE-11D9-BED3-505054503030}"

auditpol output showing the Registry audit subcategory setting

If you deployed the Sysmon configuration, confirm it is loaded and generating events. Sysmon events are recorded in the Applications and Services Logs > Microsoft > Windows > Sysmon > Operational event log. The log should include events related to the test, including the registry value modification. Depending on how the application pool was recycled and which process-creation rules are enabled, it might also contain the process that initiated the recycle.

Sysmon event for the SCEP application pool recycle

You will also find events containing process creation details, including the full command line, process ID, parent process ID, and related information.

Sysmon process creation event details

Sysmon process creation event showing the command line and parent process

Finally, perform a device enrollment. Certificate enrollment should remain unaffected by these changes, and confirming successful enrollment after making these changes is essential before returning the NDES server to production.

Restore the Previous Registry Permissions

If enrollment breaks and the cause is not immediately obvious, administrators can restore the security descriptor captured earlier by running the following PowerShell commands.

$Sddl = Get-Content -Path '.\mscep-acl-backup.txt' -Raw
$Acl = Get-Acl -Path $Key -Audit
$Acl.SetSecurityDescriptorSddlForm($Sddl.Trim())
Set-Acl -Path $Key -AclObject $Acl
Restart-WebAppPool -Name SCEP

In practice, the most common cause of failure is granting access to the wrong service identity. This is why confirming the application pool identity is the first step in this process. Administrators should not skip this validation step.

Summary

The MSCEP registry values determine which certificate templates NDES uses for SCEP enrollment. An attacker with administrative access to the NDES server could modify these values and redirect enrollment to an unintended template without creating an obvious service failure. Restricting access to the MSCEP key reduces unnecessary exposure, while registry auditing and Sysmon provide visibility into unauthorized changes and the processes responsible for them. Forward these events to your SIEM, configure alerts for unexpected modifications, and validate the detection workflow before relying on it in production.

Additional Information

Sample Sysmon Configuration for NDES on GitHub

Download Sysmon from Microsoft Sysinternals

Microsoft NDES Information Disclosure: Detection and Remediation

Get-NdesNtlmDisclosure PowerShell Script on GitHub

Configure Infrastructure to Support SCEP with Microsoft Intune

Publish NDES with Microsoft Entra Application Proxy

Always On VPN Authentication Failed Reason Code 16

Strong authentication is essential for remote access to on-premises resources over the public Internet. Using the Protected Extensible Authentication Protocol (PEAP) in combination with user certificates issued by the organization’s internal certification authority (CA) provides high assurance for remote user authentication. It includes the added benefit of making the Always On VPN connection completely seamless for the user, as their certificate is presented to the authentication server transparently during VPN connection establishment. Using PEAP with user certificates is the recommended authentication method for Always On VPN deployments.

Reason Code 16

When configuring Always On VPN to use PEAP with client authentication certificates, administrators may encounter a scenario in which a user has a valid certificate. Yet, their authentication request is rejected by the Network Policy Server (NPS) server when attempting to connect remotely. Looking at the Security event log on the NPS server, administrators will find a corresponding event ID 6273 in the Network Policy Server task category from the Microsoft Windows security auditing event source. In the Authentication Details section, you’ll find that the reason code for the failed request is Reason Code 16, with the following reason specified.

“Authentication failed due to a user credentials mismatch. Either the user name provided does not map to an existing user account or the password was incorrect”.

Password Incorrect?

The reason code indicates the user may have entered an incorrect password. However, the user does not enter their password when using PEAP with client authentication certificates, so there’s no chance the password was entered incorrectly.

TPM

I have increasingly encountered this scenario with many customers deploying Always On VPN over the last year or so. This error is often caused by a known issue with older TPM models. Specifically, those with a TPM specification sub-version of 1.16 and earlier. You can view these TPM details by opening the Windows Settings app and entering ‘security processor’ in the search field.

Workaround

These older TPM models seem to have an issue with RSA-PSS signature algorithms, as described here. If possible, administrators should upgrade devices with older TPM versions to ensure the highest level of security and assurance for their remote users. However, in cases where that is not feasible, administrators can remove RSA-PSS signature algorithms from the registry, which forces the use of a different signature algorithm and seems to restore functionality.

To do this, open the registry editor (regedit.exe) and navigate to the following registry key.

HKLM\SYSTEM\CurrentControlSet\Control\Cryptography\
Configuration\Local\SSL\00010003\

Double-click the Functions entry and remove the following algorithms from the Value data section.

  • RSAE-PSS/SHA256
  • RSAE-PSS/SHA384
  • RSAE-PSS/SHA512

Once complete, reboot the device and test authentication once again.

Intune Proactive Remediation

Administrators using Intune Proactive Remediation will find detection and remediation scripts to make these changes published on GitHub.

Detect-RsaePss.ps1

Remediate-RsaePss.ps1

Additional Information

Windows TPM 2.0 Client Authentication in TLS 1.2 with RSA PSS

Always On VPN NPS Auditing and Logging

Always On VPN NPS RADIUS Configuration Missing

Always On VPN NPS Load Balancing

SSL and TLS Training for Always On VPN Administrators

Understanding Transport Layer Security (TLS) is essential for Always On VPN administrators. TLS (formerly Security Sockets Layer, or SSL) is used not only for Secure Socket Tunneling Protocol (SSTP), the protocol of choice for the Always On VPN user tunnel in most deployments, but many other technologies such as secure websites and email, Remote Desktop Protocol (RDP), secure LDAP (LDAPS), and many more. High-quality, affordable TLS training is challenging to find, however.

UPDATE! This course has been further discounted for a limited time. Details below!

Practical TLS

Thankfully, Ed Harmoush from Practical Networking has a fantastic training course called Practical TLS that meets these requirements. It is the most comprehensive TLS training course I’ve seen and is surprisingly affordable too!

Course Content

The Practical TLS training course includes the following modules.

  • Module 1 – SSL/TLS Overview (free preview!)
  • Module 2 – Cryptography
  • Module 3 – x509 Certificates and Keys
  • Module 4 – Security through Certificates
  • Module 5 – Cipher Suites
  • Module 6 – SSL/TLS Handshake
  • Module 7 – TLS Defenses

TLS 1.3

The Practical TLS training course does not yet include a module on the newest TLS protocol, TLS 1.3. However, it is due out imminently! Ed is working on the content as we speak, and a preview module is included in the course today. Look for the final TLS 1.3 module soon.

Bonus Content

In addition to excellent TLS training, the course includes free OpenSSL training! Administrators working with certificates in non-Microsoft environments are sure to find this helpful. Understanding OpenSSL will benefit administrators working with network and security appliances such as firewalls and load balancers.

Enroll Now

The cost of the Practical TLS training course is regularly $297.00. It is a perpetual license, so you can view the content whenever you like and as often as you wish. You will also have access to future updates, such as the upcoming TLS 1.3 module. In addition, you can save $100.00 on the course by using promotional code RICHARDHICKS when you sign up. Don’t hesitate. Register for Practical TLS training now!

Special Discount

For a limited time, you can use the code PracticalTLS13 to get this entire course for just $49.00! This won’t last long, so register soon!

Additional Information

Practical Networking Blog

Practical TLS Training Course – $100 Off!

OpenSSL Training Course

Microsoft Always On VPN and TLS 1.3

Microsoft Always On VPN SSTP Security Configuration

Microsoft Always On VPN SSTP Certificate Renewal

Microsoft Always On VPN SSTP with Let’s Encrypt Certificates

Always On VPN SSTP Security Configuration

Always On VPN SSTP Security Configuration

When using Windows Server Routing and Remote Access Service (RRAS) to terminate Always On VPN client connections, administrators can leverage the Secure Socket Tunneling Protocol (SSTP) VPN protocol for client-based VPN connections. SSTP is a Microsoft proprietary VPN protocol that uses Transport Layer Security (TLS) to secure connections between the client and the VPN gateway. SSTP provides some crucial advantages over IKEv2 in terms of operational reliability. It uses the TCP port 443, the standard HTTPS port, which is universally available and ensures Always On VPN connectivity even behind highly restrictive firewalls.

TLS Certificate

When configuring SSTP, the first thing to consider is the certificate installed on the server. A certificate with an RSA key is most common, but for SSTP, provisioning a certificate with an ECDSA key is recommended for optimal security and performance. See the following two articles regarding SSTP certificate requirements and ECDSA Certificate Signing Request (CSR) creation.

Always On VPN SSL Certificate Requirements for SSTP

Always On VPN ECDSA SSL Certificate Request for SSTP

TLS Configuration

Much like IKEv2, the default TLS security settings for SSTP are less than optimal. However, SSTP can provide excellent security with some additional configuration.

TLS Protocols

There are several deprecated TLS protocols enabled by default in Windows Server. These include SSLv3.0, TLS 1.0, and TLS 1.1. They should be disabled to improve security for TLS. To do this, open an elevated PowerShell window on the VPN server and run the following commands.

New-Item -Path ‘HKLM:\SYSTEM\CurrentControlSet\Control\SecurityProviders\SCHANNEL\Protocols\SSL 3.0\Server\’ -Force

New-ItemProperty -Path ‘HKLM:\SYSTEM\CurrentControlSet\Control\SecurityProviders\SCHANNEL\Protocols\SSL 3.0\Server\’ -Name Enabled -PropertyType DWORD -Value ‘0’

New-Item -Path ‘HKLM:\SYSTEM\CurrentControlSet\Control\SecurityProviders\SCHANNEL\Protocols\TLS 1.0\Server\’ -Force

New-ItemProperty -Path ‘HKLM:\SYSTEM\CurrentControlSet\Control\SecurityProviders\SCHANNEL\Protocols\TLS 1.0\Server\’ -Name Enabled -PropertyType DWORD -Value ‘0’

New-Item -Path ‘HKLM:\SYSTEM\CurrentControlSet\Control\SecurityProviders\SCHANNEL\Protocols\TLS 1.1\Server\’ -Force

New-ItemProperty -Path ‘HKLM:\SYSTEM\CurrentControlSet\Control\SecurityProviders\SCHANNEL\Protocols\TLS 1.1\Server\’ -Name Enabled -PropertyType DWORD -Value ‘0’

Cipher Suites

Many weak TLS cipher suites and enabled by default in Windows Server. To further enhance security and performance, they can be optimized using a tool such as IIS Crypto. For example, consider prioritizing cipher suites that use ECDHE and GCM with ECDSA to improve security. Also, remove ciphers that use AES-256 to enhance scalability and performance.

Note: AES-256 does not provide any additional practical security over AES-128. Details here.

PowerShell Script

I have published a PowerShell script on GitHub that performs security hardening and TLS cipher suite optimization to streamline the configuration TLS on Windows Server RRAS servers. You can download the script here.

Validation Testing

After running the script and restarting the server, visit the SSL Labs Server Test site to validate the configuration. You should receive an “A” rating, as shown here.

Note: An “A” rating is not achievable on Windows Server 2012 or Windows Server 2012 R2 when using an RSA TLS certificate. A TLS certificate using ECDSA is required to receive an “A” rating on these platforms.

Additional Information

Always On VPN SSL/TLS Certificate Requirements for SSTP

Always On VPN ECDSA SSL Certificate Request for SSTP

Qualys SSL Labs Server Test Site

Always On VPN Protocol Recommendations for Windows Server RRAS

Microsoft SSTP Specification on MSDN

Always On VPN Device Tunnel and Custom Cryptography Native Support Now in Intune

Always On VPN Device Tunnel and Custom Cryptography Native Support Now in IntuneMicrosoft recently announced support for native Windows 10 Always On VPN device tunnel configuration in Intune. Previously administrators had to use the complicated and error-prone custom XML configuration to deploy the Windows 10 Always On VPN device tunnel to their clients. That is no longer required with this recent Intune update. In addition, administrators may now specify custom cryptography settings for IPsec Security Association (SA) parameters for IKEv2 for both device tunnel and user tunnel connections. This effectively eliminates the requirement to use custom ProfileXML for most deployment scenarios.

Device Tunnel Configuration in Intune

Follow the steps below to configure and deploy a Windows 10 Always On VPN device tunnel using the native Intune user interface.

Create Profile

1. Open the Microsoft Endpoint Manager admin center (devicemanagement.microsoft.com).
2. Navigate to Devices > Configuration Policies.
3. Click Create profile.
4. Choose Windows 10 and later from the Platform drop-down list.
5. Choose VPN from the Profile drop-down list.
6. Click Create.

Profile Settings

Proceed with the profile configuration as you would normally, providing the VPN connection name, VPN server name(s), and choosing the option to register IP addresses with internal DNS. Next use the following steps to define a device tunnel connection and specify custom cryptography for IPsec SA parameters for IKEv2.

Configure a Device Tunnel

1. Select IKEv2 from the Connection type drop-down list.
2. Click Enable in the Always On section.
3. Select Machine Certificates from the Authentication method section.
4. If the computer certificate is provisioned using Intune, select the client authentication certificate (not required if the computer certificate is provisioned using on-premises Active Directory).
5. Click Enable in the Device Tunnel section.

Define Custom Cryptography

Follow the steps below to implement minimum security baseline cryptography settings for IKEv2.

IKE Security Association Parameters

1. Select AES-128 from the Encryption algorithm drop-down list.
2. Select SHA2-256 from the Integrity check algorithm drop-down list.
3. Select 14 from the Diffie-Hellman group drop-down list.

Child Security Association Parameters

1. Select CBC-AES-128 from the Cipher transform algorithm drop-down list.
2. Select HMAC-SHA256-128 from the Authentication transform algorithm drop-down list.
3. Select 14 from the Perfect forward secrecy (pfs) group drop-down list.

Always On VPN Device Tunnel and Custom Cryptography Native Support Now in Intune

Important Note: The IPsec security association parameters outlined above are the minimum recommend security baseline for IKEv2 and are compatible with all supported versions of Windows Server RRAS. It is recommended that authenticated cipher suites (GCM) be used whenever possible. However, GCM ciphers are not supported for encryption prior to Window Server 1803. Administrators should review these security settings and adjust the parameters to meet their specific security requirements.

Server Configuration

When defining custom cryptography settings for IKEv2 for device tunnel deployment, it is critical that the server be configured using identical parameters. Failure to use matching cryptography settings on the client and server will result in error code 13868, which indicates an IPsec policy mismatch.

A PowerShell script to configure IKEv2 security association parameter minimum security baselines on the RRAS server as outlined above can be found here. The commands to make these changes on the Azure VPN gateway can be found in this post.

Caveats

While Microsoft has made great strides to ensure better support for Always On VPN configuration using the native Intune UI, there are a few critical settings are still not supported. In these scenarios the administrator must deploy Always On VPN using custom XML, as described here and here.

Custom Cryptography

IKEv2 custom cryptography settings are only exposed when IKEv2 is selected as the connection type. It appears that defining custom cryptography settings for IKEv2 when the connection type is set to Automatic is not supported at this time. If you wish to specify the Automatic connection type and use custom cryptography settings for IKEv2 you will need to deploy the device tunnel using custom ProfileXML.

IPv6

IPv6 routing when configuring split tunneling for Always On VPN in Intune is not supported.

Always On VPN Device Tunnel and Custom Cryptography Native Support Now in Intune

Additional Information

Windows 10 Always On VPN Policy Mismatch Error

Windows 10 Always On VPN Device Tunnel with Azure VPN Gateway

Windows 10 Always On VPN IKEv2 Load Balancing and NAT

Windows 10 Always On VPN IKEv2 Fragmentation

Windows 10 Always On VPN IKEv2 Security Configuration

Always On VPN Device Tunnel with Azure VPN Gateway

Always On VPN Device Tunnel with Azure VPN GatewayAlways On VPN is infrastructure independent, which allows for many different deployment scenarios including on-premises and cloud-based. In Microsoft Azure, the Azure VPN gateway can be configured to support Windows 10 Always On VPN client connections in some scenarios. Recently I wrote about using the Azure VPN gateway for Always On VPN user tunnels. In this post I’ll describe how to configure the Azure VPN gateway to support an Always On VPN device tunnel.

Limitations

There are a few crucial limitations that come with using the Azure VPN gateway for Always On VPN. Importantly, the Azure VPN gateway can support either user tunnels or device tunnels, not both at the same time. In addition, Azure supports only a single VPN gateway per VNet, so deploying an additional VPN gateway in the same VNet to support Always On VPN user tunnels is not an option.

Root CA Certificate

The Always On VPN device tunnel is authenticated using a machine certificate issued to domain-joined Windows 10 Enterprise edition clients by the organization’s internal Certification Authority (CA). The CA’s root certificate must be uploaded to Azure for the VPN gateway to authorize device tunnel connections. The root CA certificate can be exported using the Certification Authority management console (certsrv.msc) or via the command line.

Export Certificate – GUI

Follow the steps below to export a root CA certificate using the Certification Authority management console.

1. On the root CA server, open the Certification Authority management console.
2. Right-click the CA and choose Properties.
3. Select the CA server’s certificate and choose View Certificate.
4. Select the Details tab and click Copy to File.
5. Click Next.
6. Choose Base-64 encoded X.509 (.CER).

Always On VPN Device Tunnel with Azure VPN Gateway

7. Click Next.
8. Enter a location to save the file to.
9. Click Next, Finish, and Ok.

Export Certificate – Command Line

Follow the steps below to export a root CA certificate using the command line.

1. On the root CA server, open an elevated command window (not a PowerShell window).
2. Enter certutil.exe -ca.cert root_certificate.cer.
3. Enter certutil.exe -encode root.cer root_certificate_base64.cer.

Copy Public Key

1. Open the saved root certificate file using Notepad.
2. Copy the file contents between the BEGIN CERTIFICATE and END CERTIFICATE tags, as shown here. Use caution and don’t copy the carriage return at the end of the string.

Always On VPN Device Tunnel with Azure VPN Gateway

Point-to-Site Configuration

The Azure VPN gateway must be deployed as a Route-Based gateway to support point-to-site VPN connections. Detailed requirements for the gateway can be found here. Once the VPN gateway has been provisioned, follow the steps below to enable point-to-site configuration for Always On VPN device tunnels.

1. In the navigation pane of the Azure VPN gateway settings click Point-to-site configuration.
2. Click the Configure now link and specify an IPv4 address pool to be assigned to VPN clients. This IP address pool must be unique in the organization and must not overlap with an IP address ranges defined in the Azure virtual network.
3. From the Tunnel type drop-down list select IKEv2.
4. In the Root certificates section enter a descriptive name for the certificate in the Name field.
5. Copy and paste the Base64 encoded public key copied previously into the Public certificate data field.
6. Click Save to save the configuration.

Always On VPN Device Tunnel with Azure VPN Gateway

VPN Client Configuration

To support the Always On VPN device tunnel, the client must have a certificate issued by the internal CA with the Client Authentication Enhanced Key Usage (EKU). Detailed guidance for deploying a Windows 10 Always On VPN device tunnel can be found here.

Download VPN Configuration

1. Click Point-to-site configuration.
2. Click Download VPN client.
3. Click Save.
4. Open the downloaded zip file and extract the VpnSettings.xml file from the Generic folder.
5. Copy the FQDN in the VpnServer element in VpnSettings.xml. This is the FQDN that will be used in the template VPN connection and later in ProfileXML.

Create a Test VPN Connection

It is recommended to create a test VPN connection to perform validation testing of the Azure VPN gateway before provisioning an Always On VPN device tunnel broadly. On a domain-joined Windows 10 enterprise client, create a new VPN connection using IKEv2 with machine certificate authentication. Use the VPN server FQDN copied from the VpnSettings.xml file previously.

Always On VPN Device Tunnel with Azure VPN Gateway

Create an Always On VPN Connection

Once the VPN has been validated using the test profile created previously, an Always On VPN profile can be created and deployed using Intune, SCCM, or PowerShell. The following articles can be used for reference.

Deploy Always On VPN device tunnel using PowerShell

Deploy Always On VPN device tunnel using Intune

IKEv2 Security Configuration

The default IKEv2 security parameters used by the Azure VPN gateway are better than Windows Server, but the administrator will notice that a weak Diffie-Hellman (DH) key (Group 2 – 1024 bit) is used during IPsec phase 1 negotiation.

Always On VPN Device Tunnel with Azure VPN Gateway

Use the following PowerShell commands to update the default IKEv2 security parameters to recommended baseline defaults, including 2048-bit keys (DH group 14) and AES-128 for improved performance.

Connect-AzAccount
Select-AzSubscription -SubscriptionName [Azure Subscription Name]

$Gateway = [Gateway Name]
$ResourceGroup = [Resource Group Name]

$IPsecPolicy = New-AzVpnClientIpsecParameter -IpsecEncryption AES128 -IpsecIntegrity SHA256 -SALifeTime 28800 -SADataSize 102400000 -IkeEncryption AES128 -IkeIntegrity SHA256 -DhGroup DHGroup14 -PfsGroup PFS14

Set-AzVpnClientIpsecParameter -VirtualNetworkGatewayName $Gateway -ResourceGroupName $ResourceGroup -VpnClientIPsecParameter $IPsecPolicy

Note: Be sure to update the cryptography settings on the test VPN connection and in ProfileXML for Always On VPN connections to match the new VPN gateway settings. Failing to do so will result in an IPsec policy mismatch error.

Additional Information

Windows 10 Always On VPN User Tunnel with Azure VPN Gateway

Windows 10 Always On VPN IKEv2 Security Configuration

Windows 10 Always On VPN Device Tunnel Configuration using Microsoft Intune

Windows 10 Always On VPN Device Tunnel Configuration using PowerShell

Windows 10 Always On VPN Options for Azure Deployments

Windows 10 Always On VPN IKEv2 Features and Limitations

Microsoft Intune NDES Connector Setup Wizard Ended Prematurely

Microsoft Intune NDES Connector Setup Wizard Ended PrematurelyA Windows Server with the Network Device Enrollment Service (NDES) role can be provisioned on-premises to support certificate deployment for non-domain Windows 10 Always On VPN clients. In addition, the Microsoft Intune Connector must be installed and configured on the NDES server to allow Intune-managed clients to request and receive certificates from the on-premises Certification Authority (CA) server.

Setup Wizard Ended Prematurely

When installing the Microsoft Intune Connector, the administrator may encounter a scenario where the setup wizard fails with the following error message.

“Microsoft Intune Connector Setup Wizard ended prematurely because of an error. Your system has not been modified. To install this program at a later time, run Setup Wizard again. Click the Finish button to exit the Setup Wizard.”

Microsoft Intune NDES Connector Setup Wizard Ended Prematurely

Cryptographic Service Provider

This error can occur if the NDES server certificate template is configured to use the Key Storage Provider cryptography service provider (CSP). When configuring the certificate template for the NDES server, the Legacy Cryptography Service Provider must be used, as shown here.

Microsoft Intune NDES Connector Setup Wizard Ended Prematurely

Additional Information

Deploying Windows 10 Always On VPN with Intune using Custom ProfileXML

Windows 10 Always On VPN Device Tunnel Configuration using Microsoft Intune

Deploying Windows 10 Always On VPN with Microsoft Intune


Always On VPN SSTP Connects then Disconnects

Always On VPN SSTP Connects then DisconnectsWhen Always On VPN clients are configured to use the Secure Socket Tunneling Protocol (SSTP) with Windows Server Routing and Remote Access Service (RRAS), administrators may encounter a scenario in which a client can establish a VPN connection using SSTP successfully, but is then disconnected immediately. The system event log contains an entry with Event ID 6 from the RasSstp source that includes the following error message.

“The SSTP-based VPN connection to the remote access server was terminated because of a security check failure. Security settings on the remote access server do not match settings on this computer. Contact the system administrator of the remote access server and relay the following information.”

Always On VPN Connect and Disconnect with SSTP

Common Causes

The two most common causes of this issue are when SSTP is configured for SSL offload, and when a VPN client is on a network where SSL inspection is taking place.

SSTP Offload

The most common cause of this issue is when SSL offload is configured for SSTP on an external load balancer or application delivery controller (ADC). To prevent interception from a Man-in-the-Middle attack, the VPN client sends the certificate hash of the SSL certificate used when the VPN connection was established. If this information does not match what is configured on the RRAS server, the connection is assumed to be compromised and the connection is immediately dropped.

SSL Inspection

Another scenario where this issue may occur is when a VPN client is behind a network device configured to perform SSL deep-packet inspection (DPI). SSTP VPN clients will be unable to connect to the VPN server in this scenario.

Resolution

When offloading SSL to another device, the RRAS server must be configured to know which SSL certificate is being presented to remote clients. This information is stored in the following registry key.

HKLM:\SYSTEM\CurrentControlSet\Services\SstpSvc\Parameters\SHA256CertificateHash

However, this registry entry requires a binary value, which makes it a challenge to configure manually. To resolve this problem, it is recommended that the same SSL certificate installed on the load balancer/ADC also be installed on the VPN server (even though SSL will be offloaded). To do this, first import the SSL certificate and private key in to the Local Computer certificate store, then open the RRAS management console and perform the following steps.

  1. Right-click the VPN server and choose Properties.
  2. Select the Security tab.
  3. Uncheck Use HTTP in the SSL Certificate Binding section.
  4. Select the appropriate SSL certificate from the Certificate drop-down list (click View to verify).
  5. Click Apply.

This will add the correct SSL certificate information to the registry. Next, re-enable HTTP for SSL offload by performing the following steps.

  1. Check Use HTTP in the SSL Certificate Binding section.
  2. Click Apply.

PowerShell Configuration

If the SSL certificate cannot be installed on the VPN server, or to automate this configuration across multiple servers remotely, download and run the Enable-SstpOffload PowerShell script from my GitHub repository here and run the following command.

Enable-SSTPOffload -CertificateHash [SHA256 Certificate Hash of Public SSL Certificate] -Restart

For example…

Enable-SSTPOffload -CertificateHash “C3AB8FF13720E8AD9047DD39466B3C8974E592C2FA383D4A3960714CAEF0C4F2” -Restart

Additional Information

Windows 10 Always On VPN Load Balancing and SSL Offload

Windows 10 Always On VPN SSTP Load Balancing with F5 BIG-IP

Windows 10 Always On VPN SSL Certificate Requirements for SSTP

Windows 10 Always On VPN Protocol Recommendations for Windows Server RRAS


Always On VPN and IKEv2 Fragmentation

The IKEv2 protocol is a popular choice when designing an Always On VPN solution. When configured correctly it provides the best security compared to other protocols. The protocol is not without some unique challenges, however. IKEv2 is often blocked by firewalls, which can prevent connectivity. Another lesser know issue with IKEv2 is that of fragmentation. This can result in failed connectivity that can be difficult to troubleshoot.

IP Fragmentation

IKEv2 uses UDP for transport, and typically most packets are relatively small. The exception to this is when authentication takes place, especially when using client certificate authentication. The problem is further complicated by long certificate chains and by RSA keys, especially those that are greater than 2048 bit. If the payload exceeds 1500 bytes, the IP packet will have to be broken in to smaller fragments to be sent over the network. If an intermediary device in the path is configured to use a smaller Maximum Transmission Unit (MTU), that device may fragment the IP packets.

IP Fragmentation and Firewalls

Many routers and firewalls are configured to drop IP fragments by default. When this happens, IKEv2 communication may begin initially, but subsequently fail. This typically results in an error code 809 with a message stating the following.

“Can’t connect to [connection name]. The network connection between your computer and the VPN server could not be established because the remote server is not responding. This could be because one of the network devices (e.g. firewalls, NAT, routers, etc.) between your computer and the remote server is not configured to allow VPN connections. Please contact your Administrator or your service provider to determine which device may be causing the problem.”

Always On VPN error stating the remote server is not configured to allow VPN connections

Troubleshooting

When troubleshooting potential IKEv2 fragmentation-related connection failures, a network trace should be taken of the connection attempt on the client. Observe the packet sizes during the conversation, especially IKE_AUTH packets. Packet sizes exceeding the path MTU will have to be fragmented, as shown here.

Network trace showing fragmented IKE_AUTH packets that exceed the path MTU

Measuring Path MTU

Measuring the path MTU between the client and server can be helpful when troubleshooting fragmentation related issues. The mtupath.exe utility is an excellent and easy to use tool for this task. The tool can be downloaded here.

mtupath.exe output showing the measured path MTU between the VPN client and server

IKEv2 Fragmentation

To address the challenges with IP fragmentation and potential connectivity issues associated with network devices dropping fragmented packets, the IKEv2 protocol itself can be configured to perform fragmentation at the IKE layer. This eliminates the need for IP layer fragmentation, resulting in better reliability for IKEv2 VPN connections.

Both the server and the client must support IKEv2 fragmentation for this to occur. Many firewall and VPN vendors include support for IKEv2 fragmentation. Consult the vendor’s documentation for configuration guidance. For Windows Server Routing and Remote Access (RRAS) servers, the feature was first introduced in Windows Server 1803 and is supported in Windows Server 2019. Windows clients support IKEv2 fragmentation beginning with Windows 10 1803, including all versions of Windows 11.

Enabling IKEv2 Fragmentation

Windows clients support IKEv2 fragmentation by default. However, it must be enabled on the server via the registry. The following PowerShell command will enable IKEv2 fragmentation support on Windows Server 1803 and later.

New-ItemProperty -Path “HKLM:\SYSTEM\CurrentControlSet\Services\RemoteAccess\Parameters\Ikev2\” -Name EnableServerFragmentation -PropertyType DWORD -Value 1 -Force

A PowerShell script to implement IKEv2 fragmentation can be found on my GitHub here.

Validation Testing

Once IKEv2 fragmentation is configured on the VPN server, a network capture will reveal the IKE_SA_INIT packet now includes the IKEV2_FRAGMENTATION_SUPPORTED notification message.

Network trace showing the IKEV2_FRAGMENTATION_SUPPORTED notification in the IKE_SA_INIT packet

Additional Information

Always On VPN: Secure Remote Access for Windows

Always On VPN IKEv2 Security Configuration

IKEv2 Message Fragmentation (RFC 7383)

IEA Software MTU Path Scan Utility

Always On VPN Hands-On Training Classes

Always On VPN IKEv2 Connection Failure Error Code 800

Always On VPN administrators may encounter a scenario in which Windows 10 clients are unable to establish an IKEv2 VPN connection to a Windows Server Routing and Remote Access Service (RRAS) server or a third-party VPN device under the following conditions.

  1. The VPN connection is configured using ProfileXML.
  2. ProfileXML includes the <CryptographySuite> element.
  3. The VPN server is configured to use a custom IPsec policy.
  4. The VPN server supports only IKEv2.
  5. The <NativeProtocolType> in ProfileXML is set to Automatic.

When these specific conditions are met, the client will be unable to connect to the VPN server using IKEv2. The error message states:

The remote connection was not made because the attempted VPN tunnels failed. The VPN server might be unreachable. If this connection is attempting to use an L2TP/IPsec tunnel, the security parameters required for IPsec negotiation might not be configured properly.

Always On VPN IKEv2 VPN Connection Failure Error Code 800

In addition, the event log will include an error message from the RasClient source with event ID 20227 that includes the following error message.

The user [username] dialed a connection named [connection name] which has failed. The error code returned on failure is 800.

Always On VPN IKEv2 VPN Connection Failure Error Code 800

A manually configured VPN connection using IKEv2 will connect successfully under these same conditions, however.

IKEv2 Error Code 800

Error code 800 translates to ERROR_AUTOMATIC_VPN_FAILED, which is somewhat ambiguous. The error description is:

Unable to establish the VPN connection. The VPN server may be unreachable, or security parameters may not be configured properly for this connection.

Digging Deeper

A network trace of the IKEv2 VPN connection reveals the true source of the problem, which is a failure of the client and server to successfully negotiate an IKEv2 security association (SA). During the SA initiation process, the parameters offered by the client are unacceptable to the server, resulting in a NO_PROPOSAL_CHOSEN notification being returned by the server.

Always On VPN IKEv2 VPN Connection Failure Error Code 800

Custom Cryptography Settings Ignored

It appears that the Always On VPN connection ignores the custom cryptography settings defined in the CryptographySuite element in ProfileXML. However, this only occurs when the NativeProtocolType is set to Automatic. Presumably, this is a bug. 🙂

Workaround

As a workaround, set the NativeProtocolType to IKEv2. When NativeProtocolType is set to IKEv2, the VPN connection recognizes the IKEv2 parameters defined in the CryptographySuite element and the VPN connection will be established successfully.

Additional Information

Always On VPN IKEv2 Security Configuration

Always On VPN Certificate Requirements for IKEv2

Always On VPN IKEv2 Load Balancing with the KEMP LoadMaster Load Balancer