

Understanding Windows CLAT (WinCLAT) Event Logging

Windows CLAT (WinCLAT) allows IPv4-only applications to continue working on IPv6-only and IPv6-mostly networks by translating their IPv4 traffic to IPv6 for delivery to a NAT64 gateway. When troubleshooting WinCLAT, checking its current state provides only part of the picture. Windows also records events that help administrators understand when WinCLAT was enabled, how it discovered the NAT64 prefix, and when translation started or stopped. This post explains where to find these events, what they mean, and how they can assist with troubleshooting.

Contents

Locating WinCLAT Event Logs

WinCLAT records events in the Microsoft-Windows-IPxlatCfg/Operational event log. In Event Viewer, the log is located under Applications and Services Logs > Microsoft > Windows > IPxlatCfg > Operational Channel. The log is enabled by default.

IPxlatCfg operational event log.

You can also use PowerShell to display the most recent events.

Get-WinEvent -LogName 'Microsoft-Windows-IPxlatCfg/Operational' -MaxEvents 10 | Format-Table -Property TimeCreated, Id, Message -Wrap
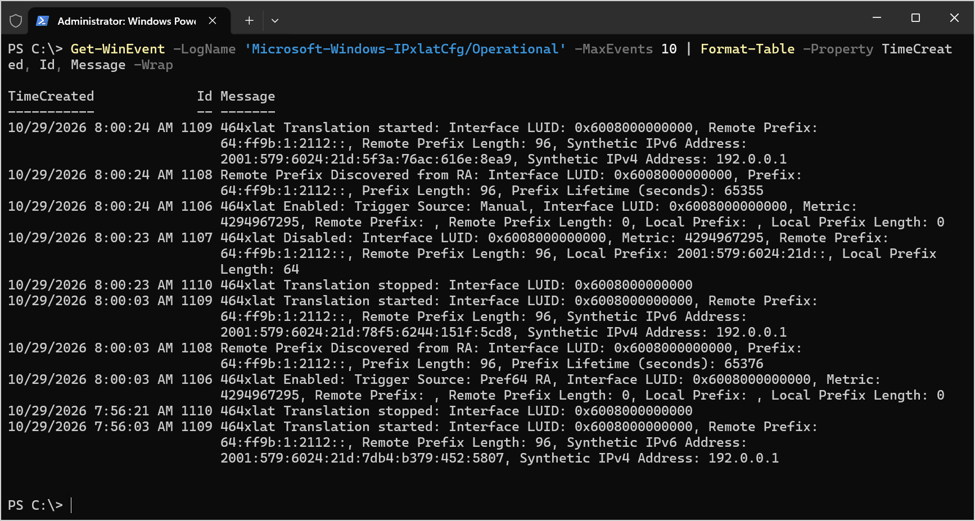
Recent WinCLAT events displayed using PowerShell.

Creating a WinCLAT Custom View

To make viewing WinCLAT event log entries easier, I recommend creating a custom view in Event Viewer. To do this, download the WinCLAT Event Viewer XML configuration file here. Next, open Event Viewer (eventvwr.msc) and perform the following steps.

  1. Right-click Custom Views and choose Import Custom View.
  2. Select the winclat-event.xml file downloaded previously and click Open.
  3. Review the Name and Description of the Custom View and click OK.
  4. Click OK.

WinCLAT events displayed in an Event Viewer custom view.

WinCLAT Event ID Reference

The following table shows the WinCLAT event IDs.

Event IDDescriptionWhen it is recorded
1106Instance enabledCLAT is enabled on an interface, automatically or manually
1107Instance disabledCLAT is disabled on an interface
1108Remote prefix discoveredCLAT discovers the NAT64 prefix for an interface
1109Translation startedCLAT begins translating on an interface
1110Translation stoppedCLAT stops translating on an interface
1111CLAT IPv6 address DAD failureThe CLAT IPv6 address fails duplicate address detection

Event ID 1106: Instance Enabled

Description: WinCLAT has been enabled on an interface. The event includes the trigger source, which identifies why WinCLAT was enabled, and the interface LUID.

When it is recorded: When WinCLAT is enabled on an interface, either automatically by Windows or manually by an administrator. The trigger source is one of the following.

CodeTrigger sourceMeaning
1Pref64 RAEnabled automatically because the network’s router advertisements include the PREF64 option
3No IPv4Enabled automatically because the interface has no IPv4 connectivity
5ManualEnabled manually with netsh.exe interface clat set instance interface=<ifIndex> state=enabled

Identifying the Trigger Source and Network Adapter

The event includes the trigger source, which identifies why WinCLAT was enabled, and the interface’s locally unique identifier (LUID). The interface LUID matches the NetLuid property returned by Get-NetAdapter. The following PowerShell commands list each event 1106 with its trigger source and adapter name.

$Adapters = @{}
Get-NetAdapter | ForEach-Object -Process { $Adapters[[uint64]$_.NetLuid] = $_.Name }
Get-WinEvent -FilterHashtable @{ LogName = 'Microsoft-Windows-IPxlatCfg/Operational'; Id = 1106 } |
    Select-Object -Property TimeCreated,
        @{ Name = 'TriggerSource'; Expression = { Switch ($_.Properties[0].Value) { 1 { 'Pref64 RA' } 3 { 'No IPv4' } 5 { 'Manual' } Default { "Unknown ($_)" } } } },
        @{ Name = 'Interface'; Expression = { $Adapters[[uint64]$_.Properties[1].Value] } }

Event ID 1107: Instance Disabled

Description: WinCLAT has been disabled on an interface.

When it is recorded: When WinCLAT is disabled on an interface. This can happen in any of the following cases.

  • AutoEnable is disabled (netsh.exe interface clat set global autoenable=disabled) or Permit is disabled (netsh.exe interface clat set global permit=disabled). Both settings disable any automatically enabled instances.
  • A manually enabled instance is disabled with netsh.exe interface clat set instance interface=<ifIndex> state=disabled.
  • The network adapter of an automatically enabled instance is restarted.

Event ID 1108: Remote Prefix Discovered

Description: WinCLAT has discovered the NAT64 prefix used for translation. The event includes the discovery source, prefix, prefix length, and prefix lifetime (seconds). The source is one of the following:

  • RA – The prefix was obtained from the PREF64 option in IPv6 router advertisements (RFC 8781).
  • DNS – The prefix was obtained by querying ipv4only.arpa against a DNS64 server (RFC 7050).

When it is recorded: When WinCLAT discovers the NAT64 prefix for an interface (normally following event 1106) and when a prefix discovered through DNS is refreshed at the end of its lifetime.

Event ID 1109: Translation Started

Description: WinCLAT has started translating IPv4 traffic on an interface. The event includes the remote prefix (NAT64 prefix), the CLAT (synthetic) IPv6 address, and the CLAT (synthetic) IPv4 address, which is assigned from the IPv4 Service Continuity Prefix 192.0.0.0/29 (RFC 7335), typically 192.0.0.1.

When it is recorded: When translation begins on an interface, which normally follows events 1106 and 1108, and when Windows restarts translation on an interface that remains enabled, such as after a network adapter restart.

Event ID 1110: Translation Stopped

Description: WinCLAT has stopped translating IPv4 traffic on an interface.

When it is recorded: When translation ends on an interface. It precedes event 1107 when an instance is disabled, and it is also recorded when Windows restarts translation on an interface that remains enabled. In that case, it is followed by event 1109.

Event ID 1111: WinCLAT IPv6 Address DAD Failure

Description: The WinCLAT IPv6 address failed duplicate address detection (DAD), meaning another node on the network is already using the address.

When it is recorded: When Windows generates a CLAT IPv6 address for an interface and duplicate address detection reports a conflict.

WinCLAT Event Logging Limitations

WinCLAT events describe changes to an instance’s state, but they do not identify the applications using WinCLAT or the destination IPv4 addresses those applications access. Administrators can use Sysmon to collect this additional information. See How to Identify Applications That Use Windows CLAT (WinCLAT) with Sysmon for more details.

Summary

WinCLAT event logging helps administrators understand how WinCLAT operates on individual network interfaces. The events record instance enablement and disablement, NAT64 prefix discovery, translation activity, and address conflicts. Reviewing this history alongside the current WinCLAT configuration and interface state provides a clearer picture when troubleshooting. For visibility into the applications and destination addresses associated with WinCLAT traffic, administrators can supplement these events with Sysmon.

Additional Information

Windows CLAT (WinCLAT) PowerShell Module on GitHub.com

Troubleshooting Windows CLAT (WinCLAT) with the WinCLAT PowerShell Module

Windows CLAT (WinCLAT) Frequently Asked Questions (FAQ)

WinCLAT resources at directaccess.richardhicks.com

Always On VPN Servers and Failover

When configuring Microsoft Always On VPN, one of the first and most crucial settings is defining the public hostname of the VPN server to which clients connect. If you’re deploying Always On VPN client configuration settings using Intune—either with the native VPN policy template or a custom XML profile—you’ll see that multiple server entries are supported. Intune even allows administrators to define a “default server.” At first glance, this might suggest that the client will try the default server first and automatically fail over to the others if it’s unavailable. Unfortunately, that’s not how it works.

Intune VPN Template

When using the native Intune VPN device configuration template, administrators will find multiple entry fields for the servers in the Base VPN section.

In the example below, the Global VPN entry is marked as ‘default’.

Custom XML

When defining VPN settings using XML configuration, administrators can also list multiple servers.

Interestingly, the VPNv2 CSP used by custom XML profiles doesn’t support the concept of a “default server” at all.

How It Really Works

Defining multiple servers in the Always On VPN profile does not enable automatic failover. The client connects only to the first server in the list. The so-called “default server” setting in Intune is ignored, and the GUI even allows you to mark all servers as default, which is meaningless.

However, the configuration isn’t entirely useless. If you define multiple servers, they’ll appear on the client side as manual options. If the first server becomes unavailable, the user can open the Settings app, navigate to the advanced settings of the Always On VPN profile, and select an alternate server to connect manually.

Summary

Although Intune and XML configurations allow multiple VPN servers, Always On VPN does not provide automatic failover. Clients only attempt to connect to the first server in the list, and the “default server” setting in Intune has no effect. Multiple entries are still useful, but only for manual server selection by end-users when the primary server is down. For true automated high availability and redundancy, consider an external solution such as Azure Traffic Manager.

Additional Information

Always On VPN Load Balancing

Always On VPN Multisite with Azure Traffic Manager

Always On VPN Disconnects in Windows 11

Always On VPN administrators migrating their endpoints to Windows 11 may encounter a scenario where Always On VPN randomly disconnects when the VPN profile is deployed using Microsoft Intune. The same configuration deployed to Windows 10 devices works reliably, however. In addition, Always On VPN profiles deployed using PowerShell (natively or with Configuration Manager) or Dynamic Profile Configurator (DPC) do not experience this problem.

Troubleshooting

Administrators troubleshooting this issue will find the root cause is associated with the Always On VPN profiles being removed and replaced each time the device syncs with Intune. This occurs even if there are no changes to the configuration. Removing and replacing the Always On VPN profiles on each device sync is unnecessary, of course, but is also highly disruptive to connected users.

Intune and XML

The Intune team identified the issue, and a fix was made available in the August update. However, many of you have reported the issue persists with some Windows 11 clients after installing the latest updates. Further investigation indicates that although the issue has been resolved when using Intune and the native VPN device configuration profile template, the problem still occurs when using the Custom device configuration template.

Workaround

Microsoft is aware of the issues with deploying Always On VPN client configuration settings using XML in Intune, but there’s no indication when or if they will fix it. Until then, administrators have two options to address this problem.

Native VPN Template

When deploying Always On VPN client configuration settings to Windows 11 endpoints, use the native VPN device configuration template, as shown here.

Intune native VPN device configuration template

Using the native VPN template does have some limitations, however. The following settings are not exposed using the native VPN template and can only be configured using XML.

XML

If you must use XML, I’ve had some success by ensuring the order and syntax of XML settings is exactly as Intune expects. Follow the steps below to confirm the XML settings order in your XML configuration file.

  1. Deploy your XML file with Intune.
  2. Run Get-VpnClientProfileXML.ps1 to extract the deployed XML settings.
  3. Compare the order of settings to your existing XML.
  4. Compare the syntax of all settings. For example, the <Servers> section should list the server FQDN twice, separated by a semi-colon.
  5. Make changes to ensure all settings in your XML are in the same order as the extracted XML.
  6. Publish a new XML configuration file using Intune and test.

I’ll caution you that this workaround doesn’t always work reliably. Some customers report that this solved their problems entirely, while others have indicated it does not. My testing shows the same results. Let us know in the comments below if this works for you!

Reference XML

I have published an Always On VPN XML configuration file on GitHub for reference. It includes all common settings using the order and syntax required to ensure reliable operation. As a reminder, the sample file includes many settings that aren’t required. It is published as guidance for reference only.

Additional Information

Always On VPN Windows 11 Issues with Intune

Always On VPN PowerShell Script Issues in Windows 11

Always On VPN Trusted Network Detection and Native Azure AD Join

Administrators deploying Microsoft Always On VPN are quickly learning that the native Azure Active Directory join (AADJ) model has significant advantages over the more traditional Hybrid Azure AD join (HAADJ) scenario. Native AADJ is much simpler to deploy and manage than HAADJ while still allowing full single sign-on (SSO) to on-premises resources for remote users. Intune even allows for the import of custom ADMX and ADML administrative templates, further reducing the dependency on on-premises Active Directory for device management.

Remote Management

Although devices aren’t joined to the domain, administrators may still wish to access those clients connected to their network for device discovery or to perform administrative tasks. However, when native AADJ clients connect via Always On VPN, the Public Windows firewall profile is assigned to the VPN tunnel adapter. The Public profile is, of course, more restrictive and blocks most management protocols by default.

Firewall Rules

While adding firewall rules to the Public profile to allow management protocols is possible, this isn’t recommended for security reasons. The Public profile is typically loaded when the device is on an untrusted network. Exposing management protocols on an insecure network is asking for trouble.

Domain Profile

Domain-joined or Hybrid AADJ endpoints will use the Domain Windows firewall profile. This profile is more permissive, allowing many standard management protocols by default. Also, administrators can add rules to allow additional access as required without increasing the risk for devices on untrusted networks.

Trusted Network Detection

So, the trick is to get a native AADJ endpoint to load the Domain profile for the VPN tunnel adapter when connected via Always On VPN. Trusted Network Detection is accomplished by using settings configured on the endpoint using the NetworkListManager Configuration Service Provider (CSP).

Intune and XML

There are two settings administrators can enable AADJ devices to detect a trusted network and load the Domain Windows firewall profile. Unfortunately, these settings can only be applied using Intune and the Custom XML template. Administrators will use the following OMA-URI settings.

AllowedTlsAuthenticationEndpoints

The AllowedTlsAuthenticationEndpoints policy setting defines the URL the device uses to validate a trusted network. The target must be an on-premises web server with a valid TLS certificate using HTTPS. The target must be a highly available internal resource inaccessible from the Internet. DirectAccess administrators will be quite familiar with this concept; it’s the Network Location Server (NLS)!

Use the following OMA-URI to configure the TLS authentication endpoint.

URI: ./Device/Vendor/MSFT/Policy/Config/
NetworkListManager/AllowedTlsAuthenticationEndpoints

String: <![CDATA[https://nls.corp.example.net]]>

ConfiguredTlsAuthenticationNetworkName

The ConfiguredTlsAuthenticationNetworkName policy setting is optional. Administrators can use this setting to provide a friendly name for the authenticated trusted network. The FQDN of the target resource (NLS) is used by default. However, using this setting overrides the default with something more meaningful.

Use the following OMA-URI to configure the TLS authentication network name.

URI: ./Device/Vendor/MSFT/Policy/Config/
NetworkListManager/ConfiguredTlsAuthenticationNetworkName

String: <Friendly network name>

Results

Once configured, you’ll find the Always On VPN tunnel adapter uses the Domain Windows firewall profile and an optional friendly network name.

Additional Information

Deploying Always On VPN with Intune using Custom XML and CSP

Always On VPN CSP Updates

Always On VPN and VpnStrategy with CSP

Always On VPN and VpnStrategy

NetMotion Mobility for DirectAccess Administrators – Split vs. Force Tunneling

Always On VPN supports a variety of VPN protocols for the user tunnel. Internet Key Exchange version 2 (IKEv2) and Secure Socket Tunneling Protocol (SSTP) are the most common. I wrote about the advantages and disadvantages of each in this post. To summarize, IKEv2 provides the highest security options but suffers from operational limitations. SSTP offers excellent security and is generally more reliable.

VpnStrategy

Always On VPN administrators must choose between IKEv2 and SSTP when configuring the Always On VPN user tunnel. Some administrators may prefer to use IKEv2 when available but then fall back to SSTP if it is not. To accomplish this requires editing the rasphone.pbk file and setting the value of VpnStrategy to 8, as described here.

Challenges

Unfortunately, setting the VpnStrategy value to 8 poses some challenges. Updating rasphone.pbk requires editing a text file on each endpoint post-deployment. Updating rasphone.pbk can be automated using the Update-Rasphone.ps1 script or Microsoft Intune proactive remediation.

Limitations

By default, Windows will overwrite the VpnStrategy setting in rasphone.pbk when fallback occurs. For example, setting VpnStrategy to prefer IKEv2 over SSTP will be reset to use SSTP first if a connection with IKEv2 fails. There’s a registry setting available that’s supposed to prevent this, but it doesn’t always work as expected.

Windows 11

There’s good news for administrators deploying Always On VPN on Windows 11. Microsoft recently introduced support for additional NativeProtocol types in XML. Specifically, VPN protocol preference can now be defined using the ProtocolList native protocol type. When using the ProtocolList native protocol type, each supported VPN protocol is listed in order of preference using the syntax shown below.

In addition, the RetryTimeInHours value defines the time Windows will try the last successful connection protocol. Setting this value to 0 overrides this and ensures the preferred protocol (the first protocol in the list) will always be attempted first.

SSTP Only

Previously the VPNv2CSP only supported IKEv2 or Automatic as values for the native protocol type. Windows 11 now supports SSTP as a native protocol type. Administrators configuring Always On VPN user tunnel connections using SSTP exclusively can now use this option.

Caveats

While the settings above are supported in both Windows 11 21H2 and 22H2, there are some known issues when enabling these settings. Specifically, when administrators define the ProtocolList value for the native protocol type, IKEv2 is always shown as the active protocol, even when an SSTP connection is established.

Also, if ProtocolList is used, the VPN connection cannot be managed using PowerShell. The VPN profile will not be displayed when running Get-VpnConnection at the time of this writing. Hopefully Microsoft will fix this soon.

Additional Information

Always On VPN CSP Updates

Always On VPN IKEv2 and SSTP Fallback

Always On VPN and Intune Proactive Remediation

Always On VPN Protocol Recommendations for Windows Server RRAS

Always On VPN IKEv2 Features and Limitations

Always On VPN and Device Sharing

Always On VPN client configuration settings are typically deployed in the user’s context. However, this presents a unique challenge when sharing a single device with multiple users who have an Always On VPN profile assigned to them. By design, Windows designates only a single user profile on a shared device to be “always on”. When multiple users with assigned Always On VPN profiles share the same machine, it could yield unexpected results.

Auto Trigger Profile

When an Always On VPN profile is provisioned to a user, Windows records information about this profile in the registry. Specifically, the Always On VPN profile’s name and GUID are recorded, as well as the user’s Security Identifier (SID) and the path to the rasphone.pbk file that contains the Always On VPN profile.

Multiple Users

When a new user logs on to a shared device and receives their Always On VPN profile, Windows overwrites this existing data in the registry with the current user’s information. Each time this user logs on, their Always On VPN connection will establish automatically. Any other users with Always On VPN profiles configured on the same shared device will no longer connect automatically after this. The most recently deployed Always On VPN profile will be designated the “always on” profile.

Connect Automatically

In the above scenario, any user with an assigned Always On VPN profile on the shared device can take over the “always on” designation by opening the VPN connection properties and checking the “Connect automatically” check box.

When this happens, this user will now own the “always on” profile, and other users on the shared device will no longer connect automatically.

Workarounds

If multiple users share a single device requiring Always On VPN connectivity, you have a few options.

Intune

If you are deploying Always On VPN client configuration settings using Intune, you must use the Custom device configuration profile template. Specifically, as shown here, you must deploy your XML configuration file using the ./Device/Vendor/MSFT/VPNv2/ OMA-DM URI.

Unfortunately, the native Intune VPN template does not support deploying Always On VPN profiles in the “all users” context.

PowerShell

When using PowerShell, either natively or with SCCM or another software deployment tool, administrators can use my Always On VPN deployment PowerShell script with the -AllUserConnection parameter.

PowerON DPC

When using PowerON Platforms’ Dynamic Profile Configurator (DPC) to deploy Always On VPN client configuration settings using on-premises Active Directory or via Intune, no changes are required. DPC deploys Always On VPN user profiles in the “all users” context by default.

Additional Information

New-AovpnConnection.ps1 PowerShell Script on GitHub

PowerON Platforms’ Dynamic Profile Configurator (DPC)

Always On VPN DPC with PowerON Platforms’ DPC

Always On VPN with Active Directory Group Policy

Windows Always On VPN is a workload explicitly designed to be implemented and managed using Microsoft Endpoint Manager/Intune. While this is the best way to deploy and manage Always On VPN client configuration settings, it is not the only way. Administrators can also use System Center Configuration Manager (SCCM) by deploying a PowerShell script and XML configuration file to configure Always On VPN. Of course, it’s always possible to run the PowerShell script on individual machines.

Group Policy

Until now, there have been few options for deploying and managing Windows Always On VPN using Active Directory and group policy. This presents a challenge for administrators who still rely on group policy to manage their endpoints. It is possible to deploy the PowerShell script and XML configuration file using a group policy startup script. However, there are many limitations to this approach. Administrators must learn to properly configure the XML file and manage any configuration updates post-implementation.

Always On VPN DPC

The folks at PowerON Platforms have developed the Always On VPN Dynamic Profile Configurator (DPC) to address these shortcomings. Always On VPN DPC allows administrators to deploy and manage Always On VPN client configuration settings using Active Directory and group policy. Their software comes with Active Directory group policy templates that include all the necessary settings and client software that manages the configuration on the endpoint.

Advanced Features

Always On VPN DPC includes advanced features not included in Microsoft Endpoint Manager/Intune or XML. Here’s a sample of helpful custom settings that can be configured using Always On VPN DPC.

  • VpnStrategy
  • Interface metrics
  • Route metrics
  • Dynamically updated Office 365 exclusion route list
  • IKE mobility settings
  • IPv6 routes
  • And more…

DPC and Intune

Microsoft recently announced support for importing custom ADMX files to Intune. This allows administrators to leverage Always On VPN DPC using Microsoft Endpoint Manager/Intune. More details here.

Videos

I’ve created a brief introduction video for PowerOn Platforms Always On VPN DPC on YouTube. Soon I’ll be releasing additional videos that cover the installation and configuration of Always On VPN DPC and some of its advanced features, so be sure to subscribe to my YouTube channel.

Learn More

Are you interested in learning more about PowerON Platforms Always On VPN DPC? Fill out the form below, and I’ll contact you with more information. In addition, you can visit aovpndpc.com to register for an evaluation license.

Special Thanks

I want to extend a special thank you to Leo D’Arcy and the entire team at PowerON Platforms for allowing me to preview this software before its wide release. Also, I’m honored that you have graciously accepted my input and feedback for this solution. I’m consistently amazed at how rapidly you’ve corrected issues and implemented new features at my behest. You are all amazing. Thanks again! 😁

Additional Information

AovpnDPC.com

Introducing PowerON Platforms Always On VPN DPC on YouTube.com

What’s New in Always On VPN DPC 3.0

Always On VPN DPC and Microsoft Endpoint Manager/Intune

Always On VPN Client Routes Missing

Choosing an Enterprise VPN

When configuring Always On VPN for Windows 10 and Windows 11 clients, administrators may encounter a scenario where an IPv4 route defined in Microsoft Endpoint Manager/Intune or custom XML is not reachable over an established Always On VPN connection. Further investigation indicates the route is added to the configuration on the endpoint but does not appear in the routing table when the connection is active.

Routing Configuration

When split tunneling is enabled, administrators must define routes to IP networks that are reachable over the Always On VPN connection. The method of defining these routes depends on the client configuration deployment method.

Endpoint Manager

Using Microsoft Endpoint Manager, administrators define IP routes in the Split Tunneling section of the configuration settings for the Always On VPN device configuration profile. Routes are defined by entering the destination prefix and prefix size. In this example, the 10.0.0.0/8 and 172.21.12.0/21 IPv4 networks are defined for routing over the Always On VPN tunnel.

Custom XML

Using custom XML deployed using Microsoft Endpoint Manager, System Center Configuration Manager (SCCM), or PowerShell, routes are defined in the XML file using the following syntax.

Client Configuration

Validate the routing configuration has been implemented on the endpoint successfully by running the following PowerShell command.

Get-VpnConnection -Name <Connection Name> | Select-Object -ExpandProperty Routes

As you can see here, the IPv4 routes 10.0.0.0/8 and 172.21.12.0/21 are included in the client’s Always On VPN configuration, as shown below.

Missing Route

However, after establishing an Always On VPN connection, the 172.21.12.0/21 network is not reachable. To continue troubleshooting, run the following PowerShell command to view the active routing table.

Get-NetRoute -AddressFamily IPv4

As you can see above, the only IPv4 route in the VPN configuration added to the routing table is the 10.0.0.0/8 network. The 172.21.12.0/21 IPv4 route is missing.

Network Prefix Definition

IPv4 routes missing from the Always On VPN client’s routing table result from incorrect network prefix definition. Specifically, the IPv4 route 172.21.12.0/21 used in the example here is not a valid network address. Rather, it is a host address in the 172.21.8.0/21 network, as shown below.

The Get-Subnet PowerShell cmdlet is part of the Subnet PowerShell module. To install this module, run the following PowerShell command.

Install-Module Subnet

Resolution

Using the example above, enabling access to the 172.21.12.0/21 subnet would require defining the IPv4 prefix in the routing configuration as 172.21.8.0/21. The moral of this story is always validate routing prefixes to ensure they are, in fact, network addresses and not host addresses.

Additional Information

Always On VPN Routing Configuration

Always On VPN Default Class-based Route and Microsoft Endpoint Manager/Intune

Always On VPN and Zero Trust Network Access (ZTNA)

Always On VPN and Zero Trust Network Access (ZTNA)

Zero Trust Network Access (ZTNA) is a term that administrators are likely familiar with, as it is one of the hottest marketing buzzwords in circulation today. ZTNA can mean different things depending on the deployment scenario. ZTNA is fundamentally about enforcing the principle of least privilege for endpoints connecting remotely to the corporate network when it comes to enterprise mobility and remote access.

Trusted Access

Historically, VPNs and even DirectAccess granted full, unrestricted network access to authenticated devices and users. Once the endpoint has an IP address, and in the absence of other controls (routing limitations, firewall access controls, etc.), the user could access any resource on the internal network. The rationale was that authenticated devices and users should be considered “trusted”.

Limitations

The Trusted Access model has some significant limitations. It assumes that all traffic from authorized users and devices is legitimate. However, if an endpoint is compromised, an attacker has broad access to the internal network, which is not ideal from a security perspective.

Zero Trust

Zero Trust Network Access is a concept where administrators define explicitly the minimum level of access required to support remote workers. Instead of granting full network access to the endpoint, controlling access using fine-grained policies is enforced on the VPN connection. Configuring limited network access for Always On VPN clients dramatically reduces exposure of the internal network to compromised endpoints.

ZTNA Management

There is a significant management burden associated with this approach, however. Administrators must identify each application requiring VPN access and determine all associated protocols and ports to be allowed, and internal resources to which they will communicate. Although this task isn’t difficult if clients require access to a small subset of internal resources, it can be a substantial undertaking if clients require access to many internal resources from numerous client applications.

Moving Targets

Making things more challenging is that application and network infrastructure often change constantly, requiring administrators to manage network access continually to ensure application availability. When adding new applications or changing the internal infrastructure, updating the configuration on all remote endpoints will be required.

Updating Always On VPN configuration for devices managed with Microsoft Endpoint Manager (formerly Intune) isn’t difficult. However, it can be more challenging when using PowerShell with System Center Configuration Manager (SCCM) or another endpoint management platform.

Traffic Filters

ZTNA can be configured with Always On VPN using Traffic Filters. With Traffic Filters, administrators can apply fine-grained access control for VPN traffic based on a combination of the following.

  • Source IP address (IP address, address range, or subnet)
  • Destination IP address (IP address, address range, or subnet)
  • Protocol (TCP, UDP, IP, etc.)
  • Source Port
  • Destination Port

Endpoint Manager Configuration

Configuring Traffic Filters for Always On VPN connections can be performed using Microsoft Endpoint Manager. Open the Endpoint Manager management console (https://endpoint.microsoft.com), navigate to the Always On VPN device configuration profile, then perform the following steps.

  1. Expand App and Traffic Rules.
  2. Click Add next to Network traffic rules for this VPN connection.
  1. Enter a descriptive name in the Name field.
  2. Select Split tunnel from the Rule type drop-down list.
  3. Enter “6” in the Protocol field.
  4. Enter “3389” in the Lower port and Upper port fields in the Remote port ranges section.
  5. Enter an IPv4 address in the Lower IPv4 address field.
  6. Enter an IPv4 address in the Upper IPv4 address field. Enter the same IPv4 address as the lower address to specify a single host.
  7. Click Save.

The example above shows a traffic filter restricting access to TCP port 3389 (Remote Desktop Protocol) from all VPN clients to the 172.16.0.0/24 network.

Note: Repeat these steps to create as many traffic filters as required for any processes or applications that must communicate over the Always On VPN connection.

XML Configuration

Traffic Filters can also be configured using custom XML. To implement the same Traffic Filter described previously, add the following code between the <VPNProfile> and </VPNProfile> tags in your XML configuration file.

<TrafficFilter>
   <Protocol>6</Protocol>
   <RemotePortRanges>3389</LocalPortRanges>
   <RemoteAddressRanges>172.16.0.0/24</RemoteAddressRanges>
</TrafficFilter>

Note: Address ranges used in Traffic Filters can be defined using CIDR notation in XML, but they are not supported using Microsoft Endpoint Manager today.

Default Deny

When configuring a Traffic Filter for an Always On VPN profile, an implicit “deny all” rule is automatically enabled. Any traffic not explicitly defined in a Traffic Filter will be denied, including unsolicited inbound traffic, which has crucial implications for the device tunnel because it is used commonly for system management of remote devices.

Direction

Traffic Filters are enabled for the Outbound direction only, by default. Beginning with Windows 10 2004, Microsoft introduced support for Inbound traffic filters. Before Windows 10 2004, configuring a Traffic Filter on the device tunnel would break manage-out scenarios by denying all unsolicited inbound network access.

As of this writing, configuring inbound Traffic Filters using Microsoft Endpoint Manager is not supported. They are only configurable using custom XML.

To implement a Traffic Filter to allow inbound RDP access from the internal network over the device tunnel, add the following code between the <VPNProfile> and </VPNProfile> tags in your XML configuration file.

<TrafficFilter>
   <Protocol>6</Protocol>
   <LocalPortRanges>3389</LocalPortRanges>
   <RemoteAddressRanges>172.16.0.0/16</RemoteAddressRanges>
   <Direction>Inbound</Direction>
</TrafficFilter>

Note: When configuring inbound Traffic Filters, specify the port of the listening process or application using the LocalPortRanges field.

Application Filters

Administrators can combine Application Filters with Traffic Filters to control network access over the Always On VPN connection even more granularly. Applications can be defined by the following.

  • Package Family Name (PFN) – This is the unique name of a Microsoft Store application. Use the Get-AppxPackage PowerShell command to find the PFN for an application.
  • File Path – This is the full path to any executable on the file system. For example, c:\Windows\System32\mstsc.exe.
  • SYSTEM – This allows Windows kernel-mode drivers (such as ping.exe and net.exe) to send traffic over the Always On VPN connection.

As of this writing, configuring Application Filters using Microsoft Endpoint Manager is not supported. They are only configurable using custom XML.

Application Filter Examples

Below are three examples showing different Application Filters based on file path, Package Family Name, and SYSTEM.

File Path

This example shows a Traffic Filter configured to allow RDP access to an internal subnet using the native Windows Remote Desktop client (mstsc.exe).

<TrafficFilter>
   <App>
      <Id>C:\Windows\System32\mstsc.exe</Id>
   </App>
   <Protocol>6</Protocol>
   <RemotePortRanges>3389</RemotePortRanges>
   <RemoteAddressRanges>172.16.0.0/24</RemoteAddressRanges>
</TrafficFilter>

Package Family Name

This example shows a Traffic Filter configured to allow RDP access to an internal subnet using the Microsoft Windows Store Remote Desktop client.

<TrafficFilter>
   <App>
      <Id>Microsoft.RemoteDesktop_8wekyb3d8bbwe</Id>
   </App>
   <Protocol>6</Protocol>
   <RemotePortRanges>3389</RemotePortRanges>
   <RemoteAddressRanges>172.16.0.0/24</RemoteAddressRanges>
</TrafficFilter>

SYSTEM

This example shows a Traffic Filter configured to allow the netsh.exe process access to an internal subnet.

<TrafficFilter>
   <App>
      <Id>SYSTEM</Id>
   </App>
   <Protocol>6</Protocol>
   <RemotePortRanges>445</RemotePortRanges>
   <RemoteAddressRanges>172.16.0.0/24</RemoteAddressRanges>
</TrafficFilter>

This example shows a Traffic Filter configured to allow the ping.exe process access to an internal subnet.

<TrafficFilter>
   <App>
      <Id>SYSTEM</Id>
   </App>
   <Protocol>1</Protocol>
   <RemoteAddressRanges>172.16.0.0/24</RemoteAddressRanges>
</TrafficFilter>

Note: Ping uses ICMP (IP protocol 1), which is a network layer protocol. As such, defining ports for the filter is not required.

IPv6 Compatibility

Sadly, the filtering techniques described in this article do not work when also configuring IPv6 on the Always On VPN connection. As of this writing, enabling Traffic Filters when an IPv6 address is assigned to the VPN interface is not supported. More details can be found here.

Always On VPN Traffic Filters and IPv6

Summary

Configuring Zero Trust Network Access (ZTNA) with Windows 10 Always On VPN is not trivial. Still, with attention to detail, it can be a highly effective tool to enforce fine-grained network access policies and reduce exposure of the internal network to compromised endpoints. Combining Traffic Filters with Application Filters allows administrators to tightly control Always On VPN access and ensure the principle of least privilege is applied.

Additional Information

Windows 10 Always On VPN Traffic Filters and IPv6

Windows 10 Always On VPN User Tunnel XML Configuration Reference File

Windows 10 Always On VPN Device Tunnel XML Configuration Reference File

Windows 10 Always On VPN VPNv2 CSP Reference

IP Protocol Numbers

Always On VPN Traffic Filters and IPv6

Always On VPN Windows Server RRAS Service Does Not Start

Using Traffic Filters with Always On VPN provides administrators the option to configure a true Zero Trust Network Access (ZTNA) solution for their field-based users and devices. By enabling traffic filtering, network access over the Always On VPN connection can be controlled using fine-grained policies. Traffic Filter rules can be configured to restrict access based source and destination IP addresses, protocols, and source and destination ports. Administrators can further restrict access based on the application generating the traffic.

IPv6

While testing these features recently, I learned that the Microsoft Endpoint Manager (formerly Intune) user interface does not appear to support IPv6 when configuring traffic filter rules. As you can see here, the UI explicitly asks for an IPv4 address and complains when entering an IPv6 address in the address field, as shown here.

Interestingly, it is possible to add IPv6 addresses in XML, as follows.

<TrafficFilter>
   <App>
      <Id>Microsoft.RemoteDesktop_8wekyb3d8bbwe</Id>
   </App>
   <Protocol>6</Protocol>
   <RemotePortRanges>3389</RemotePortRanges>
   <RemoteAddressRanges>2001:470:f109::/48</RemoteAddressRanges>
</TrafficFilter>

Connection Failure

Unfortunately, after loading the XML on a test client, the Always On VPN connection fails with the following error message.

“Can’t connect to <ConnectionName>. Catastrophic failure.”

In addition, the Application event log records an event ID 20227 from the RasClient source with the following error.

“The user <UserName> dialed a connection name <ConnectionName> which has failed. The error code returned on failure is -2147418113.”

Workaround

At this time, the only known workaround is to update the configuration on the RRAS server to use IPv4 addressing for VPN clients.

Summary

Unfortunately, IPv6 is still a second-class citizen when it comes to Always On VPN. Although enabling IPv6 works well in most common deployment scenarios, the Microsoft Endpoint Manager management console often fails to accept IPv6 entries in IP address fields. In addition, some advanced features such as traffic filtering are incompatible with IPv6.

Additional Information

Windows 10 Always On VPN and Zero Trust Network Access (ZTNA)

Windows 10 Always On VPN Windows Server RRAS Service Does Not Start