
Troubleshooting Windows CLAT (WinCLAT) with the WinCLAT PowerShell Module

Windows CLAT (WinCLAT) is generally available on Windows 11 25H2, starting with build 26200.9550. WinCLAT is the Windows client-side translator for 464XLAT (RFC 6877). It translates IPv4 traffic from applications into IPv6 for delivery to a NAT64 gateway, allowing IPv4-only applications to continue working on IPv6-only and IPv6-mostly networks. Successful operation depends on both the Windows client configuration and the supporting network infrastructure. This post explains how to use the WinCLAT PowerShell module to verify these requirements, diagnose common problems, and test IPv4 connectivity through the translation path.

Why Use the WinCLAT PowerShell Module

WinCLAT is configured and inspected using the netsh.exe interface clat command context. However, its output requires careful interpretation when troubleshooting. A configuration command can complete without error even when Group Policy prevents the requested setting from taking effect. An instance can report that it is translating while IPv4 traffic fails, and disabling a global setting does not necessarily stop a manually enabled instance. The WinCLAT PowerShell module simplifies these tasks by checking the effective configuration after changes and providing health checks with explanations and recommended corrective actions. It supports troubleshooting on individual computers and across multiple remote computers.

How WinCLAT Activates

Understanding when WinCLAT activates automatically helps explain many troubleshooting scenarios. With AutoEnable enabled, Windows automatically activates WinCLAT on eligible non-cellular interfaces when the following conditions are met.

  • WinCLAT is permitted. The Permit setting is enabled. Today, it is disabled by default in Windows.
  • The interface has an IPv6 address assigned using Stateless Address Autoconfiguration (SLAAC) and an IPv6 default route.
  • The interface has no native IPv4 connectivity. On an IPv6-mostly network, DHCPv4 option 108, called IPv6-Only Preferred (RFC 8925), tells a compatible client to operate without a native IPv4 address for the period specified by the DHCPv4 server. WinCLAT provides IPv4 application connectivity over IPv6 during that time.
  • A NAT64 prefix has been discovered, either from the PREF64 option in router advertisements (RFC 8781) or by querying ipv4only.arpa for AAAA records through a DNS64 server (RFC 7050). DNS64 is required for the DNS-based discovery method but is not required when WinCLAT discovers the prefix through PREF64.

NAT64 Gateway Requirements

Successful IPv4 connectivity through WinCLAT also requires a reachable NAT64 gateway configured to translate traffic using the discovered prefix. Discovering a prefix and activating WinCLAT do not confirm that the gateway is reachable or that traffic can pass through it.

Automatic and Manual Activation

AutoEnable is enabled by default and allows Windows to activate WinCLAT automatically when an interface meets the required conditions. Manually enabled instances behave differently, as described later in this post. WinCLAT can be enabled manually on a specific interface after automatic activation is disabled. When WinCLAT is translating, Windows assigns the interface an IPv4 address from the 192.0.0.0/29 IPv4 Service Continuity Prefix (RFC 7335) and adds an IPv4 default route through WinCLAT.

Installing the Module

The WinCLAT module is available in the PowerShell Gallery and runs on Windows PowerShell 5.1 and PowerShell 7. Run the following command to install the module.

Install-Module -Name WinCLAT -Scope CurrentUser

The module is needed only on the computer running the commands. Remote computers require WinRM, and commands that read interface state or change configuration require an elevated session on the target.

Step 1: Run Test-WinCLAT

Test-WinClat is the starting point for any WinCLAT problem. Run it from an elevated session so the interface checks can run.

Test-WinClat

The summary shows the overall result (Pass, Warning, Fail, or NotApplicable), whether any interface is translating, and the checks that returned a warning or failure. Individual checks can also return Info for conditions that do not affect the overall result. To display every check and its explanation, use -Detailed with Format-List.

Test-WinClat -Detailed | Format-List -Property Check, InterfaceAlias, Result, Detail
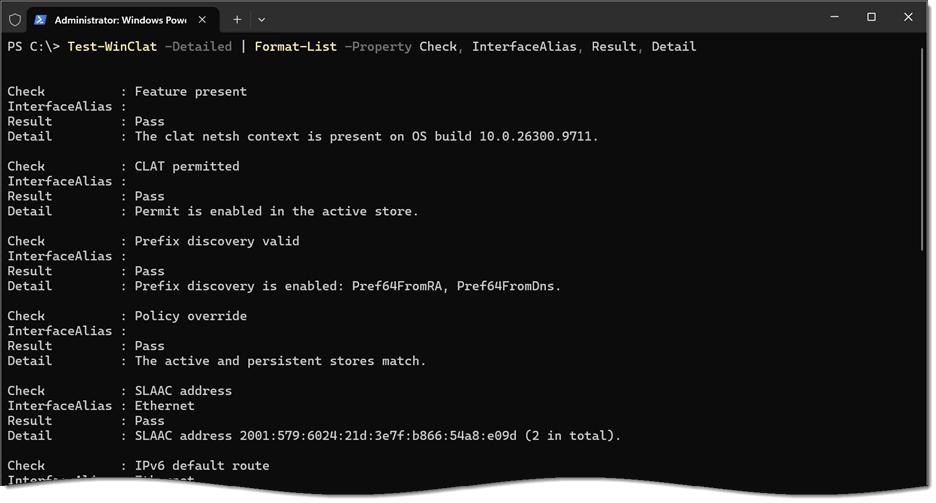
To show only the checks that need attention, including recommended corrective actions, run the following command.

Test-WinClat -Detailed | Where-Object -FilterScript { $_.Result -in 'Fail', 'Warning' } | Format-List -Property Check, InterfaceAlias, Detail, Remediation

Test-WinClat Tests

The following is a list of checks that Test-WinClat performs.

TestWhat it verifies
Feature presentThe clat netsh.exe context exists on the computer
CLAT permittedPermit is enabled in the active (effective) configuration
Prefix discovery validAt least one of Pref64FromRA and Pref64FromDns is enabled
Policy overrideGroup Policy is not overriding the local configuration
SLAAC addressThe interface has an IPv6 address from SLAAC
IPv6 default routeThe interface has an IPv6 default route
Native IPv4The interface has no native IPv4 address
Instance activeWinCLAT is translating when its prerequisites are met
CLAT addressThe WinCLAT IPv6 address is assigned to the interface and on its current prefix
Prefix consistencyThe NAT64 prefix matches the prefix returned by DNS64, when DNS64 is available
Mode sanityWinCLAT can activate: AutoEnable is enabled, or an instance has been enabled manually
Functional testIPv4 traffic passes through WinCLAT (optional)

Global checks do not require elevation. Interface checks are skipped, rather than failed, when the session is not elevated. Results of Info are informational and do not affect the overall result.

Step 2: Inspect the Configuration

Get-WinClatConfiguration returns the global settings. Use -Store Both to compare the active (effective) configuration with the persistent (local) configuration.

Get-WinClatConfiguration -Store Both

Compare the active configuration with the persistent configuration to identify differences between the effective settings and the locally stored settings. Use the PolicyControlled property to identify settings controlled by Group Policy. This property also identifies policy-controlled settings whose effective values match the local values, which a comparison of the two stores alone would not reveal.

Step 3: Inspect the Instances

Get-WinClatInstance returns the WinCLAT state of each IPv6-enabled interface. It requires elevation.

Get-WinClatInstance

Two properties are particularly useful when troubleshooting:

  • Mode shows whether the instance was enabled Automatically by Windows or Manually by an administrator.
  • TriggerSource shows why the instance was enabled: Pref64 RA (the network advertises PREF64), No IPv4 (the interface has no IPv4 connectivity), or Manual. It is read from event 1106 in the Microsoft-Windows-IPxlatCfg/Operational event log.

Common Problems

The following are common problems associated with WinCLAT configuration and operation.

Feature Not Present

Get-WinClatConfiguration returns Status FeatureNotAvailable, and Test-WinClatfails the Feature present check. WinCLAT is generally available on Windows 11 25H2 build 26200.9550 and later. The OSBuild property shows each computer’s build number, making it easy to identify computers that need the latest cumulative update.

WinCLAT is not available on Windows Server. Servers return Status NotSupported, and Test-WinClat reports an overall result of NotApplicable.

WinCLAT Not Permitted

Permit is disabled by default, so WinCLAT does not activate automatically on Wi-Fi or Ethernet interfaces until Permit is enabled, either locally or through Group Policy. Test-WinClat fails the CLAT permitted check only when an interface is IPv6-only and could use WinCLAT. On a dual-stack network, the check is informational because WinCLAT would not be used there anyway.

With AutoEnable enabled, WinCLAT activates on eligible interfaces as soon as Permit is enabled.

DHCPv4 Option 108

Permit also affects DHCPv4 option 108. Windows honors option 108 only while WinCLAT is permitted. With Permit disabled, a client on an IPv6-mostly network accepts a DHCPv4 lease and uses native IPv4, so WinCLAT is not needed, and the CLAT permitted check is informational.

WinCLAT Not Active on Dual-Stack Network

This is expected. WinCLAT does not activate on an interface with native IPv4. Test-WinClatreports Native IPv4 and Instance active as Info on dual-stack interfaces. If a dual-stack interface has no SLAAC address or no IPv6 default route, as on a network that assigns IPv6 addresses with DHCPv6 only, those checks are also Info rather than Fail, because they matter only if the network becomes IPv6-only.

SLAAC Addressing Not Present

WinCLAT requires an IPv6 address configured using SLAAC. An interface whose IPv6 addresses are assigned only through DHCPv6 does not meet this requirement. DHCPv6 can still provide other configuration information, such as DNS server addresses and a domain search list. Test-WinClat checks for a SLAAC address and reports when an interface that needs WinCLAT does not have one.

Group Policy Overrides Local Configuration

Netsh.exe reports success when a local change is made to a setting that Group Policy controls, but the effective value does not change. Set-WinClatConfiguration reads the configuration back after every change and reports the result with Status PolicyOverride when the policy keeps a different value.

In addition, Test-WinClat indicates when local settings conflict with Group Policy enforced settings.

Group Policy can control Permit, Pref64FromRA, and Pref64FromDns. There is no policy for AutoEnable. The policy values are stored in the following registry location.

HKLM\SOFTWARE\Policies\Microsoft\Windows\TCPIP\v6Transition\IPxlatCfgSvc

No NAT64 Prefix Discovered

An instance that is enabled but has no NAT64 prefix cannot translate. Test-WinClat fails the Instance active check and names the prefix discovery methods that are enabled. Common causes include:

  • The network does not include the PREF64 option in router advertisements, and Pref64FromDns is disabled.
  • No usable NAT64 prefix is available through router advertisements, and Pref64FromDns is enabled, but the DNS servers assigned to the client do not provide DNS64.
  • Both Pref64FromRA and Pref64FromDns are disabled. Netsh.exe accepts this combination silently, but WinCLAT can never activate. Set-WinClatConfiguration refuses it.

When WinCLAT discovers a NAT64 prefix through the PREF64 option in router advertisements, DNS64 is not required for prefix discovery or for translating IPv4 application traffic. A reachable NAT64 gateway using that prefix is still required. If DNS64 is unavailable, the Prefix consistency check is informational because there is no DNS64-derived prefix to compare.

Delayed WinCLAT Activation

WinCLAT activates fastest when the network advertises the NAT64 prefix through PREF64. When DNS64 is the only available prefix discovery method, Windows first waits to determine that the interface has no native IPv4 connectivity, so activation takes several seconds longer. Allow time for this process before treating an inactive instance as a configuration problem.

Manually Enabled Instances Continue Translating

Disabling Permit or AutoEnable stops translation on instances that Windows enabled automatically. Manually enabled instances can continue translating after either setting is disabled. When troubleshooting continued translation, check the instance’s Mode property to determine whether it was enabled manually.

Use Get-WinClatInstance to identify manually enabled instances.

Get-WinClatInstance | Where-Object -FilterScript { $_.Enabled -and $_.Mode -eq 'Manual' }

Note that netsh.exe refuses to change an instance while AutoEnable is enabled. To return an interface from manual to automatic control, disable AutoEnable, disable the instance, and enable AutoEnable again:

Set-WinClatConfiguration -AutoEnable Disabled
Set-WinClatInstance -InterfaceAlias 'Ethernet' -State Disabled
Set-WinClatConfiguration -AutoEnable Enabled

WinCLAT Stops Working After Reboot

Manual instance state is runtime only. It survives an adapter restart and link loss, but it is lost on reboot. Enabling an instance manually requires disabling AutoEnable, and AutoEnable remains disabled after the reboot, so WinCLAT does not activate at all. Enable AutoEnable again to restore automatic operation:

Set-WinClatConfiguration -AutoEnable Enabled

The Mode sanity check in Test-WinClat reports this condition.

IPv4 Fails After Moving to a Different Network

When a translating client moves to a different IPv6 network without restarting its network adapter, WinCLAT keeps its IPv6 address on the previous network’s prefix. The instance still reports that it is translating, but IPv4 traffic through WinCLAT fails. Microsoft has acknowledged this known issue and is working to resolve it in a future release.

Test-WinClat detects this condition. The CLAT address check fails, naming the address in use and the current prefix, while the Instance active check passes.

Restarting the network adapter resolves the issue.

Restart-NetAdapter -Name 'Ethernet'

The IPv6 address reported by netsh.exe interface clat show instance cannot be used to detect this condition, because it may report a new address that is not actually assigned to the interface. The CLAT address check compares the addresses actually assigned to the adapter with its current prefix.

Netsh.exe Reports Addresses That Are Not Assigned

An instance that is enabled but no longer translating can retain stale information in netsh.exe output. For example, a manually enabled instance on an interface that now has native IPv4 connectivity might still report a WinCLAT IPv6 address and 192.0.0.1 even though those addresses are no longer assigned to the interface. It might also display a NAT64 prefix with a remaining lifetime of zero. Use Get-NetIPAddress to confirm the addresses assigned to the interface. Clear the manual instance using the three-command sequence shown earlier or restart the computer.

Testing the Translation Path

The checks above assess WinCLAT configuration and local instance state. The functional test verifies connectivity to a specific IPv4 destination through WinCLAT and the NAT64 gateway. Use Test-WinClat with an IPv4 target address that is reachable through the gateway and known to respond to the selected test.

Test-WinClat -IPv4Target 172.16.0.204 -Detailed | Format-Table -Property Check, InterfaceAlias, Result, Detail -Wrap

The test sends up to three ICMP echo requests. Add -IPv4Port to test a TCP connection instead, which is useful where ICMP is filtered.

Test-WinClat -IPv4Target 172.16.0.204 -IPv4Port 443

Keep the following in mind when interpreting the result.

  • Use an IPv4 address as the target. A hostname can resolve to a synthesized AAAA record through DNS64, allowing the connection to use IPv6 through NAT64 without using WinCLAT. Testing with an IPv4 address ensures the test uses IPv4. Check the selected interface and source address to confirm that the traffic passes through WinCLAT.
  • Native IPv4 can bypass WinCLAT. If another interface provides native IPv4 connectivity to the test destination, Windows might send the test traffic through that interface. The module reports Info when the selected path bypasses WinCLAT, even if the destination responds successfully. Review the Detail property to identify the selected interface and source address and confirm whether the test used WinCLAT.
  • Unreachable destinations time out. ICMP destination unreachable messages that NAT64 returns for IPv4 destinations are not delivered to the IPv4 application, so a test to an unreachable or filtered address returns a Warning after timing out rather than an immediate failure. Choose a target that is known to respond, ideally on your own infrastructure.
  • One test covers one path. When several interfaces translate, the test proves that IPv4 works through the interface Windows chose, not on each interface.

Troubleshooting at Scale

The WinCLAT commands accept computer names from the pipeline, including input from Get-Content and Get-ADComputer, and process remote computers in parallel over WinRM. Before connecting, the module checks TCP port 5985. If that connection fails, it reports the computer as Unreachable without waiting for a full WinRM timeout. This status indicates that the module could not reach the required endpoint. The computer might be offline, the port might be blocked, or WinRM might be configured to use a different TCP port.

Filtering and Exporting Results

The module returns a result for every target computer, including those that cannot be reached, do not support the feature, or cannot be fully checked because the session lacks elevation. The Status property identifies the outcome, and the Message property explains it.

# Test every computer in an OU and show only the computers with problems
Get-ADComputer -Filter * -SearchBase 'OU=Windows Clients,DC=corp,DC=example,DC=net' | Test-WinClat | Where-Object -FilterScript { $_.Overall -ne 'Pass' }
# Export the detailed results of every check for later analysis
Get-Content -Path .\clients.txt | Test-WinClat -Detailed | Export-Csv -Path .\winclat-results.csv -NoTypeInformation
# Save the names of unreachable computers to test again later
Get-Content -Path .\clients.txt | Test-WinClat | Where-Object -FilterScript { $_.Status -eq 'Unreachable' } | Select-Object -ExpandProperty ComputerName | Set-Content -Path .\retry.txt

The output is flat, so it exports cleanly with Export-Csv for reporting and comparison over time.

Known Issues

The following Windows behaviors can affect WinCLAT operation and troubleshooting. The module can identify some of these conditions, but it does not correct the underlying Windows behavior. Available workarounds are listed below.

IssueEffectWorkaround
WinCLAT keeps its IPv6 address on the previous prefix after a network changeIPv4 traffic through WinCLAT fails; Test-WinClat reports CLAT address FailRestart the network adapter
WinCLAT IPv4 address is dynamically registered in DNSConnections to the client may fail when DNS resolves its name to a WinCLAT IPv4 addressNone
Translated ICMP errors are not delivered to IPv4 applicationsUnreachable IPv4 destinations time out instead of failing immediatelyNone

Summary

Troubleshooting WinCLAT starts with Test-WinClat, which checks every prerequisite, explains each failure, and suggests remediation. Get-WinClatConfiguration reveals Group Policy overrides, and Get-WinClatInstance shows whether each instance was enabled automatically or manually. Most problems come down to a few causes: Permit disabled by default, Group Policy overriding local settings, no NAT64 prefix discovered, a manual instance that does not follow the global settings, or a stale WinCLAT address after a network change. Because netsh.exe reports success even when a change does not take effect, always verify the result by reading the state back, which the WinCLAT module does automatically.

Additional Information

WinCLAT PowerShell Module on GitHub

WinCLAT on directaccess.richardhicks.com

90 DAYS LEFT: Windows Server 2016 End of Life January 2027 – Plan Your AD CS Migration Now

Heads up, fellow Windows Server administrators! There are now just THREE MONTHS remaining before Windows Server 2016 reaches end of support, so now is the time to finalize any migrations for workloads hosted on this platform. Mainstream support ended on January 11, 2022, and Windows Server 2016 has since remained in extended support. However, extended support ends on January 12, 2027. After that date, Microsoft will no longer provide security updates or technical support, increasing the risk of running production workloads due to exposure to newly discovered vulnerabilities and exploits.

Active Directory Certificate Services

Many organizations are still running critical infrastructure on Windows Server 2016. Administrators often delay upgrading Microsoft Active Directory Certificate Services (AD CS) due to its complexity. However, a well-planned AD CS migration not only reduces risk but also provides an opportunity to modernize cryptography, certificate templates, and operational practices.

Certificate Authorities

Administrators must carefully migrate Certificate Authorities (CAs) running on Windows Server 2016 to minimize downtime. In environments where ongoing CA maintenance has been limited, migrating the CA database can be especially challenging. If the CA is installed on a domain controller, now is a good time to consider separating these services to ensure reliable operation. Also, it’s a good idea to evaluate the CA’s configuration and security posture during migration to enhance security and improve service resilience.

NDES Servers

Microsoft Network Device Enrollment Services (NDES) servers, commonly deployed to facilitate certificate enrollment via Microsoft Intune, pose a unique challenge during migration. Unfortunately, configuring NDES is exceedingly complex and error-prone. NDES relies on a delicate combination of specialized IIS configuration, AD service accounts, custom certificate templates, and CA permissions, making even minor changes risky without proper planning. Not surprisingly, administrators are often hesitant to touch these systems as they are notoriously difficult to troubleshoot when problems arise.

Pro Tip: We spend an entire day covering NDES configuration in the Mastering Enterprise PKI Certificates with Microsoft Intune training course. The next session is February 3-5, 2027. Register now!

Intune Certificate Connectors

Don’t overlook Windows Server 2016 servers with the Intune Certificate Connector installed. Fortunately, this is one of the more manageable workloads to migrate. All that’s required is to install new connectors on supported servers and delete the old ones.

Summary

With extended support for Windows Server 2016 ending on January 12, 2027, organizations running production workloads—especially critical infrastructure such as Active Directory Certificate Services (AD CS), Certificate Authorities (CAs), and NDES servers—face significant security risks from unpatched vulnerabilities once the OS reaches end-of-life. Careful migration planning to newer versions such as Windows Server 2022 or 2025 is essential to minimize downtime, improve security posture, and ensure long-term resilience.

Start Planning Now

Don’t risk running unsupported workloads in 2027! Complete your migration today. If you’d like expert guidance, I have many years of experience migrating these workloads. I have developed specialized tools and techniques to ensure a smooth, secure, and successful transition. Fill out the form below to schedule a free one-hour consultation to assess your Windows Server 2016 AD CS workloads, identify migration risks, and outline next steps.

Additional Information

Windows Server 2016 Lifecycle Policy

PKI Fundamentals with Microsoft Active Directory Certificate Services (AD CS) Online Training Course

Mastering Enterprise PKI Certificates with Microsoft Intune Online Training Course

WEBINAR: Preparing for 100-Day Certificates with CertKit

Join me and the CertKit team on Tuesday, October 6, 2026, at 9:00 AM PDT for a free, live webinar about the upcoming reduction in public TLS certificate lifetimes. Beginning March 15, 2027, the maximum validity period for public TLS certificates will be reduced to 100 days. This change will make manual certificate management increasingly difficult for many organizations.

Automation

Shorter certificate lifetimes require organizations to identify, enroll, deploy, and renew certificates more frequently. Automation can help reduce the administrative effort and the risk of service interruptions caused by expired certificates. This is especially important for public-facing Microsoft workloads such as Internet Information Services (IIS), Remote Desktop Services (RDS), Always On VPN, DirectAccess, and other services that use public TLS certificates.

Visibility

Effective certificate management begins with knowing which certificates exist, where they are installed, and when they expire. Without this visibility, organizations may overlook certificates until they are close to expiration or have already expired.

Internal Certificates

Certificates issued by a private certification authority (CA) aren’t subject to the lifetime restrictions imposed on public TLS certificates. However, they still require inventory, monitoring, and renewal. A consistent approach to managing public and private certificates can help reduce operational overhead.

How CertKit Helps

CertKit is a cloud-based service for managing public and private TLS certificates. During the webinar, we’ll demonstrate how CertKit provides visibility into certificate inventories and expiration dates while automating common lifecycle tasks such as enrollment, deployment, and renewal. We’ll also review recent additions to the service.

Register Now

The webinar takes place on Tuesday, October 6, at 9:00 AM PDT. Registration is required. Everyone who registers will be notified when the session recording is available.

Live! 360 Event Orlando, Florida 2026

I’m excited to announce that I’ll be attending the upcoming Live! 360 Event, November 15-20, 2026, at Royal Pacific Resort at Universal Orlando, Florida. I’ll be in attendance all week and will be delivering a few talks at the event this year.

Sessions

I’ll be presenting two sessions at this year’s event. They are:

Join Me!

If you are planning to attend the event, please join my sessions! I will be at the conference center all week, so don’t hesitate to reach out and contact me while you are there. I’m looking forward to seeing everyone soon!

Always On VPN Security Updates September 2026

Microsoft released the September 2026 security updates today, which include numerous fixes affecting Always On VPN deployments. This month’s edition addresses vulnerabilities in Windows Server Routing and Remote Access (RRAS), VPN protocols such as Secure Socket Tunneling Protocol (SSTP) and Internet Key Exchange version 2 (IKEv2). The updates also include Active Directory Certificate Services (AD CS), a crucial supporting infrastructure service for Always On VPN.

RRAS

September 2026 Microsoft security updates include 8 CVEs for RRAS. Four are rated Critical, the most severe having a CVSS rating of 9.8.

RCEs

The following four CVEs are Remote Code Execution vulnerabilities. All are rated critical.

Privilege Escalation

The following two CVEs are RRAS privilege escalation vulnerabilities. All are rated Important.

Denial of Service

Finally, the last CVE addresses a denial-of-service vulnerability in RRAS.

VPN Protocols

The following section outlines vulnerabilities addressed in the September 2026 security updates affecting commonly used VPN protocols.

SSTP

The following four CVEs cover vulnerabilities in SSTP. One is rated critical with a CVSS score of 9.8. The rest are rated Important.

IKEv2

The following CVEs address vulnerabilities in the IKEv2 VPN protocol. All are rated important.

AD CS

Microsoft AD CS is commonly deployed to issue and manage certificates used for encryption and user and device authentication in Always On VPN deployments. The following four CVEs address vulnerabilities disclosed in AD CS. The first two are privilege escalation vulnerabilities, the third covers information disclosure, and the last addresses a tampering vulnerability. All are rated Important.

Summary

The September 2026 Microsoft security updates address several critical vulnerabilities affecting organizations that have deployed Microsoft Always On VPN. Administrators are encouraged to update their systems as soon as possible.

Additional Information

Microsoft September 2026 Security Updates

Intranet Certificate Monitoring with CertKit

CertKit is a cloud-based solution that automates the issuance and management of public TLS certificates. It also provides certificate monitoring and alerting for public-facing workloads. However, many organizations have internal (non-public-facing) services that also use TLS. CertKit agent v1.13.0, currently in preview, closes this gap by providing visibility into TLS certificates used by intranet resources. After installing the latest release of the agent, CertKit can now provide visibility into the status of TLS certificates for internal resources.

Intranet Monitoring

After installing or updating the CertKit agent to v1.13.0, administrators can select an internal TLS service to monitor. Follow the steps below to enable this feature.

Certificate Collection

I recommend creating a separate Certificate Collection to support intranet monitoring. In the CertKit management console, click Add Collection, enter a unique, descriptive name, and click Add Collection.

Install the Agent

Once the new collection is created, navigate to the Agents tab, select your platform, then download, install, and register the agent.

Monitor New Host

After the agent is installed and registered, navigate to the Monitoring tab and click Monitor New Host. Enter the fully qualified domain name (FQDN) of the resource and specify its TLS port. Under Host Visibility, select Internal, and then choose the agent to monitor the host from. When finished, click Monitor Host.

Note: The server running the CertKit agent does not require a TLS certificate of its own to monitor internal resources.

Monitored Hosts

CertKit can track certificates for any internal workload that uses TLS. In this example, the monitored resources include web applications, security appliances, load balancers, and HTTP CRL distribution points. The list also includes LDAPS on the domain controllers and the RDP and WinRM HTTPS services on the management workstation.

The circle next to each resource indicates its certificate status. Green indicates a healthy certificate, yellow indicates one approaching expiration, and red indicates an expired certificate or another detected issue.

Note: The RDP certificate on the management workstation appears red because it contains only the Remote Desktop Authentication EKU (1.3.6.1.4.1.311.54.1.2). It intentionally does not include Server Authentication, which CertKit currently expects when validating the service. CertKit is aware of this limitation and plans to address it in a future release.

Host Discovery

CertKit provides robust discovery for public websites but does not currently offer equivalent functionality for intranet resources. Administrators can identify internal systems listening on a specific port by using Nmap.

nmap.exe -Pn -p [port] --open [internal subnet]

For example:

nmap.exe -Pn -p 443 --open 172.16.0.0/24

Alternatively, add the -oX switch to save the output in XML format.

nmap.exe -Pn -p 443 --open 172.16.0.0/24 -oX scan.xml

The resulting Nmap XML file output can be converted to CSV format using this PowerShell code.

Summary

CertKit agent v1.13.0 extends certificate monitoring to internal TLS services, giving administrators greater visibility into certificates that were previously difficult to track. Although intranet host discovery remains a manual process, tools such as Nmap and PowerShell can help identify resources to add to the monitoring platform

Getting Started with CertKit

Need help improving certificate visibility and management across your organization? Want to automate public TLS certificate enrollment for workloads such as DirectAccess, Always On VPN, IIS, SQL, and more? I can help you assess your certificate environment, identify monitoring gaps, and develop a strategy for managing certificates across internal and public-facing workloads. Fill out the form below, and I’ll provide you with more information.

← Back

Thank you for your response. ✨

Additional Information

CertKit Website

What Is CertKit?

CerKit Agent Support for Always On VPN SSTP and DirectAccess IPHTTPS TLS Certificates

IIS TLS Certificate Deployment with CertKit

The Case for 6-Day Public TLS Certificates

DirectAccess IPHTTPS and Let’s Encrypt 6-Day TLS Certificates

NDES Security Hardening: Protecting and Monitoring the SCEP Registry Configuration

The Active Directory Certificate Services (AD CS) Network Device Enrollment Service (NDES) is widely deployed to support the issuance and management of enterprise PKI certificates via Microsoft Intune and the Intune Certificate Connector. NDES relies on registry settings to identify its issuing CA, certificate templates, and other SCEP configuration parameters. An attacker with sufficient access to an NDES server could alter these settings and redirect enrollment to another template published on the issuing CA and accessible to the NDES service account. Because enrollment might continue without an obvious service failure, administrators could overlook the change. This article explains how to restrict access to the MSCEP registry key, audit modifications, and use Sysmon to collect additional investigative context.

Understanding the MSCEP Registry Configuration

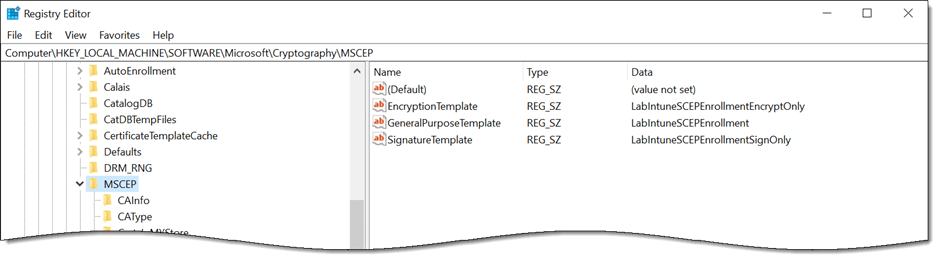
NDES stores its core SCEP configuration under the HKLM\SOFTWARE\Microsoft\Cryptography\MSCEP registry key. These settings identify the issuing CA and certificate templates used for enrollment and control other aspects of NDES operation. Because they directly influence how certificate requests are processed, unauthorized changes could alter enrollment behavior without modifying the NDES application itself.

Enrollment Templates

NDES uses the following registry values to identify the certificate templates used for SCEP enrollment.

HKLM\SOFTWARE\Microsoft\Cryptography\MSCEP\EncryptionTemplate
HKLM\SOFTWARE\Microsoft\Cryptography\MSCEP\GeneralPurposeTemplate
HKLM\SOFTWARE\Microsoft\Cryptography\MSCEP\SignatureTemplate

In many deployments, all three values reference the same template. If the environment supports distinct signature, encryption, or general-purpose enrollment scenarios, each value can reference a template designed for that specific purpose.

Additional MSCEP Settings

The MSCEP key contains more than certificate template assignments. Its CAInfo and CAType subkeys identify the CA to which NDES submits requests, while other subkeys control settings such as the hash algorithm and capabilities advertised to SCEP clients.

Information Disclosure and Reconnaissance

The default permissions for the MSCEP registry key are inherited from HKLM\SOFTWARE, which grants the local Users group read access. This allows locally authenticated users, as well as users granted remote registry access, to read the template names and CA configuration. Template names can aid reconnaissance, as an attacker can query Active Directory for the corresponding template definitions and evaluate their configurations against known AD CS escalation techniques. The CAInfo subkey can also disclose the internal fully qualified domain name of the issuing CA. Restricting access to the MSCEP key reduces unnecessary exposure of this information.

Why the MSCEP Key Is an Effective Monitoring Target

After NDES is deployed to production, these values should change only during planned reconfiguration. This makes the MSCEP key a high-value, low-noise monitoring target. Legitimate modifications should be rare and documented, while any unexpected change warrants immediate investigation.

Before You Begin

The changes described in this article modify access permissions and configure auditing for registry settings that NDES requires. An incorrect service identity, incomplete allowlist, or unsupported environmental assumption can prevent certificate enrollment. Test these changes in a nonproduction environment first, confirm that you have a working backup and rollback procedure, and validate successful enrollment before applying them broadly. Adapt the examples to your environment and follow your organization’s change management and security review processes.

In addition, be sure to back up the configuration before making any changes. A full server backup or a virtual machine snapshot is helpful. However, administrators can perform additional steps to save information before altering the default settings.

Determine the NDES Service Account

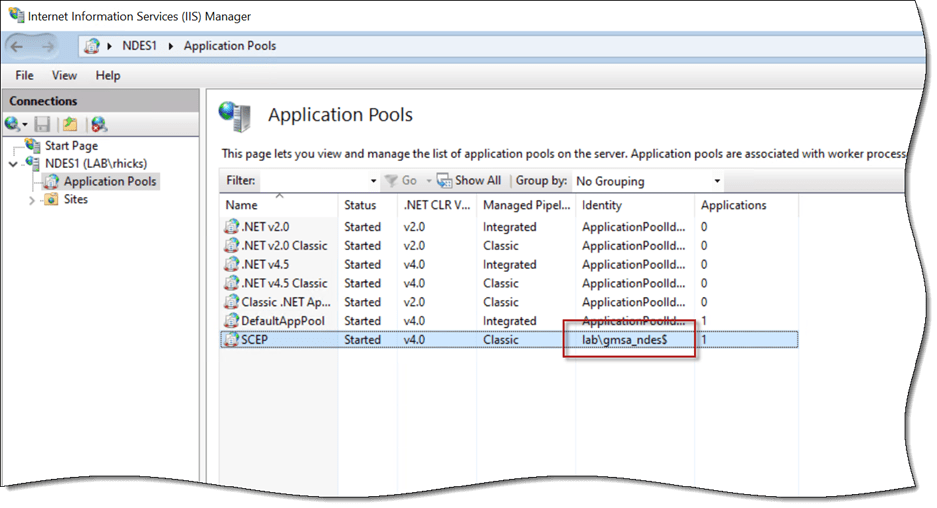
The permissions applied below grant access to the account used by the SCEP application pool. Confirm this account before proceeding by opening IIS Manager (inetmgr.exe), expanding the IIS server, and selecting Application Pools. Highlight the SCEP application pool and note the account shown in the Identity column.

Back Up the Current Permissions

A registry export with reg.exe captures data but not the security descriptor, so it is not a rollback for this change. Run the following PowerShell commands to capture the descriptor in SDDL format instead.

$Key = 'HKLM:\SOFTWARE\Microsoft\Cryptography\MSCEP'
(Get-Acl -Path $Key -Audit).Sddl | Out-File -FilePath .\mscep-acl-backup.txt -Encoding utf8

The rollback process is covered later in this post.

Restricting Access to the MSCEP Key

For a dedicated NDES server, restrict the MSCEP key to SYSTEM, the local Administrators group, and the identity used by the SCEP application pool. All other access entries should be removed, including the inherited Read permission for the local Users group. If another service identity requires access in your environment, such as a domain service account used by the Intune Certificate Connector, account for it in both the explicit access rules and the allowlist before applying the changes.

Administrators must retain full control. Even if the Administrators entry were removed, a local administrator could exercise the necessary privileges to take ownership of the key and rewrite its permissions. The ACL therefore reduces unnecessary access but does not provide a security boundary against a local administrator or an attacker with equivalent privileges. This is why the auditing described in the next section is an important complementary control.

Important Note: Registry values do not carry their own security descriptors, so the permissions applied here govern the MSCEP key, every value in it, and every subkey beneath it. The service identity is granted full control rather than read because NDES writes to this key during normal operation, and read-only access will break it.

Removing Inheritance

The inherited entries from HKLM\SOFTWARE are where the broad access comes from, so they must be removed first. On the NDES server, open an elevated PowerShell command window and run the following commands.

$Acl = Get-Acl -Path $Key -Audit
$Acl.SetAccessRuleProtection($True, $False)

The -Audit parameter reads the system access control list (SACL) and the discretionary access control list (DACL), so both can be updated and committed in a single write later. The second parameter of SetAccessRuleProtection is set to false, which discards the inherited entries rather than converting them to explicit copies. This approach is intentional. Inherited entries cannot be removed with PurgeAccessRules method, so preserving them would leave the broad grants in place and defeat the entire exercise. No explicit deny entry is required anywhere in this process. After this change, the local Users group has no access to the key at all.

Granting Explicit Access

Breaking inheritance also removes the SYSTEM and Administrators grants, so our explicit entries will replace them. Well-known security identifiers (SIDs) are used instead of account names, so this works correctly on non-English Windows installations.

$ServiceIdentity = 'corp\gmsa_ndes$'   # or 'corp\svc_ndes' if using a domain service account
$Sid = (New-Object System.Security.Principal.NTAccount($ServiceIdentity)).Translate([System.Security.Principal.SecurityIdentifier])
ForEach ($Identity in @('S-1-5-18', 'S-1-5-32-544', $Sid.Value)) {
    $Trustee = New-Object System.Security.Principal.SecurityIdentifier($Identity)
    $Acl.AddAccessRule((New-Object System.Security.AccessControl.RegistryAccessRule($Trustee, 'FullControl', 'ContainerInherit', 'None', 'Allow')))
}

S-1-5-18 is the well-known SID for SYSTEM, and S-1-5-32-544 is the well-known SID for the local Administrators group. ContainerInherit ensures the rights propagate to the subkeys.

Removing Unapproved Access Entries

The remaining explicit entries are evaluated against an allowlist, and anything that does not belong to those three identities is purged.

$AllowedSids = @('S-1-5-18', 'S-1-5-32-544', $Sid.Value)
ForEach ($Entry in ($Acl.Access | Where-Object { -not $_.IsInherited } | Select-Object -ExpandProperty IdentityReference -Unique)) {
    If ($Entry -is [System.Security.Principal.SecurityIdentifier]) {
        $EntrySid = $Entry
}
Else {
        $EntrySid = $Entry.Translate([System.Security.Principal.SecurityIdentifier])   
}
   
If ($AllowedSids -notcontains $EntrySid.Value) {
        $Acl.PurgeAccessRules($EntrySid)   
}
}

Sweeping against an allowlist rather than purging a fixed list of known principals removes application capability SIDs, CREATOR OWNER, any application pool entry that no longer matches the current SCEP application pool service account, and anything left over from previous administrative changes, without enumerating them in advance. It also makes the operation repeatable, so running it a second time on an already hardened server produces the same result.

Important Note: This code uses SID comparison. Identity references can be returned as either an NTAccount or a SecurityIdentifier, depending on whether the account resolves, so comparing by name will silently miss orphaned entries.

Auditing Changes to the MSCEP Key

Restricting the ACL reduces unnecessary access, but it cannot prevent a local administrator from taking ownership or rewriting the permissions. Auditing provides a complementary detective control by recording attempts to modify the key.

Add the Registry Audit Rule

To enable auditing, add an audit rule to the MSCEP key’s SACL that records successful and failed attempts by any identity to modify its values, subkeys, or permissions. Then commit the DACL and SACL together.

$Everyone = New-Object System.Security.Principal.SecurityIdentifier('S-1-1-0')
$AuditRule = New-Object System.Security.AccessControl.RegistryAuditRule($Everyone, 'SetValue, CreateSubKey, Delete, ChangePermissions, TakeOwnership', 'ContainerInherit', 'None', 'Success, Failure')
$Acl.AddAuditRule($AuditRule)
Set-Acl -Path $Key -AclObject $Acl

The audited operations are limited to changes. Specifically, setting a value, creating or deleting a subkey, changing permissions, and taking ownership. Reads are intentionally not audited. The three identities that still have access read these values routinely, so auditing that activity would generate excessive noise. Note that failure auditing applies only to the listed modification rights, so a denied read attempt will not be logged.

In addition, TakeOwnership and ChangePermissions are included deliberately because an attempt to alter the key’s security descriptor could indicate that someone is trying to weaken or bypass the applied controls. These operations should be rare after deployment and warrant investigation when they are not associated with an approved administrative change.

Recycle the SCEP Application Pool

Once the permissions are committed, recycle the SCEP application pool to close any existing registry handles and ensure the worker process reopens the MSCEP key under the new access controls.

Restart-WebAppPool -Name SCEP

Enable the Registry Audit Subcategory

An audit rule on its own does not generate events. The Object Access category must have the Registry subcategory enabled before Windows will write anything to the Security event log. Confirm the current setting by running the following command.

auditpol.exe /get /subcategory:"{0CCE921E-69AE-11D9-BED3-505054503030}" /r

The subcategory is referenced by GUID rather than by name for locale independence. If it is not enabled, enable it through Group Policy under Advanced Audit Policy Configuration > Object Access > Audit Registry rather than setting it locally, so the setting survives and applies consistently across your NDES infrastructure.

Recommended Security Alerts

With the Registry audit subcategory and the SACL configured as described, creating, deleting, or modifying a registry value under the MSCEP key generates event ID 4657 in the Security event log, identifying the account, the value name, and both the old and new data. That last detail is what makes the event immediately actionable. You do not have to look up what the template was supposed to be, because the event tells you what it was and what it was changed to.

My recommendation is to alert on every event ID 4657 associated with EncryptionTemplate, GeneralPurposeTemplate, or SignatureTemplate values rather than attempting to tune out individual processes or accounts. These values should remain static after deployment, so their expected change volume is zero. Monitor modifications elsewhere under the MSCEP path as well but establish a baseline before treating every such event as an alert because some NDES configurations may update other values or subkeys during normal operation.

Additional Alerts

Two additional events are worth correlating when one of these fires:

  • Event ID 4670 records a change to the permissions on the object. On a hardened key, this is a strong signal, since it means someone modified the ACL you just applied.
  • An application pool recycle or an IIS restart shortly after a value change is the corroborating signal. Because NDES caches the template configuration in the worker process, a substituted template does not take effect until the SCEP application pool or server restarts. An attacker seeking immediate activation would therefore need to trigger a recycle or restart, creating another potentially observable event. Otherwise, the change could take effect later during a routine recycle or restart.

Add Process Context with Sysmon

Security event ID 4657 identifies the account, process name, process ID, registry value, and old and new data associated with a change. However, it does not provide the full command line, process lineage, hashes, or surrounding activity needed for a more complete investigation. The System Monitor (sysmon.exe) utility from the Microsoft Sysinternals suite supplements the Security event log with this information.

Sysmon is not a replacement for SACL. The Security event records the authorization decision as Windows made it, which is the authoritative record. Sysmon records the process lineage around that decision. The two sources are complementary. Sysmon can capture the process that triggers an application pool recycle or an IIS restart when that activity matches the configured process creation rules.

Sample Sysmon Configuration for NDES

I have published a sample Sysmon configuration for NDES servers on GitHub. It is available here. This targeted configuration monitors SCEP enrollment settings, IIS application pool activity, registration authority certificates and private keys, credential access, and selected AD CS, certificate store, IIS, and operating-system security events relevant to an NDES deployment. It is not intended to serve as a general enterprise baseline. You can run it as a standalone configuration on an NDES server or merge its rule groups into an existing baseline such as SwiftOnSecurity or Olaf Hartong sysmon-modular.

Install or Update Sysmon

After reviewing and testing the sample configuration, install Sysmon or apply the configuration to an existing Sysmon deployment. To install Sysmon, open an elevated command window and run the following command.

sysmon.exe -accepteula -i sysmon-ndes.xml

To update an existing installation and confirm the active configuration, run the following commands.

sysmon.exe -c sysmon-ndes.xml
sysmon.exe -c

Sysmon events are written to the following event log location.

Applications and Services Logs > Microsoft > Windows > Sysmon > Operational.

Sysmon Monitoring Coverage

The configuration is centered on detecting changes to security-sensitive registry locations. The remaining rules capture the process, file, network, and system activity needed to investigate those changes.

  • Registry events 12, 13, and 14 cover the MSCEP key and its subkeys using a contains condition so both the native and WOW6432Node paths are captured. The same rule group covers the Certificate Services configuration key, machine certificate stores and trust anchors, SCHANNEL and TLS configuration, IIS service configuration, and common persistence locations.
  • Process creation events capture the tools used to make these changes, including reg.exe, regedit.exe, certutil.exe, appcmd.exe, and iisreset.exe. Tools such as appcmd.exe and iisreset.exe, as well as PowerShell commands such as Restart-WebAppPool, can recycle the SCEP application pool or restart IIS, allowing a modified template configuration to take effect. Sysmon can capture these actions when the initiating process and command line match the configured process-creation rules. PowerShell Script Block Logging provides additional visibility into commands executed within an existing PowerShell session, which might not be captured as separate Sysmon process-creation events.
  • Process access events are restricted to handle requests against LSASS with the access masks commonly associated with credential dumping. On a host that holds registration authority private keys and runs under a gMSA identity, this is the single highest-value rule.
  • File creation and deletion events cover the private key containers under Crypto\RSA, Crypto\Keys, and Crypto\PCPKSP, the IIS configuration directory, and certificate file extensions. Web content extensions such as .aspx and .ashx are also included, because a file with one of those extensions appearing under the NDES site is a strong indicator of a web shell.
  • Network connection events are purposefully scoped to scripting hosts and file transfer utilities rather than everything. An NDES server constantly talks to the CA and enrolling clients, and logging all of it produces excessive noise and provides little insight.
  • Named pipe, WMI, and process tampering events are also included. Legitimate volume for these is close to zero on a dedicated NDES server, so they are logged in full.

Note: The registry rule group includes an exclusion for the highest-volume legitimate writers, such as services.exe, svchost.exe, and TrustedInstaller.exe, as well as CreateKey events. Without those exclusions, useful events are buried within minutes. However, broad process-based exclusions can create visibility gaps. Administrators should validate that those exclusions do not suppress meaningful changes to the monitored paths.

Correlating Sysmon and Security Log Events

When a template value is modified, the Security event log records event ID 4657 with the account, value name, and old and new data. Sysmon records event ID 13 for the same operation, including the image path and process GUID associated with the write. If Sysmon also captured the corresponding process-creation event, the process GUID can be used to correlate event ID 13 with event ID 1, which provides the full command line and parent-process information. The Security event identifies the audited account and registry change, while Sysmon supplies richer process lineage and surrounding activity.

Sysmon Deployment Considerations

Before deploying this configuration, confirm that it is compatible with your installed Sysmon version and existing monitoring baseline. Test it on a representative NDES server first, then review the resulting event volume and adjust only those rules that conflict with known, legitimate activity.

  • Confirm the schema version supported by your installed Sysmon build by running
    sysmon.exe -s before deployment. The sample configuration uses schema version 4.90 and therefore requires Sysmon 15 or later.
  • The FileBlockExecutable rules actively block matching executable files rather than merely recording their creation. Review and test these rules carefully before deploying the configuration in production.
  • If you already run a Sysmon baseline, merge these rule groups into it rather than installing this configuration over the top of it. Installing a new configuration replaces the existing one entirely.
  • Forward both the Sysmon Operational event log and the Security event log to your Security Information and Event Management (SIEM) platform. Local event logs on a compromised server hosting an Internet-published SCEP endpoint are of limited investigative value, and an alert that nobody receives provides little protection.
  • Validate the configuration in a lab first. Sysmon rule evaluation order is not always intuitive, and an overly broad include rule on a busy server can generate a surprising amount of data.

NDES Operational Considerations

Tightening permissions on a key that a running service depends on has consequences worth understanding before you make these changes in production.

  • If the Intune Certificate Connector service runs as a custom account rather than SYSTEM, add that account to the allowlist and grant it read access. Check the logon account on the connector service before you begin. In this scenario, I recommend running the Intune Certificate Connector as SYSTEM to follow security best practices.
  • If you change the SCEP application pool identity later, NDES will fail until the key permissions are updated to include the new identity. These permissions are aligned to a specific account, so any change to that account requires a corresponding change here.
  • If you operate multiple NDES servers, apply these changes to all of them to ensure full coverage.
  • Document any planned change to the template configuration in your change management process. If you alert on these events as recommended, someone will need to close the ticket the alert generates.

Validate Permissions, Auditing, and Enrollment

Run the following PowerShell command to verify the resulting access rules.

(Get-Acl -Path $Key).Access | Format-Table IdentityReference, RegistryRights, IsInherited

Only SYSTEM, BUILTIN\Administrators, and the NDES service account identity should be listed, and none of the entries should be inherited. Next, run the following command to confirm the audit rule is present.

(Get-Acl -Path $Key -Audit).Audit

With the Registry audit subcategory enabled, perform a controlled test in a lab by changing a template value and recycling the SCEP application pool. Verify that event ID 4657 appears in the Security event log and includes the expected old and new values.

If event ID 4657 does not appear in the Security event log after you modify a registry value under the MSCEP key, confirm that the Registry audit subcategory is enabled.

auditpol.exe /get /subcategory:"{0CCE921E-69AE-11D9-BED3-505054503030}"

If you deployed the Sysmon configuration, confirm it is loaded and generating events. Sysmon events are recorded in the Applications and Services Logs > Microsoft > Windows > Sysmon > Operational event log. The log should include events related to the test, including the registry value modification. Depending on how the application pool was recycled and which process-creation rules are enabled, it might also contain the process that initiated the recycle.

You will also find events containing process creation details, including the full command line, process ID, parent process ID, and related information.

Finally, perform a device enrollment. Certificate enrollment should remain unaffected by these changes, and confirming successful enrollment after making these changes is essential before returning the NDES server to production.

Restore the Previous Registry Permissions

If enrollment breaks and the cause is not immediately obvious, administrators can restore the security descriptor captured earlier by running the following PowerShell commands.

$Sddl = Get-Content -Path '.\mscep-acl-backup.txt' -Raw
$Acl = Get-Acl -Path $Key -Audit
$Acl.SetSecurityDescriptorSddlForm($Sddl.Trim())
Set-Acl -Path $Key -AclObject $Acl
Restart-WebAppPool -Name SCEP

In practice, the most common cause of failure is granting access to the wrong service identity. This is why confirming the application pool identity is the first step in this process. Administrators should not skip this validation step.

Summary

The MSCEP registry values determine which certificate templates NDES uses for SCEP enrollment. An attacker with administrative access to the NDES server could modify these values and redirect enrollment to an unintended template without creating an obvious service failure. Restricting access to the MSCEP key reduces unnecessary exposure, while registry auditing and Sysmon provide visibility into unauthorized changes and the processes responsible for them. Forward these events to your SIEM, configure alerts for unexpected modifications, and validate the detection workflow before relying on it in production.

Additional Information

Sample Sysmon Configuration for NDES on GitHub

Download Sysmon from Microsoft Sysinternals

Microsoft NDES Information Disclosure: Detection and Remediation

Get-NdesNtlmDisclosure PowerShell Script on GitHub

Configure Infrastructure to Support SCEP with Microsoft Intune

Publish NDES with Microsoft Entra Application Proxy

Microsoft NDES Information Disclosure: Detection and Remediation

The Active Directory Certificate Services (AD CS) Network Device Enrollment Service (NDES) is a common building block for certificate deployment with Microsoft Intune. When NDES is used with the Intune Certificate Connector, the NDES server is published to the Internet so that managed devices can enroll for certificates using the Simple Certificate Enrollment Protocol (SCEP). Anything accessible via the Internet warrants careful attention, and a default NDES installation can expose more information than administrators might expect. Specifically, the NDES administration page can disclose sensitive information and should be removed. However, removing access to the page isn’t enough. Even after the NDES administration page is removed, IIS can continue to expose Windows authentication on that path through orphaned configuration entries, enabling NTLM-based information disclosure to unauthenticated Internet clients.

NDES Administration Page

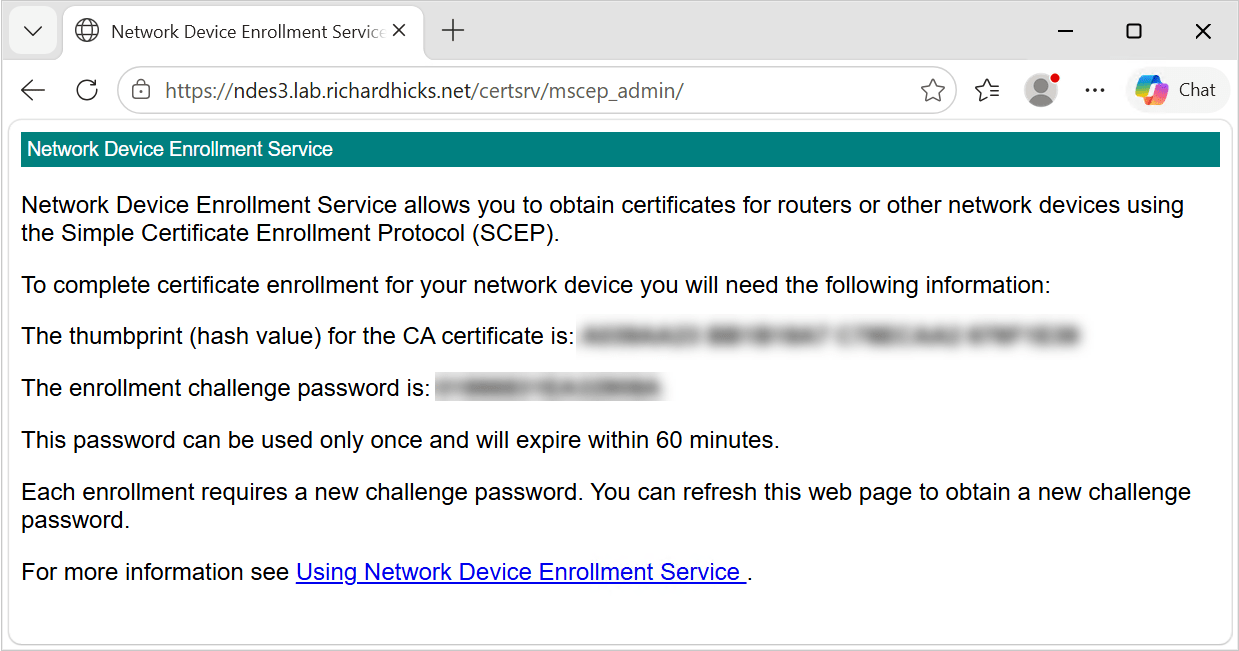
NDES exposes its web-based functionality through applications hosted in Internet Information Services (IIS). A default NDES installation creates two IIS applications under the CertSrv virtual directory. The first is mscep, which is the SCEP endpoint itself. The second is mscep_admin, which is the NDES administration page used to generate one-time challenge passwords.

Standalone Configuration

In a standalone NDES deployment, an administrator browses to the administration page, authenticates, and receives a one-time password that is embedded in the certificate request. NDES validates the password against its local cache before forwarding the request to the certification authority (CA).

Intune Certificate Connector

The Intune Certificate Connector does not use this mechanism. Intune generates its own challenge, and the NDES policy module installed by the connector validates the certificate request against the authorizations Intune has granted for that specific device. The connector also disables the standard NDES challenge-password mechanism. As a result, the administration page is not used for Intune certificate enrollment and serves no operational purpose in this configuration.

Preauthentication Limitations

Reverse-proxy preauthentication normally provides an additional security boundary by requiring a client to authenticate before its request is forwarded to the published application. With Microsoft Entra Application Proxy, Microsoft Entra ID preauthentication can block unauthenticated Internet clients from reaching the internal web application, reducing its exposure to scanning, password-spraying attacks, and other malicious requests.

However, SCEP clients cannot complete the Microsoft Entra ID authentication process or present the authentication token required by Application Proxy. Enabling preauthentication would therefore prevent managed endpoints from reaching NDES and enrolling for certificates. When publishing NDES through Microsoft Entra Application Proxy, the Pre Authentication setting must be configured as Passthrough. Other reverse proxies must similarly allow unauthenticated requests to reach the NDES SCEP endpoint. The Intune SCEP policy module, not the reverse proxy, validates and authorizes certificate requests before NDES submits them to the certification authority.

Information Disclosure

Because the NDES administration page is configured to use Windows authentication, IIS can negotiate NTLM with an unauthenticated client that requests the mscep_admin path. When the client sends an NTLM Type 1 negotiation message, IIS can respond with a Type 2 challenge containing a target information block. No credentials are required to receive this challenge or the information it contains.

Depending on the server configuration and negotiated NTLM options, the Type 2 message can disclose some or all of the following information:

  • NetBIOS domain name
  • NetBIOS computer name
  • DNS domain name
  • DNS computer name (server FQDN)
  • DNS forest name
  • Operating system version and build number

This is significant because the internal Active Directory namespace often differs from the public namespace used to publish NDES. For example, the published external name might be ndes1.example.com, but the NTLM challenge might disclose an internal domain of corp.example.net and a server FQDN of ndes1.corp.example.net. None of that information is available from public DNS.

Testing

To view disclosed information, use curl.exe to send a static NTLM type 1 negotiation message and inspect the response headers. Run the following command on the NDES server.

curl.exe -skI -H 'Authorization: NTLM TlRMTVNTUAABAAAAB4IIAAAAAAAAAAAAAAAAAAAAAAA=' https://localhost/certsrv/mscep_admin

A response containing a WWW-Authenticate header with an NTLM value indicates the endpoint is offering a challenge. When the header includes a base64 payload beginning with TlRMTVNTUAAC, the server has returned a type 2 message, leading to information disclosure on the target host. A response with no WWW-Authenticate header at all is the desired result.

Here are the PowerShell commands to decode and view the base64 payload and the disclosed information.

$Response = curl.exe -skI -H 'Authorization: NTLM TlRMTVNTUAABAAAAB4IIAAAAAAAAAAAAAAAAAAAAAAA=' https://localhost/certsrv/mscep_admin
$Challenge = ($Response | Select-String -Pattern '^WWW-Authenticate:\s*NTLM\s+(\S+)').Matches.Groups[1].Value
$Bytes = [Convert]::FromBase64String($Challenge)
[Text.Encoding]::Unicode.GetString($Bytes) -Replace '[^\x20-\x7E]', ' '

PowerShell Script

I have created and published a PowerShell script to simplify testing NDES servers for information leakage. The script is published on GitHub here. In addition, you can install the script from the PowerShell Gallery by running the following command.

Install-Script -Name Get-NdesNtlmDisclosure

The output of the command on a vulnerable server is as follows.

A Note on External Testing

When NDES is published using Microsoft Entra Application Proxy, external test results can be inconsistent. In my repeated testing across three separate servers, the first request sometimes returned a bare NTLM challenge with no payload, and a second request, seconds later, returned the full type 2 message. Therefore, do not treat a single clean external result as confirmation. Test locally on the server itself, then repeat external tests at least twice to confirm the results.

Additional Security Concerns

Beyond the namespace disclosure, an Internet-accessible NDES administration page introduces some additional security concerns.

Password Spray Attacks

An internet-facing endpoint that accepts domain credentials is a target for password spraying attacks. Failed authentication attempts can count toward the configured account-lockout threshold, introducing a potential denial-of-service risk to user accounts.

Service Disclosure

The presence of an NTLM challenge on the well-known mscep_admin path also identifies the server as an NDES host, providing attackers with useful reconnaissance information for targeted attacks.

Remediation

If the reverse proxy configuration exposes the NDES administration page, it becomes an Internet-accessible authenticated endpoint that no part of the Intune enrollment workflow uses. Removing it is a simple and effective attack-surface reduction measure.

Remove the NDES Administration Page

Administrators can remove the NDES administration page IIS application by opening an elevated PowerShell command window and running the following command.

Remove-WebApplication -Site 'Default Web Site' -Name 'CertSrv/mscep_admin'

After running this command, browsing to the administration page returns HTTP 404. The application is gone, and SCEP enrollment continues to work normally. At this point, most administrators would consider the task complete.

The Problem

If you attempt to browse the administration page after removing it, you will still be prompted to authenticate. If you supply valid credentials, you will receive the expected 404. The authentication prompt itself is the real problem.

IIS Authentication Settings

The NDES role configuration writes IIS authentication settings for the administration page into a separate location element in applicationHost.config. Remove-WebApplication deletes the application definition under the sites element, but it does not touch the location element. IIS continues to match the path and applies the authentication settings it finds there, even though no application exists at that location.

The orphaned configuration is visible only in the raw configuration file. It does not appear in IIS Manager, and Get-WebApplication reports nothing at that path. You can run the following command to view this configuration.

Select-String -Path "$env:SystemRoot\System32\inetsrv\config\applicationHost.config" -Pattern '<location path=|windowsAuthentication enabled='

On a server where the administration page has been removed, the output still includes an entry like the following.

991: <location path=”Default Web Site/CertSrv/mscep_admin”>
997: <windowsAuthentication enabled=”true”>

Orphaned Configuration

To fully remediate this information disclosure and prevent potential disruption caused by password-spraying attacks, administrators must also remove the orphaned configuration location. This eliminates Windows authentication on the administration path entirely.

Remove-WebConfigurationLocation -Name 'Default Web Site/CertSrv/mscep_admin'

The NDES role configuration also enables Windows authentication on the SCEP application. Because anonymous authentication is also enabled, requests to the SCEP endpoint are ordinarily processed without an authentication challenge. However, Windows authentication is not required on an NDES server supporting the Intune Certificate Connector, and leaving it enabled on an Internet-facing endpoint serves no operational purpose. I recommend disabling it explicitly.

Set-WebConfigurationProperty -PSPath 'MACHINE/WEBROOT/APPHOST' -Location 'Default Web Site/CertSrv/mscep' -Filter 'system.webServer/security/authentication/windowsAuthentication' -Name 'enabled' -Value $False

By default, Windows authentication is handled in kernel mode, so stale state information in HTTP.SYS can continue serving challenges after a configuration change. Be sure to run iisreset.exe after making these changes.

iisreset.exe /restart

Validation

Repeat the NTLM probes demonstrated earlier against the administration page. The absence of a WWW-Authenticate header confirms the challenge has been eliminated.

curl.exe -skI -H 'Authorization: NTLM TlRMTVNTUAABAAAAB4IIAAAAAAAAAAAAAAAAAAAAAAA=' https://localhost/certsrv/mscep_admin

Confirm that SCEP still responds anonymously. A status code of 200 with a plain-text capability list is expected.

curl.exe -skI 'https://localhost/certsrv/mscep/mscep.dll?operation=GetCACaps'

Repeat the first test against the internal FQDN and the published external FQDN, then perform a device enrollment to confirm the deployment is unaffected.

PowerShell

After making these changes, Get-NdesNtlmDisclosure.ps1 will indicate that the NTLM challenge is not offered.

Summary

The NDES administration page is not required when the Intune Certificate Connector is installed on an NDES server and should be removed as part of attack surface reduction. However, removing the IIS application leaves behind an orphaned configuration location that continues to apply Windows authentication settings to the path. The result can be an Internet-facing endpoint that discloses the internal domain name, server name, forest name, operating system build, and other information to an unauthenticated remote client that initiates NTLM negotiation.

Removing the admin application alone is not enough. You must also remove the configuration location, disable Windows authentication where it is not required, restart IIS, and validate the result with an NTLM probe to ensure full mitigation.

Additional Information

Get-NdesNtlmDisclosure PowerShell Script on GitHub

Publish NDES with Microsoft Entra Application Proxy

Intune Certificate Connector Configuration Failed

Microsoft Intune Certificate Connector Failure

Certificate Connector for Intune Configuration Failure

Create and Assign SCEP Profiles in Microsoft Intune

RFC 8894 – Simple Certificate Enrolment Protocol

Always On VPN Security Updates July 2026

Microsoft released the July 2026 Windows security updates today, including several fixes that directly affect Always On VPN deployments. This month’s release addresses vulnerabilities in the Secure Socket Tunneling Protocol (SSTP), Internet Key Exchange (IKE), and the Routing and Remote Access Service (RRAS), making it an important update for organizations using Always On VPN.

SSTP Remote Code Execution

The highest-priority issue for Always On VPN administrators is a Remote Code Execution (RCE) vulnerability affecting the Secure Socket Tunneling Protocol (SSTP). SSTP is commonly used for Always On VPN user tunnel connections. Because SSTP is, by design, exposed directly to the Internet, vulnerabilities affecting this protocol deserve immediate attention. Microsoft rates this vulnerability as Critical with a CVSS base score of 8.1.

CVE-2026-50694 – Windows SSTP Remote Code Execution Vulnerability

IKE Vulnerabilities

These vulnerabilities primarily affect IKE-based VPN connections and could allow an attacker to disrupt VPN connectivity using specially crafted packets. While Microsoft rates these vulnerabilities as Important rather than Critical, organizations should still plan to deploy these updates promptly.

CVE-2026-50721 – IKEv1 Denial of Service via RSA-SHA1 authentication payload

CVE-2026-50722 – IKEv2 Denial of Service via RSA-SHA1 authentication payload

CVE-2026-12413 – IKEv2 Denial of Service via malformed fragmentation

CVE-2026-50696 – IKE Protocol Denial of Service Vulnerability

RRAS Vulnerabilities

The July 2026 security updates also address several vulnerabilities in the Windows Server Routing and Remote Access Service (RRAS). All are rated Important by Microsoft.

CVE-2026-57096 – Windows RRAS Elevation of Privilege Vulnerability

CVE-2026-49791 – Windows RRAS Elevation of Privilege Vulnerability

CVE-2026-50451 – Windows RRAS Elevation of Privilege Vulnerability

Summary

The SSTP RCE vulnerability is particularly concerning because the service is typically exposed to the Internet and could allow an unauthenticated attacker to execute code remotely. Organizations should prioritize deployment of this update. The IKE and RRAS vulnerabilities are rated Important and can generally be addressed during the next scheduled maintenance window, although administrators should avoid unnecessary delays in applying these updates.

What’s New in Entra Private Network Connector v1.5.4892.0

An important update is available for the Microsoft Entra Private Network Connector. The Entra Private Network Connector is used to publish on-premises web applications to the internet. It is also used for Global Secure Access (GSA) with Entra Private Access, allowing GSA clients to access on-premises resources. Entra Private Network Connector v1.5.4892.0 includes important new functionality to streamline troubleshooting and improve stability and performance.

New Features

The Entra Private Network Connector v1.5.4892.0 now includes a diagnostic tool on the system tray. This gives administrators a visual indicator of connector status and provides quick access to diagnostics and log files.

Diagnostics

Right-clicking the connector and choosing ‘Connector diagnostics’ launches the Connector Diagnostics window. Here you’ll find three tabs: Overview, Health Check, and Advanced Logs.

Overview

The Overview tab provides details about the connector, such as the Tenant ID, Connector ID, version, supported TLS versions, the connector server’s IPv4 address (IPv6 information is not displayed), the server’s hostname, and the operating system version.

Health Check

Clicking on the Health Check tab will perform a comprehensive system health check. Status information for each check is provided, indicating whether it is Passed or Failed. Optionally, administrators can export the report in text, HTML, or JSON format for further analysis. Each health check can be expanded to reveal additional information about the individual check.

Advanced Logs

Clicking the Advanced Logs tab allows administrators to retrieve detailed log information. Session channel logging is enabled by default but can optionally be disabled if needed. You can choose specific start and end dates and times to collect logs, then click Retrieve Logs to collect them.

Once complete, it’s not immediately obvious where to find these logs. Clicking the Logs Retrieved button prompts the administrator to select a location in which to save the log files.

Improvements

This update improves the reliability of name resolution by filtering invalid DNS responses. In addition, the update improves connector logging to the Windows Event Log and fixes various issues and bugs.

Updating to v1.5.4892.0

Existing Entra Private Network Connector installations will not automatically receive this update. Administrators must manually download the connector from the Microsoft Entra admin center and apply the update themselves to take advantage of these new features and capabilities.

Additional Information

Microsoft Entra Private Network Connector v1.5.4892.0

Microsoft Entra Private Network Connector Overview and Deployment Strategies

Preventing Port Exhaustion on Entra Private Network Connector Servers