Enabling Secure Remote Administration for the NetMotion Mobility Console

During the initial setup of a NetMotion Mobility gateway server, the administrator must choose to allow either Secure (HTTPS) or Non-secure (HTTP) connections when using the web-based Mobility Console.

Enabling Secure Remote Administration for the NetMotion Mobility Console

Configuring HTTPS

Security best practices dictate HTTPS should be enabled to protect credentials used to log on to the gateway remotely. Immediately after selecting the Secure (https:) option, the administrator is prompted to enter server certificate information. Enter this information and click OK to continue and complete the rest of the configuration as necessary.

Enabling Secure Remote Administration for the NetMotion Mobility Console

Self-Signed Certificate

When logging in to the Mobility console, the administrator is presented with a certificate error indicating there is a problem with the website’s security certificate. This is because the certificate is self-signed by the NetMotion Mobility gateway server and is not trusted.

Enabling Secure Remote Administration for the NetMotion Mobility Console

PKI Issued Certificate

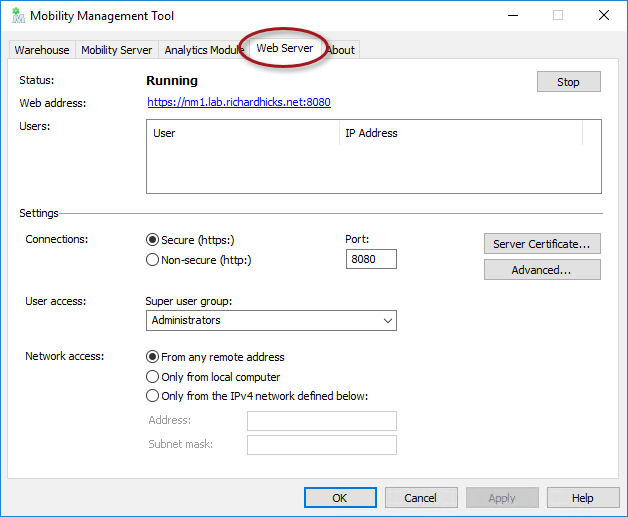
The recommended way to resolve this is to request a certificate from a trusted certification authority (CA). To do this, open the Mobility Management Tool on the Mobility gateway server and click on the Web Server tab.

Enabling Secure Remote Administration for the NetMotion Mobility Console

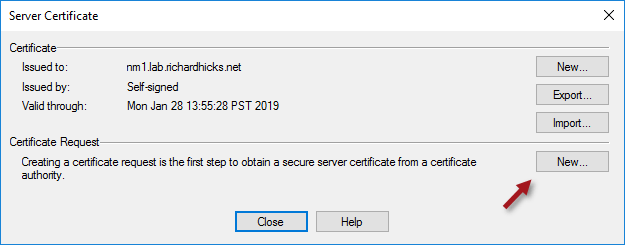
Click on the Server Certificate button and then click New in the Certificate Request section.

Enabling Secure Remote Administration for the NetMotion Mobility Console

In the SAN (subject alternative name) field of the Optional Extension section enter the Fully Qualified Domain Name (FQDN) of the server using the syntax dns:fqdn. Include both the FQDN and the single-label hostname (short name) separated by a comma to ensure both names work without issue. For example:

dns:nm1.lab.richardhicks.net,dns:nm1

Enabling Secure Remote Administration for the NetMotion Mobility Console

Before requesting a certificate from a CA, the root and any intermediate CA certificates must first be imported. Click the Import button next to each, as required.

Enabling Secure Remote Administration for the NetMotion Mobility Console

Click Copy in the Certificate Request section to copy the Certificate Signing Request (CSR) to the clipboard and then save it to a text file. Now submit the CSR to be signed by the CA using the certreq.exe command. Open an elevated command or PowerShell window and enter the following commands.

certreq.exe -attrib “CertificateTemplate:[TemplateName]” -submit [Path_to_CSR_file]

For example:

certreq.exe -attrib “CertificateTemplate:LabWebServer” -submit certreq.txt

Select a CA from the list and click OK, then save the certificate response when prompted.

Enabling Secure Remote Administration for the NetMotion Mobility Console

Enabling Secure Remote Administration for the NetMotion Mobility Console

Click Response and specify the location of the certificate response file saved in the previous step.

Enabling Secure Remote Administration for the NetMotion Mobility Console

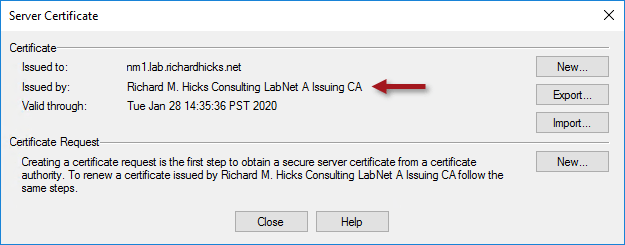
Once complete, the newly issued certificate will be in place. Click Close to complete the process.

Enabling Secure Remote Administration for the NetMotion Mobility Console

Click Yes when prompted to restart the Mobility console.

Enabling Secure Remote Administration for the NetMotion Mobility Console

Trusted Certificate

Opening the Mobility Console no longer produces a certificate error message with a certificate installed from a trusted CA.

Enabling Secure Remote Administration for the NetMotion Mobility Console

In addition, if you followed the guidance above and included the single-label hostname in the SAN field, accessing the server using the short name will also work without issue.

Enabling Secure Remote Administration for the NetMotion Mobility Console

Summary

Always select the option to use HTTPS to ensure the highest level of security and protection of credentials when remotely administering a NetMotion Mobility gateway server. For optimal security and to provide the best user experience, use a certificate issued and managed by a trusted CA to prevent certificate errors when opening the Mobility console.

Additional Information

NetMotion Mobility as an Alternative to DirectAccess

NetMotion Mobility Device Tunnel Configuration

Comparing NetMotion Mobility and DirectAccess Part 1 – Security

Comparing NetMotion Mobility and DirectAccess Part 2 – Performance

DirectAccess and NetMotion Mobility Webinar


DirectAccess Manage Out with ISATAP and NLB Clustering

DirectAccess Manage Out with ISATAP and NLB ClusteringDirectAccess connections are bidirectional, allowing administrators to remotely connect to clients and manage them when they are out of the office. DirectAccess clients use IPv6 exclusively, so any communication initiated from the internal network to remote DirectAccess clients must also use IPv6. If IPv6 is not deployed natively on the internal network, the Intrasite Automatic Tunnel Addressing Protocol (ISATAP) IPv6 transition technology can be used to enable manage out.

ISATAP Supportability

According to Microsoft’s support guidelines for DirectAccess, using ISATAP for manage out is only supported for single server deployments. ISATAP is not supported when deployed in a multisite or load-balanced environment.

Not supported” is not the same as “doesn’t work” though. For example, ISATAP can easily be deployed in single site DirectAccess deployments where load balancing is provided using Network Load Balancing (NLB).

ISATAP Configuration

To do this, you must first create DNS A resource records for the internal IPv4 address for each DirectAccess server as well as the internal virtual IP address (VIP) assigned to the cluster.

DirectAccess Manage Out with ISATAP and NLB Clustering

Note: Do NOT use the name ISATAP. This name is included in the DNS query block list on most DNS servers and will not resolve unless it is removed. Removing it is not recommended either, as it will result in ALL IPv6-enabled hosts on the network configuring an ISATAP tunnel adapter.

Once the DNS records have been added, you can configure a single computer for manage out by opening an elevated PowerShell command window and running the following command:

Set-NetIsatapConfiguration -State Enabled -Router [ISATAP FQDN] -PassThru

DirectAccess Manage Out with ISATAP and NLB Clustering

Once complete, an ISATAP tunnel adapter network interface with a unicast IPv6 address will appear in the output of ipconfig.exe, as shown here.

DirectAccess Manage Out with ISATAP and NLB Clustering

Running the Get-NetRoute -AddressFamily IPv6 PowerShell command will show routes to the client IPv6 prefixes assigned to each DirectAccess server.

DirectAccess Manage Out with ISATAP and NLB Clustering

Finally, verify network connectivity from the manage out host to the remote DirectAccess client.

Note: There is a known issue with some versions of Windows 10 and Windows Server 2016 that may prevent manage out using ISATAP from working correctly. There’s a simple workaround, however. More details can be found here.

Group Policy Deployment

If you have more than a few systems on which to enable ISATAP manage out, using Active Directory Group Policy Objects (GPOs) to distribute these settings is a much better idea. You can find guidance for creating GPOs for ISATAP manage out here.

DirectAccess Client Firewall Configuration

Simply enabling ISATAP on a server or workstation isn’t all that’s required to perform remote management on DirectAccess clients. The Windows firewall running on the DirectAccess client computer must also be configured to securely allow remote administration traffic from the internal network. Guidance for configuring the Windows firewall on DirectAccess clients for ISATAP manage out can be found here.

ISATAP Manage Out for Multisite and ELB

The configuration guidance in this post will not work if DirectAccess multisite is enabled or external load balancers (ELB) are used. However, ISATAP can still be used. For more information about enabling ISATAP manage out with external load balancers and/or multisite deployments, fill out the form below and I’ll provide you with more details.

Summary

Once ISATAP is enabled for manage out, administrators on the internal network can remotely manage DirectAccess clients wherever they happen to be. Native Windows remote administration tools such as Remote Desktop, Windows Remote Assistance, and the Computer Management MMC can be used to manage remote DirectAccess clients. In addition, enterprise administration tools such as PowerShell remoting and System Center Configuration Manger (SCCM) Remote Control can also be used. Further, third-party remote administration tools such as VNC, TeamViewer, LogMeIn, GoToMyPC, Bomgar, and many others will also work with DirectAccess ISATAP manage out.

Additional Information

ISATAP Recommendations for DirectAccess Deployments

DirectAccess Manage Out with ISATAP Fails on Windows 10 and Windows Server 2016 

DirectAccess Client Firewall Rule Configuration for ISATAP Manage Out

DirectAccess Manage Out and System Center Configuration Manager (SCCM)

Contact Me

Interested in learning more about ISATAP manage out for multisite and external load balancer deployments? Fill out the form below and I’ll get in touch with you.

← Back

Thank you for your response. ✨

DirectAccess WinRM Conflicts and Errors

Introduction

When installing DirectAccess for the first time, an administrator may encounter the following error message while running the Remote Access Setup wizard.

Error. The client cannot connect to the destination specified in the request. Verify that the service on the destination is running and is accepting requests. Consult the logs and documentation for the WS-Management service running on the destination, most commonly IIS or WinRM. If the destination is the WinRM service, run the following command on the destination to analyze and configure the WinRM service: “winrm quickconfig”.

DirectAccess WinRM Conflicts and Errors

Troubleshooting

Running winrm quickconfig in an elevated PowerShell command window returns the following message.

WinRM service is already running on this machine.
WinRM is already set up for remote management on this computer.

DirectAccess WinRM Conflicts and Errors

Clicking Check prerequisites again does not resolve the error message.

Post-Installation Errors

If DirectAccess is already installed and working properly, an administrator may encounter a scenario in which the operations status page displays nothing, yet remote DirectAccess clients are connected and able to access corporate resources without issue.

DirectAccess WinRM Conflicts and Errors

In addition, clicking Edit on Step 2 in the Remote Access Management console and choosing Network Adapters produces an error message stating “An error occurred when validating interfaces”. You can select a network adapter from the drop-down list, but the Next and Finish buttons are grayed out.

DirectAccess WinRM Conflicts and Errors

Conflicts with WinRM

These errors are commonly caused by a conflict with WinRM Service settings enforced via Active Directory group policy. To confirm this, open an elevated PowerShell command window run the winrm enumerate winrm/config/listener command. The listener configuration source will be listed as GPO.

DirectAccess WinRM Conflicts and Errors

The administrator will also find the presence of the following registry keys on the DirectAccess server.

HKLM\Software\Policies\Microsoft\Windows\WinRM\Service\AllowAutoConfig
HKLM\Software\Policies\Microsoft\Windows\WinRM\Service\IPv4Filter
HKLM\Software\Policies\Microsoft\Windows\WinRM\Service\IPv6Filter

Resolution

To resolve this conflict, prevent the GPO with this setting from being applied to the DirectAccess server(s). You will find this GPO setting in the Group Policy Management console (GPMC) by navigating to Computer Configuration -> Policies -> Administrative Templates -> Windows Components -> Windows Remote Management (WinRM) -> WinRM Service and setting the state of Allow remote server management through WinRM to Not configured.

DirectAccess WinRM Conflicts and Errors

Additional Resources

DirectAccess and Windows 10 Better Together

DirectAccess and Windows 10 in Education

VIDEO – DirectAccess and Windows 10 in Action 

BOOK – Implementing DirectAccess with Windows Server 2016