Deploying user or device authentication certificates to support Always On VPN requires installing the Certificate Connector for Microsoft Intune. The same connector can link Intune to on-premises public key infrastructure (PKI) using PKCS or SCEP certificates. The connector can be configured to run in the SYSTEM context or a domain service account.
Configuration Failure
Administrators may encounter the following error message when installing the certificate connector and selecting the option to use a domain service account.
“Configuration failed. Configuring Microsoft Intune Certificate Connector failed. No changes were made to Feature or Proxy settings. Please try again.”
Root Cause
This error occurs because the service account does not have the correct permissions assigned on the server where the connector is being installed. Specifically, the service account must have the Logon as a service right assigned. To do this, open the local group policy editor (gpedit.msc) and perform the following steps.
Expand Computer Configuration > Windows Settings > Security Settings > Local Policies > User Rights Assignment.
Double-click Log on as a service.
Click Add User or Group.
Add the service account.
Click OK.
Once complete, remove the Certificate Connector for Intune and re-run the installation again.
When configuring Always On VPN for Windows 10 and Windows 11 clients, administrators may encounter a scenario where an IPv4 route defined in Microsoft Endpoint Manager/Intune or custom XML is not reachable over an established Always On VPN connection. Further investigation indicates the route is added to the configuration on the endpoint but does not appear in the routing table when the connection is active.
Routing Configuration
When split tunneling is enabled, administrators must define routes to IP networks that are reachable over the Always On VPN connection. The method of defining these routes depends on the client configuration deployment method.
Endpoint Manager
Using Microsoft Endpoint Manager, administrators define IP routes in the Split Tunneling section of the configuration settings for the Always On VPN device configuration profile. Routes are defined by entering the destination prefix and prefix size. In this example, the 10.0.0.0/8 and 172.21.12.0/21 IPv4 networks are defined for routing over the Always On VPN tunnel.
Custom XML
Using custom XML deployed using Microsoft Endpoint Manager, System Center Configuration Manager (SCCM), or PowerShell, routes are defined in the XML file using the following syntax.
Client Configuration
Validate the routing configuration has been implemented on the endpoint successfully by running the following PowerShell command.
As you can see here, the IPv4 routes 10.0.0.0/8 and 172.21.12.0/21 are included in the client’s Always On VPN configuration, as shown below.
Missing Route
However, after establishing an Always On VPN connection, the 172.21.12.0/21 network is not reachable. To continue troubleshooting, run the following PowerShell command to view the active routing table.
Get-NetRoute -AddressFamily IPv4
As you can see above, the only IPv4 route in the VPN configuration added to the routing table is the 10.0.0.0/8 network. The 172.21.12.0/21 IPv4 route is missing.
Network Prefix Definition
IPv4 routes missing from the Always On VPN client’s routing table result from incorrect network prefix definition. Specifically, the IPv4 route 172.21.12.0/21 used in the example here is not a valid network address. Rather, it is a host address in the 172.21.8.0/21 network, as shown below.
The Get-Subnet PowerShell cmdlet is part of the Subnet PowerShell module. To install this module, run the following PowerShell command.
Install-Module Subnet
Resolution
Using the example above, enabling access to the 172.21.12.0/21 subnet would require defining the IPv4 prefix in the routing configuration as 172.21.8.0/21. The moral of this story is always validate routing prefixes to ensure they are, in fact, network addresses and not host addresses.
Recently I did some validation testing with Always On VPN on Windows 11, and I’m happy to report that everything seems to work without issue. However, a few readers have reported 853 errors when establishing an Always On VPN connection after upgrading to Windows 11.
Can’t Connect
After upgrading to Windows 11, an Always On VPN connection may fail with the following error message.
“The remote access connection completed, but authentication failed because the certificate that authenticates the client to the server is not valid. Ensure the certificate used for authentication is valid.”
Error 853
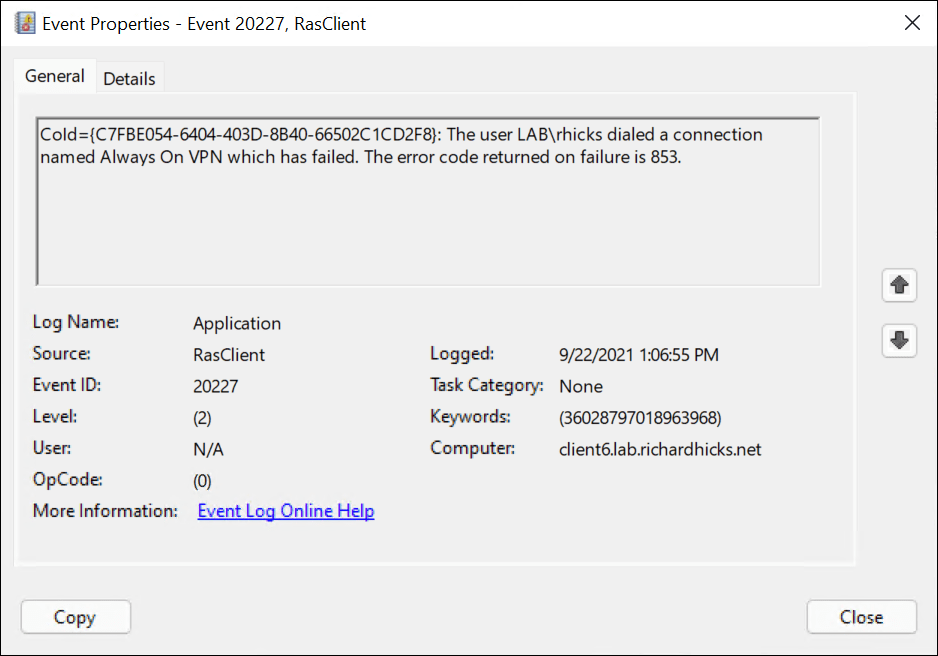
In addition, the Application event log records an event ID 20227 from the RasClient source that includes the following message.
“The user <username> dialed a connection name <connection name> which has failed. The error code returned on failure is 853.”
Server Identity
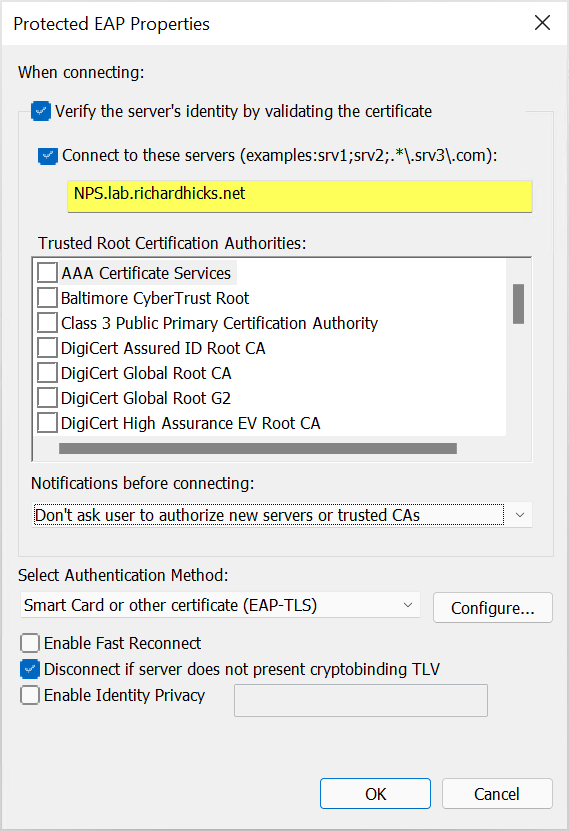
This error will occur when using Protected Extensible Authentication Protocol (PEAP) authentication. Specifically, it can happen when the option to verify NPS server validity by its certificate is selected, and an explicit list of NPS servers is defined, as shown here.
Case Sensitive
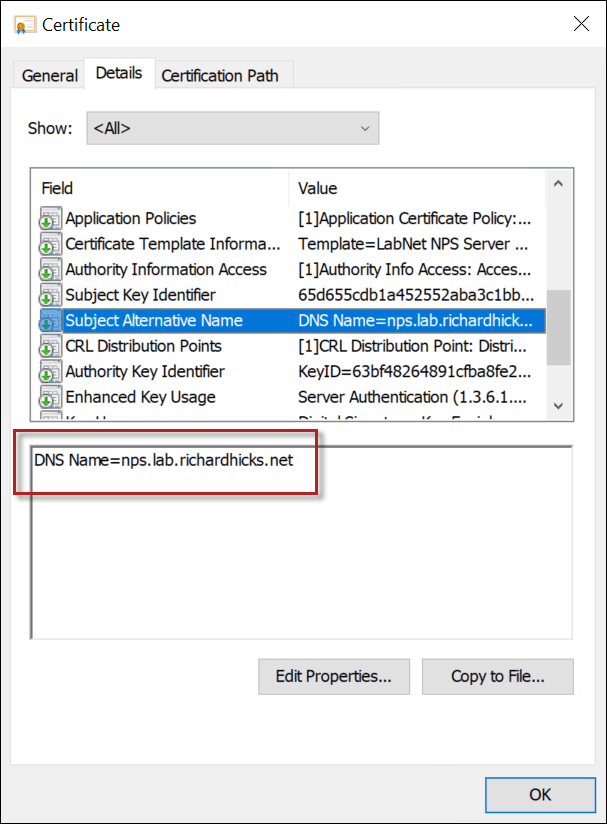
In this specific scenario, Windows 11 now appears to be case-sensitive when it compares the NPS server name entered in the NPS configuration to the Subject Name on the certificate returned by the server. For example, if the Subject Name (or Subject Alternative Name, if present) entry on the NPS server certificate is nps.lab.richardhicks.net, using NPS.lab.richardhicks.net will not match and return an 853 error.
Windows 11
Case matching when validating the NPS server certificate is a change in behavior from Windows 10. Before Windows 11, this comparison was case-insensitive, and any combination of case would match if the entire hostname matched. Going forward, it appears Microsoft has also decided to require case matching to validate the server certificate.
Recommendations
Administrators should look carefully at the server certificate issued to the NPS server and ensure their client configuration accurately reflects the hostname in a case-sensitive manner to ensure a smooth migration from Windows 10 to Windows 11.