






The Active Directory Certificate Services (AD CS) Network Device Enrollment Service (NDES) is a common building block for certificate deployment with Microsoft Intune. When NDES is used with the Intune Certificate Connector, the NDES server is published to the Internet so that managed devices can enroll for certificates using the Simple Certificate Enrollment Protocol (SCEP). Anything accessible via the Internet warrants careful attention, and a default NDES installation can expose more information than administrators might expect. Specifically, the NDES administration page can disclose sensitive information and should be removed. However, removing access to the page isn’t enough. Even after the NDES administration page is removed, IIS can continue to expose Windows authentication on that path through orphaned configuration entries, enabling NTLM-based information disclosure to unauthenticated Internet clients.
NDES Administration Page
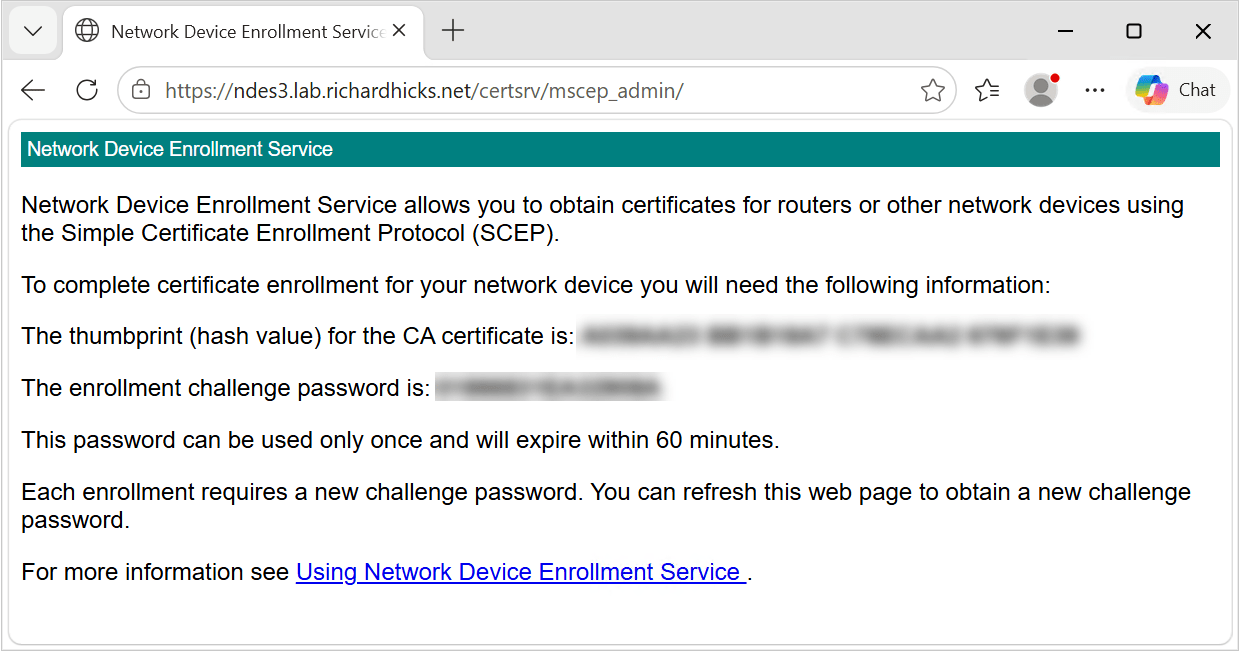
NDES exposes its web-based functionality through applications hosted in Internet Information Services (IIS). A default NDES installation creates two IIS applications under the CertSrv virtual directory. The first is mscep, which is the SCEP endpoint itself. The second is mscep_admin, which is the NDES administration page used to generate one-time challenge passwords.
Standalone Configuration
In a standalone NDES deployment, an administrator browses to the administration page, authenticates, and receives a one-time password that is embedded in the certificate request. NDES validates the password against its local cache before forwarding the request to the certification authority (CA).
Intune Certificate Connector
The Intune Certificate Connector does not use this mechanism. Intune generates its own challenge, and the NDES policy module installed by the connector validates the certificate request against the authorizations Intune has granted for that specific device. The connector also disables the standard NDES challenge-password mechanism. As a result, the administration page is not used for Intune certificate enrollment and serves no operational purpose in this configuration.
Preauthentication Limitations
Reverse-proxy preauthentication normally provides an additional security boundary by requiring a client to authenticate before its request is forwarded to the published application. With Microsoft Entra Application Proxy, Microsoft Entra ID preauthentication can block unauthenticated Internet clients from reaching the internal web application, reducing its exposure to scanning, password-spraying attacks, and other malicious requests.
However, SCEP clients cannot complete the Microsoft Entra ID authentication process or present the authentication token required by Application Proxy. Enabling preauthentication would therefore prevent managed endpoints from reaching NDES and enrolling for certificates. When publishing NDES through Microsoft Entra Application Proxy, the Pre Authentication setting must be configured as Passthrough. Other reverse proxies must similarly allow unauthenticated requests to reach the NDES SCEP endpoint. The Intune SCEP policy module, not the reverse proxy, validates and authorizes certificate requests before NDES submits them to the certification authority.

Information Disclosure
Because the NDES administration page is configured to use Windows authentication, IIS can negotiate NTLM with an unauthenticated client that requests the mscep_admin path. When the client sends an NTLM Type 1 negotiation message, IIS can respond with a Type 2 challenge containing a target information block. No credentials are required to receive this challenge or the information it contains.
Depending on the server configuration and negotiated NTLM options, the Type 2 message can disclose some or all of the following information:
- NetBIOS domain name
- NetBIOS computer name
- DNS domain name
- DNS computer name (server FQDN)
- DNS forest name
- Operating system version and build number
This is significant because the internal Active Directory namespace often differs from the public namespace used to publish NDES. For example, the published external name might be ndes1.example.com, but the NTLM challenge might disclose an internal domain of corp.example.net and a server FQDN of ndes1.corp.example.net. None of that information is available from public DNS.
Testing
To view disclosed information, use curl.exe to send a static NTLM type 1 negotiation message and inspect the response headers. Run the following command on the NDES server.
curl.exe -skI -H 'Authorization: NTLM TlRMTVNTUAABAAAAB4IIAAAAAAAAAAAAAAAAAAAAAAA=' https://localhost/certsrv/mscep_admin

A response containing a WWW-Authenticate header with an NTLM value indicates the endpoint is offering a challenge. When the header includes a base64 payload beginning with TlRMTVNTUAAC, the server has returned a type 2 message, leading to information disclosure on the target host. A response with no WWW-Authenticate header at all is the desired result.
Here are the PowerShell commands to decode and view the base64 payload and the disclosed information.
$Response = curl.exe -skI -H 'Authorization: NTLM TlRMTVNTUAABAAAAB4IIAAAAAAAAAAAAAAAAAAAAAAA=' https://localhost/certsrv/mscep_admin$Challenge = ($Response | Select-String -Pattern '^WWW-Authenticate:\s*NTLM\s+(\S+)').Matches.Groups[1].Value$Bytes = [Convert]::FromBase64String($Challenge)[Text.Encoding]::Unicode.GetString($Bytes) -Replace '[^\x20-\x7E]', ' '

PowerShell Script
I have created and published a PowerShell script to simplify testing NDES servers for information leakage. The script is published on GitHub here. In addition, you can install the script from the PowerShell Gallery by running the following command.
Install-Script -Name Get-NdesNtlmDisclosure
The output of the command on a vulnerable server is as follows.

A Note on External Testing
When NDES is published using Microsoft Entra Application Proxy, external test results can be inconsistent. In my repeated testing across three separate servers, the first request sometimes returned a bare NTLM challenge with no payload, and a second request, seconds later, returned the full type 2 message. Therefore, do not treat a single clean external result as confirmation. Test locally on the server itself, then repeat external tests at least twice to confirm the results.
Additional Security Concerns
Beyond the namespace disclosure, an Internet-accessible NDES administration page introduces some additional security concerns.
Password Spray Attacks
An internet-facing endpoint that accepts domain credentials is a target for password spraying attacks. Failed authentication attempts can count toward the configured account-lockout threshold, introducing a potential denial-of-service risk to user accounts.
Service Disclosure
The presence of an NTLM challenge on the well-known mscep_admin path also identifies the server as an NDES host, providing attackers with useful reconnaissance information for targeted attacks.
Remediation
If the reverse proxy configuration exposes the NDES administration page, it becomes an Internet-accessible authenticated endpoint that no part of the Intune enrollment workflow uses. Removing it is a simple and effective attack-surface reduction measure.
Remove the NDES Administration Page
Administrators can remove the NDES administration page IIS application by opening an elevated PowerShell command window and running the following command.
Remove-WebApplication -Site 'Default Web Site' -Name 'CertSrv/mscep_admin'
After running this command, browsing to the administration page returns HTTP 404. The application is gone, and SCEP enrollment continues to work normally. At this point, most administrators would consider the task complete.
The Problem
If you attempt to browse the administration page after removing it, you will still be prompted to authenticate. If you supply valid credentials, you will receive the expected 404. The authentication prompt itself is the real problem.
IIS Authentication Settings
The NDES role configuration writes IIS authentication settings for the administration page into a separate location element in applicationHost.config. Remove-WebApplication deletes the application definition under the sites element, but it does not touch the location element. IIS continues to match the path and applies the authentication settings it finds there, even though no application exists at that location.
The orphaned configuration is visible only in the raw configuration file. It does not appear in IIS Manager, and Get-WebApplication reports nothing at that path. You can run the following command to view this configuration.
Select-String -Path "$env:SystemRoot\System32\inetsrv\config\applicationHost.config" -Pattern '<location path=|windowsAuthentication enabled='
On a server where the administration page has been removed, the output still includes an entry like the following.
991: <location path=”Default Web Site/CertSrv/mscep_admin”>
997: <windowsAuthentication enabled=”true”>

Orphaned Configuration
To fully remediate this information disclosure and prevent potential disruption caused by password-spraying attacks, administrators must also remove the orphaned configuration location. This eliminates Windows authentication on the administration path entirely.
Remove-WebConfigurationLocation -Name 'Default Web Site/CertSrv/mscep_admin'
The NDES role configuration also enables Windows authentication on the SCEP application. Because anonymous authentication is also enabled, requests to the SCEP endpoint are ordinarily processed without an authentication challenge. However, Windows authentication is not required on an NDES server supporting the Intune Certificate Connector, and leaving it enabled on an Internet-facing endpoint serves no operational purpose. I recommend disabling it explicitly.
Set-WebConfigurationProperty -PSPath 'MACHINE/WEBROOT/APPHOST' -Location 'Default Web Site/CertSrv/mscep' -Filter 'system.webServer/security/authentication/windowsAuthentication' -Name 'enabled' -Value $False
By default, Windows authentication is handled in kernel mode, so stale state information in HTTP.SYS can continue serving challenges after a configuration change. Be sure to run iisreset.exe after making these changes.
iisreset.exe /restart
Validation
Repeat the NTLM probes demonstrated earlier against the administration page. The absence of a WWW-Authenticate header confirms the challenge has been eliminated.
curl.exe -skI -H 'Authorization: NTLM TlRMTVNTUAABAAAAB4IIAAAAAAAAAAAAAAAAAAAAAAA=' https://localhost/certsrv/mscep_admin

Confirm that SCEP still responds anonymously. A status code of 200 with a plain-text capability list is expected.
curl.exe -skI 'https://localhost/certsrv/mscep/mscep.dll?operation=GetCACaps'

Repeat the first test against the internal FQDN and the published external FQDN, then perform a device enrollment to confirm the deployment is unaffected.
PowerShell
After making these changes, Get-NdesNtlmDisclosure.ps1 will indicate that the NTLM challenge is not offered.

Summary
The NDES administration page is not required when the Intune Certificate Connector is installed on an NDES server and should be removed as part of attack surface reduction. However, removing the IIS application leaves behind an orphaned configuration location that continues to apply Windows authentication settings to the path. The result can be an Internet-facing endpoint that discloses the internal domain name, server name, forest name, operating system build, and other information to an unauthenticated remote client that initiates NTLM negotiation.
Removing the admin application alone is not enough. You must also remove the configuration location, disable Windows authentication where it is not required, restart IIS, and validate the result with an NTLM probe to ensure full mitigation.
Additional Information
Get-NdesNtlmDisclosure PowerShell Script on GitHub
Publish NDES with Microsoft Entra Application Proxy
Intune Certificate Connector Configuration Failed
Microsoft Intune Certificate Connector Failure
Certificate Connector for Intune Configuration Failure


 When configuring a Windows Server with the Routing and Remote Access Service (RRAS) role to support Windows 10 Always On VPN connections, the administrator may encounter the following error message when installing or updating the TLS certificate used for Secure Socket Tunneling Protocol (SSTP) connections.


